最近越来越忙了,要忙各种项目,Blog都没空更了。。。等着抽空更新一波之前没发的文章。。。

踏歌长行,梦想永在。
No results found
Vert.x 蓝图项目已经发布至Vert.x官方网站:Vert.x Blueprint Tutorials
Vert.x 蓝图系列 的第三篇教程出炉咯!这篇教程是微服务实战相关的主题。篇幅较长,team给了模板用于渲染对应的文档,因此这里就直接放链接了:
对应的GitHub Repository: sczyh30/vertx-blueprint-microservice
上部分蓝图教程中我们一起探索了如何用Vert.x开发一个基于消息的应用。在这部分教程中,我们将粗略地探索一下kue-http模块的实现。
kue-http模块中只有一个类KueHttpVerticle,作为整个REST API以及UI服务的实现。对REST API部分来说,如果看过我们之前的 Vert.x 蓝图 | 待办事项服务开发教程 的话,你应该对这一部分非常熟悉了,因此这里我们就不详细解释了。有关使用Vert.x Web实现REST API的教程可参考 Vert.x 蓝图 | 待办事项服务开发教程。
除了REST API之外,我们还给Vert.x Kue提供了一个用户界面。我们复用了Automattic/Kue的用户界面所以我们就不用写前端代码了(部分API有变动的地方我已进行了修改)。我们只需要将前端代码与Vert.x Web适配即可。
首先,前端的代码都属于静态资源,因此我们需要配置路由来允许访问静态资源:
|
|
这样我们就可以直接访问静态资源咯~
注意到Kue UI使用了Jade(最近貌似改名叫Pug了)作为模板引擎,因此我们需要一个Jade模板解析器。好在Vert.x Web提供了一个Jade模板解析的实现: io.vertx:vertx-web-templ-jade,所以我们可以利用这个实现来渲染UI。首先在类中定义一个JadeTemplateEngine并在start方法中初始化:
|
|
然后我们就可以写一个处理器方法来根据不同的任务状态来渲染UI:
|
|
首先我们需要给渲染引擎指定我们前端代码的地址 (1)。然后我们从Redis中获取其中所有的任务类型,然后向解析器context中添加任务状态、网页标题、任务类型等信息供渲染器渲染使用 (2)。接着我们就可以调用engine.render(context, path, handler)方法进行渲染 (3)。如果渲染成功,我们将页面写入HTTP Response (4)。
现在我们可以利用render方法去实现其它的路由函数了:
|
|
然后我们给它绑个路由就可以了:
|
|
是不是非常方便呢?不仅如此,Vert.x Web还提供了其它各种模板引擎的支持,比如 FreeMaker, Pebble 以及 Thymeleaf 3。如果感兴趣的话,你可以查阅官方文档来获取详细的使用指南。
是不是等不及要看UI长啥样了?现在我们就来展示一下!首先构建项目:
gradle build
kue-http需要kue-core运行着(因为kue-core里注册了Event Bus服务),因此我们先运行kue-core,再运行kue-http。不要忘记运行Redis:
redis-server
java -jar kue-core/build/libs/vertx-blueprint-kue-core.jar -cluster -ha -conf config/config.json
java -jar kue-http/build/libs/vertx-blueprint-kue-http.jar -cluster -ha -conf config/config.json
为了更好地观察任务处理的流程,我们再运行一个示例:
java -jar kue-example/build/libs/vertx-blueprint-kue-example.jar -cluster -ha -conf config/config.json
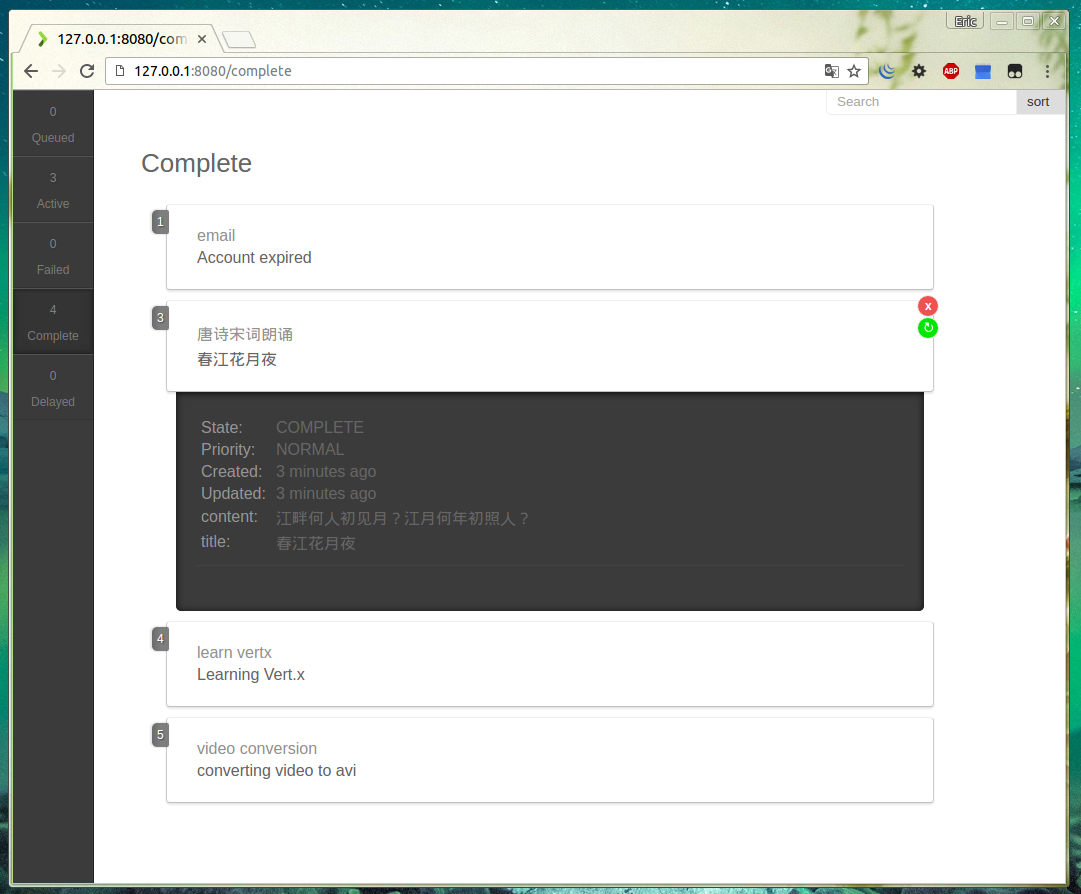
好啦!现在在浏览器中访问http://localhost:8080,我们的Kue UI就呈现在我们眼前啦!
本文章是 Vert.x 蓝图系列 的第二篇教程。全系列:
欢迎回到Vert.x 蓝图系列~在本教程中,我们将利用Vert.x开发一个基于消息的应用 - Vert.x Kue,它是一个使用Vert.x开发的优先级工作队列,数据存储使用的是 Redis 。Vert.x Kue是Automattic/kue的Vert.x实现版本。我们可以使用Vert.x Kue来处理各种各样的任务,比如文件转换、订单处理等等。
通过本教程,你将会学习到以下内容:
本教程是 Vert.x 蓝图系列 的第二篇教程,对应的Vert.x版本为 3.3.3 。本教程中的完整代码已托管至GitHub。
既然我们要用Vert.x开发一个基于消息的应用,那么我们先来瞅一瞅Vert.x的消息系统吧~在Vert.x中,我们可以通过 Event Bus 来发送和接收各种各样的消息,这些消息可以来自不同的Vertx实例。怎么样,很酷吧?我们都将消息发送至Event Bus上的某个地址上,这个地址可以是任意的字符串。
Event Bus支持三种消息机制:发布/订阅(Publish/Subscribe)、点对点(Point to point)以及请求/回应(Request-Response)模式。下面我们就来看一看这几种机制。
在发布/订阅模式中,消息被发布到Event Bus的某一个地址上,所有订阅此地址的Handler都会接收到该消息并且调用相应的处理逻辑。我们来看一看示例代码:
|
|
我们可以通过vertx.eventBus()方法获取EventBus的引用,然后我们就可以通过consume方法订阅某个地址的消息并且绑定一个Handler。接着我们通过publish向此地址发送消息。如果运行上面的例子,我们会得到一下结果:
|
|
如果我们把上面的示例中的publish方法替代成send方法,上面的实例就变成点对点模式了。在点对点模式中,消息被发布到Event Bus的某一个地址上。Vert.x会将此消息传递给其中监听此地址的Handler之一。如果有多个Handler绑定到此地址,那么就使用轮询算法随机挑一个Handler传递消息。比如在此示例中,程序只会打印2: +1s或者1: +1s之中的一个。
当我们绑定的Handler接收到消息的时候,我们可不可以给消息的发送者回复呢?当然了!当我们通过send方法发送消息的时候,我们可以同时指定一个回复处理函数(reply handler)。然后当某个消息的订阅者接收到消息的时候,它就可以给发送者回复消息;如果发送者接收到了回复,发送者绑定的回复处理函数就会被调用。这就是请求/回应模式。
好啦,现在我们已经粗略了解了Vert.x中的消息系统 - Event Bus的基本使用,下面我们就看看Vert.x Kue的基本设计。有关更多关于Event Bus的信息请参考Vert.x Core Manual - Event Bus。
在我们的项目中,我们将Vert.x Kue划分为两个模块:
kue-core: 核心组件,提供优先级队列的功能kue-http: Web组件,提供Web UI以及REST API另外我们还提供一个示例模块kue-example用于演示以及阐述如何使用Vert.x Kue。
既然我们的项目有两个模块,那么你一定会好奇:两个模块之间是如何进行通信的?并且如果我们写自己的Kue应用的话,我们该怎样去调用Kue Core中的服务呢?不要着急,谜底将在后边的章节中揭晓:-)
回顾一下Vert.x Kue的作用 - 优先级工作队列,所以在Vert.x Kue的核心模块中我们设计了以下的类:
Job - 任务(作业)数据实体JobService - 异步服务接口,提供操作任务以及获取数据的相关逻辑KueWorker - 用于处理任务的VerticleKue - 工作队列前边我们提到过,我们的两个组件之间需要一种通信机制可以互相通信 - 这里我们使用Vert.x的集群模式,即以clustered的模式来部署Verticle。这样的环境下的Event Bus同样也是集群模式的,因此各个组件可以通过集群模式下的Event Bus进行通信。很不错吧?在Vert.x的集群模式下,我们需要指定一个集群管理器ClusterManager。这里我们使用默认的HazelcastClusterManager,使用Hazelcast作为集群管理。
在Vert.x Kue中,我们将JobService服务发布至分布式的Event Bus上,这样其它的组件就可以通过Event Bus调用该服务了。我们设计了一个KueVerticle用于注册服务。Vert.x提供了Vert.x Service Proxy(服务代理组件),可以很方便地将服务注册至Event Bus上,然后在其它地方获取此服务的代理并调用。我们将在下面的章节中详细介绍Vert.x Service Proxy。
在我们的Vert.x Kue中,大多数的异步方法都是基于Future的。如果您看过蓝图系列的第一篇文章的话,您一定不会对这种模式很陌生。在Vert.x 3.3.2中,我们的Future支持基本的响应式的操作,比如map和compose。它们用起来非常方便,因为我们可以将多个Future以响应式的方式组合起来而不用担心陷入回调地狱中。
正如我们在Vert.x Kue 特性介绍中提到的那样,Vert.x Kue支持两种级别的事件:任务事件(job events) 以及 队列事件(queue events)。在Vert.x Kue中,我们设计了三种事件地址:
vertx.kue.handler.job.{handlerType}.{addressId}.{jobType}: 某个特定任务的任务事件地址vertx.kue.handler.workers.{eventType}: (全局)队列事件地址vertx.kue.handler.workers.{eventType}.{addressId}: 某个特定任务的内部事件地址在特性介绍文档中,我们提到了以下几种任务事件:
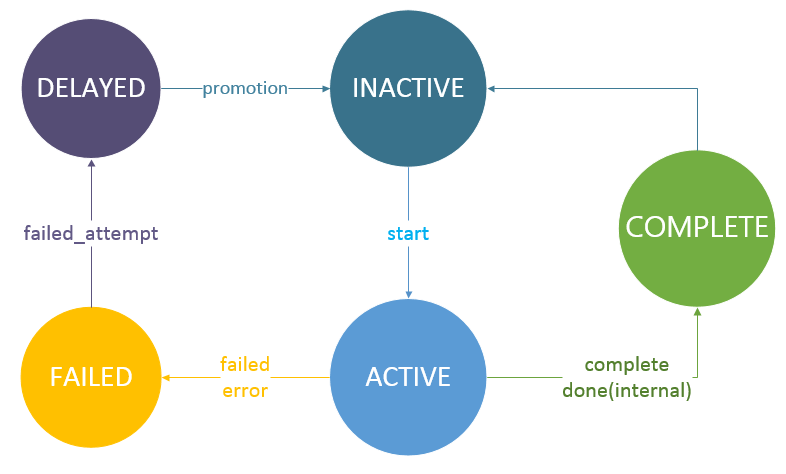
start 开始处理一个任务 (onStart)promotion 一个延期的任务时间已到,提升至工作队列中 (onPromotion)progress 任务的进度变化 (onProgress)failed_attempt 任务处理失败,但是还可以重试 (onFailureAttempt)failed 任务处理失败并且不能重试 (onFailure)complete 任务完成 (onComplete)remove 任务从后端存储中移除 (onRemove)队列事件也相似,只不过需要加前缀job_。这些事件都会通过send方法发送至Event Bus上。每一个任务都有对应的任务事件地址,因此它们能够正确地接收到对应的事件并进行相应的处理逻辑。
特别地,我们还有两个内部事件:done和done_fail。done事件对应一个任务在底层的处理已经完成,而done_fail事件对应一个任务在底层的处理失败。这两个事件使用第三种地址进行传递。
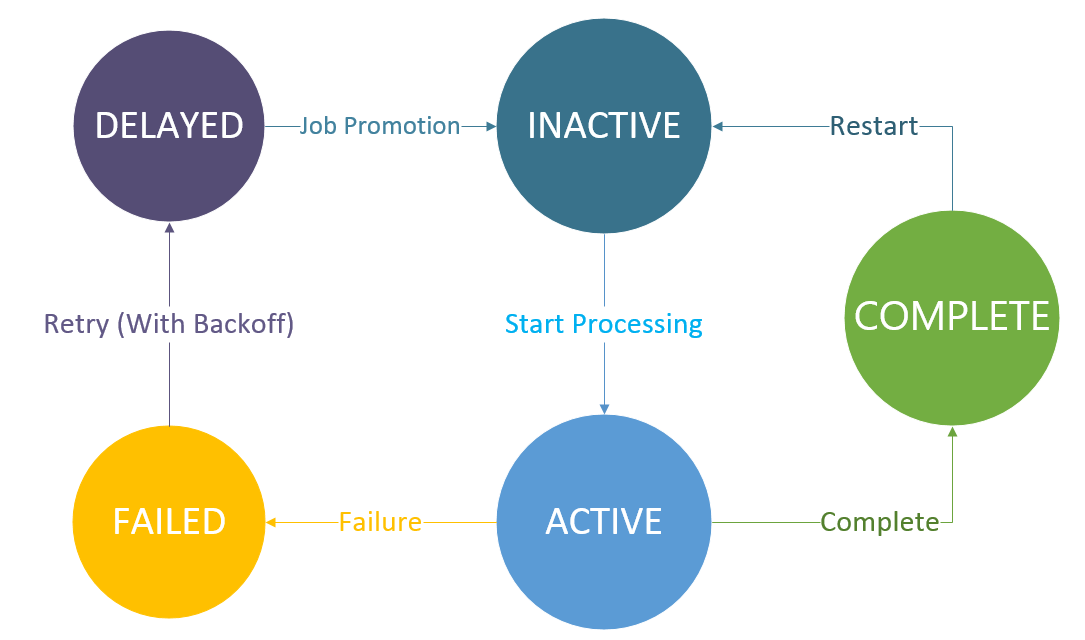
在Vert.x Kue中,任务共有五种状态:
INACTIVE: 任务还未开始处理,在工作队列中等待处理ACTIVE: 任务正在处理中COMPLETE: 任务处理完成FAILED: 任务处理失败DELAYED: 任务延时处理,正在等待计时器时间到并提升至工作队列中我们使用状态图来描述任务状态的变化:
以及任务状态的变化伴随的事件:
为了让大家对Vert.x Kue的架构有大致的了解,我用一幅图来简略描述整个Vert.x Kue的设计:
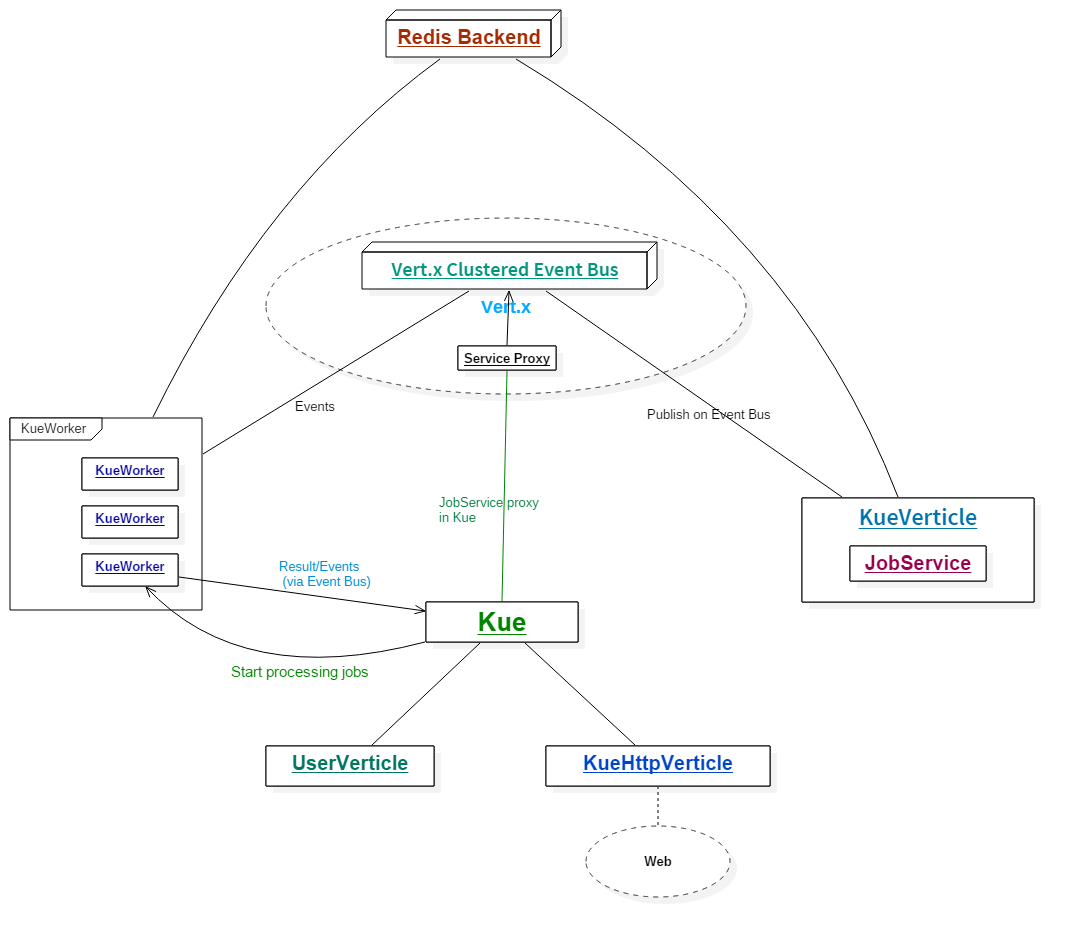
现在我们对Vert.x Kue的设计有了大致的了解了,下面我们就来看一看Vert.x Kue的代码实现了~
我们来开始探索Vert.x Kue的旅程吧!首先我们先从GitHub上clone源代码:
git clone https://github.com/sczyh30/vertx-blueprint-job-queue.git
然后你可以把项目作为Gradle项目导入你的IDE中。(如何导入请参考相关IDE帮助文档)
正如我们之前所提到的,我们的Vert.x Kue中有两个功能模块和一个实例模块,因此我们需要在Gradle工程文件中定义三个子工程。我们来看一下本项目中的build.gradle文件:
|
|
(⊙o⊙)…比之前的待办事项服务项目中的长不少诶。。。我们来解释一下:
configure(allprojects)作用域中,我们配置了一些全局信息(对所有子工程都适用)。kue-core、kue-http以及kue-example。这里我们来解释一下里面用到的依赖。在kue-core中,vertx-redis-client用于Redis通信,vertx-service-proxy用于Event Bus上的服务代理。在kue-http中,我们将kue-core子工程作为它的一个依赖。vertx-web和vertx-web-templ-jade用于Kue Web端的开发。annotationProcessing用于注解处理(Vert.x Codegen)。我们已经在上一篇教程中介绍过了,这里就不展开讲了。我们还需要在 settings.gradle 中配置工程:
|
|
看完了配置文件以后,我们再来浏览一下我们的项目目录结构:
|
|
在Gradle中,项目的源码都位于{projectName}/src/main/java目录内。这篇教程是围绕Vert.x Kue Core的,所以我们的代码都在kue-core目录中。
好啦!现在我们已经对Vert.x Kue项目的整体结构有了大致的了解了,下面我们开始源码探索之旅!
Vert.x Kue是用来处理任务的,因此我们先来看一下代表任务实体的Job类。Job类位于io.vertx.blueprint.kue.queue包下。代码可能有点长,不要担心,我们把它分成几部分,分别来解析。
我们先来看一下Job类中的成员属性:
|
|
我去。。。好多属性!我们一个一个地解释:
address_id: 一个UUID序列,作为Event Bus的地址id: 任务的编号(id)type: 任务的类型data: 任务携带的数据,以 JsonObject 类型表示priority: 任务优先级,以 Priority 枚举类型表示。默认优先级为正常(NORMAL)delay: 任务的延迟时间,默认是 0state: 任务状态,以 JobState 枚举类型表示。默认状态为等待(INACTIVE)attempts: 任务已经尝试执行的次数max_attempts: 任务尝试执行次数的最大阈值removeOnComplete: 代表任务完成时是否自动从后台移除zid: zset操作对应的编号(zid),保持先进先出顺序ttl: TTL(Time to live)backoff: 任务重试配置,以 JsonObject 类型表示progress: 任务执行的进度result: 任务执行的结果,以 JsonObject 类型表示还有这些统计数据:
created_at: 代表此任务创建的时间promote_at: 代表此任务从延时状态被提升至等待状态时的时间updated_at: 代表任务更新的时间failed_at: 代表任务失败的时间started_at: 代表任务开始的时间duration: 代表处理任务花费的时间,单位为毫秒(ms)你可能注意到在 Job 类中还存在着几个静态成员变量:
|
|
对于 logger 对象,我想大家应该都很熟悉,它代表一个Vert.x Logger实例用于日志记录。但是你一定想问为什么 Job 类中存在着一个Vertx类型的静态成员。Job类不应该是一个数据对象吗?当然咯!Job类代表一个数据对象,但不仅仅是一个数据对象。这里我模仿了一些Automattic/kue的风格,把一些任务相关逻辑方法放到了Job类里,它们大多都是基于Future的异步方法,因此可以很方便地去调用以及进行组合变换。比如:
|
|
由于我们不能在Job类被JVM加载的时候就获取Vertx实例,我们必须手动给Job类中的静态Vertx成员赋值。这里我们是在Kue类中对其进行赋值的。当我们创建一个工作队列的时候,Job类中的静态成员变量会被初始化。同时为了保证程序的正确性,我们需要一个方法来检测静态成员变量是否初始化。当我们在创建一个任务的时候,如果静态成员此时未被初始化,那么日志会给出警告:
|
|
我们还注意到 Job 类也是由@DataObject注解修饰的。Vert.x Codegen可以处理含有@DataObject注解的类并生成对应的JSON转换器,并且Vert.x Service Proxy也需要数据对象。
在Job类中我们有四个构造函数。其中address_id成员必须在一个任务被创建时就被赋值,默认情况下此地址用一个唯一的UUID字符串表示。每一个构造函数中我们都要调用_checkStatic函数来检测静态成员变量是否被初始化。
正如我们之前所提到的那样,我们通过一个特定的地址vertx.kue.handler.job.{handlerType}.{addressId}.{jobType}在分布式的Event Bus上发送和接收任务事件(job events)。所以我们提供了两个用于发送和接收事件的辅助函数emit和on(类似于Node.js中的EventEmitter):
|
|
在后面的代码中,我们将频繁使用这两个辅助函数。
在我们探索相关的逻辑函数之前,我们先来描述一下Vert.x Kue的数据在Redis中是以什么样的形式存储的:
vertx_kue命名空间下(以vertx_kue:作为前缀)vertx:kue:job:{id}: 存储任务实体的mapvertx:kue:ids: 计数器,指示当前最大的任务IDvertx:kue:job:types: 存储所有任务类型的列表vertx:kue:{type}:jobs: 指示所有等待状态下的某种类型任务的列表vertx_kue:jobs: 存储所有任务zid的有序集合vertx_kue:job:{state}: 存储所有指定状态的任务zid的有序集合vertx_kue:jobs:{type}:{state}: 存储所有指定状态和类型的任务zid的有序集合vertx:kue:job:{id}:log: 存储指定id的任务对应日志的列表OK,下面我们就来看看Job类中重要的逻辑函数。
我们之前提到过,Vert.x Kue中的任务一共有五种状态。所有的任务相关的操作都伴随着任务状态的变换,因此我们先来看一下state方法的实现,它用于改变任务的状态:
|
|
首先我们先创建了一个Future对象。然后我们调用了 client.transaction().multi(handler) 函数开始一次Redis事务 (1)。在Vert.x 3.3.2中,所有的Redis事务操作都移至RedisTransaction类中,所以我们需要先调用client.transaction()方法去获取一个事务实例,然后调用multi代表事务块的开始。
在multi函数传入的Handler中,我们先判定当前的任务状态。如果当前任务状态不为空并且不等于新的任务状态,我们就将Redis中存储的旧的状态信息移除 (2)。为了方便起见,我们提供了一个RedisHelper辅助类,里面提供了一些生成特定地址以及编码解码zid的方法:
|
|
所有的key都必须在vertx_kue命名空间下,因此我们封装了一个getKey方法。我们还实现了createFIFO和stripFIFO方法用于生成zid以及解码zid。zid的格式使用了Automattic/Kue中的格式。
回到state方法来。我们使用zrem(String key, String member, Handler<AsyncResult<String>> handler)方法将特定的数据从有序集合中移除。两个key分别是vertx_kue:job:{state} 以及 vertx_kue:jobs:{type}:{state};member对应着任务的zid。
接下来我们使用hset方法来变更新的状态 (3),然后用zadd方法往vertx_kue:job:{state} 和 vertx_kue:jobs:{type}:{state}两个有序集合中添加此任务的zid,同时传递一个权重(score)。这个非常重要,我们就是通过这个实现优先级队列的。我们直接使用priority对应的值作为score。这样,当我们需要从Redis中获取任务的时候,我们就可以通过zpop方法获取优先级最高的任务。我们会在后面详细讲述。
不同的新状态需要不同的操作。对于ACTIVE状态,我们通过zadd命令将zid添加至vertx_kue:jobs:ACTIVE有序集合中并赋予优先级权值 (4)。对于DELAYED状态,我们通过zadd命令将zid添加至vertx_kue:jobs:DELAYED有序集合中并赋予提升时间(promote_at)权值 (5)。对于INACTIVE状态,我们向vertx:kue:{type}:jobs列表中添加一个元素 (6)。这些操作都是在Redis事务块内完成的。最后我们通过exec方法一并执行这些事务操作 (7)。如果执行成功,我们给future赋值(当前任务)。最后我们返回future并且与updateNow方法相组合。
updateNow方法非常简单,就是把updated_at的值设为当前时间,然后存到Redis中:
|
|
这里我们来看一下整个Job类中最重要的方法之一 - save方法,它的作用是保存任务至Redis中。
|
|
首先,任务类型不能为空所以我们要检查type是否为空 (1)。接着,如果当前任务的id大于0,则代表此任务已经存储过(因为id是存储时分配),此时只需执行更新操作(update)即可 (2)。然后我们创建一个Future对象,然后使用incr方法从vertx_kue:ids字段获取一个新的id (3)。同时我们使用RedisHelper.createFIFO(id)方法来生成新的zid (4)。接着我们来判断任务延时是否大于0,若大于0则将当前任务状态设置为DELAYED。然后我们通过sadd方法将当前任务类型添加至vertx:kue:job:types列表中 (5) 并且保存任务创建时间(created_at)以及任务提升时间(promote_at)。经过这一系列的操作后,所有的属性都已准备好,所以我们可以利用hmset方法将此任务实体存储至vertx:kue:job:{id}哈希表中 (6)。如果存储操作成功,那么将当前任务实体赋给future,否则记录错误。最后我们返回此future并且将其与update方法进行组合。
update方法进行一些更新操作,它的逻辑比较简单:
|
|
可以看到update方法只做了三件微小的工作:存储任务更新时间、存储zid以及更改当前任务状态(组合state方法)。
最后总结一下将一个任务存储到Redis中经过的步骤:save -> update -> state :-)
移除任务非常简单,借助zrem和del方法即可。我们来看一下其实现:
|
|
注意到成功移除任务时,我们会向Event Bus上的特定地址发送remove任务事件。此事件包含着被移除任务的id。
我们可以通过几种 onXXX 方法来监听任务事件:
|
|
注意到不同的事件,对应接收的数据类型也有差异。我们来说明一下:
onComplete、onPromotion 以及 onStart: 发送的数据是对应的Job对象onFailure and onFailureAttempt: 发送的数据是JsonObject类型的,其格式类似于:
|
|
onProgress: 发送的数据是当前任务进度onRemove: 发送的数据是JsonObject类型的,其中id代表被移除任务的编号我们可以通过progress方法来更新任务进度。看一下其实现:
|
|
progress方法接受两个参数:第一个是当前完成的进度值,第二个是完成状态需要的进度值。我们首先计算出当前的进度 (1),然后向特定地址发送progress事件 (2)。最后我们将进度存储至Redis中并更新时间,返回Future (3)。
当一个任务处理失败时,如果它有剩余的重试次数,Vert.x Kue会自动调用failAttempt方法进行重试。我们来看一下failAttempt方法的实现:
|
|
(⊙o⊙)非常简短吧~实际上,failAttempt方法是三个异步方法的组合:error、failed以及attemptInternal。当一个任务需要进行重试的时候,我们首先向Event Bus发布 error 队列事件并且在Redis中记录日志,然后将当前的任务状态置为FAILED,最后重新处理此任务。
我们先来看一下error方法:
|
|
它的逻辑很简单:首先我们向Event Bus发布 错误 事件,然后记录错误日志即可。这里我们封装了一个发布错误的函数emitError:
|
|
其中发送的错误信息格式类似于下面的样子:
|
|
接下来我们再来看一下failed方法的实现:
|
|
非常简单,首先我们更新任务的更新时间和失败时间,然后通过state方法将当前任务状态置为FAILED即可。
任务重试的核心逻辑在attemptInternal方法中:
|
|
在我们的Job数据对象中,我们存储了最大重试次数max_attempts以及已经重试的次数attempts,所以我们首先根据这两个数据计算剩余的重试次数remaining (1)。如果还有剩余次数的话,我们就先调用attemptAdd方法增加一次已重试次数并 (2),然后我们调用reattempt方法执行真正的任务重试逻辑 (3)。最后返回这两个异步方法组合的Future。如果其中一个过程出现错误,我们就发布error事件 (4)。如果没有剩余次数了或者超出剩余次数了,我们直接返回错误。
在我们解析reattempt方法之前,我们先来回顾一下Vert.x Kue中的任务失败恢复机制。Vert.x Kue支持延时重试机制(retry backoff),并且支持不同的策略(如 fixed 以及 exponential)。之前我们提到Job类中有一个backoff成员变量,它用于配置延时重试的策略。它的格式类似于这样:
|
|
延时重试机制的实现在getBackoffImpl方法中,它返回一个Function<Integer, Long>对象,代表一个接受Integer类型(即attempts),返回Long类型(代表计算出的延时值)的函数:
|
|
首先我们从backoff配置中获取延迟重试策略。目前Vert.x Kue支持两种策略:fixed 和 exponential。前者采用固定延迟时间,而后者采用指数增长型延迟时间。默认情况下Vert.x Kue会采用fixed策略 (1)。接下来我们从backoff配置中获取延迟时间,如果配置中没有指定,那么就使用任务对象中的延迟时间delay (2)。接下来就是根据具体的策略进行计算了。对于指数型延迟,我们计算[delay * 0.5 * 2^attempts]作为延迟时间 (3);对于固定型延迟策略,我们直接使用获取到的延迟时间 (4)。
好啦,现在回到“真正的重试”方法 —— reattempt方法来:
|
|
首先我们先检查backoff配置是否存在,若存在则计算出对应的延时时间 (1) 并且设定delay和promote_at属性的值然后保存至Redis中 (2)。接着我们通过delayed方法将任务的状态设为延时(DELAYED) (3)。如果延时重试配置不存在,我们就通过inactive方法直接将此任务置入工作队列中 (4)。
这就是整个任务重试功能的实现,也不是很复杂蛤?观察上面的代码,我们可以发现Future组合无处不在。这种响应式的组合非常方便。想一想如果我们用回调的异步方式来写代码的话,我们很容易陷入回调地狱中(⊙o⊙)。。。几个回调嵌套起来总显得不是那么优美和简洁,而用响应式的、可组合的Future就可以有效地避免这个问题。
不错!到现在为止我们已经探索完Job类的源码了~下面我们来看一下JobService类。
在本章节中我们来探索一下JobService接口及其实现 —— 它包含着各种普通的操作和统计Job的逻辑。
我们的JobService是一个通用逻辑接口,因此我们希望应用中的每一个组件都能访问此服务,即进行RPC。在Vert.x中,我们可以将服务注册至Event Bus上,然后其它组件就可以通过Event Bus来远程调用注册的服务了。
传统的RPC有一个缺点:消费者需要阻塞等待生产者的回应。你可能想说:这是一种阻塞模型,和Vert.x推崇的异步开发模式不相符。没错!而且,传统的RPC不是真正面向失败设计的。
还好,Vert.x提供了一种高效的、响应式的RPC —— 异步RPC。我们不需要等待生产者的回应,而只需要传递一个Handler<AsyncResult<R>>参数给异步方法。这样当收到生产者结果时,对应的Handler就会被调用,非常方便,这与Vert.x的异步开发模式相符。并且,AsyncResult也是面向失败设计的。
所以讲到这里,你可能想问:到底怎么在Event Bus上注册服务呢?我们是不是需要写一大堆的逻辑去包装和发送信息,然后在另一端解码信息并进行调用呢?不,这太麻烦了!有了Vert.x 服务代理,我们不需要这么做!Vert.x提供了一个组件 Vert.x Service Proxy 来自动生成服务代理。有了它的帮助,我们就只需要按照规范设计我们的异步服务接口,然后用@ProxyGen注解修饰即可。
[NOTE @ProxyGen注解的限制 | @ProxyGen注解的使用有诸多限制。比如,所有的异步方法都必须是基于回调的,也就是说每个方法都要接受一个Handler<AsyncResult<R>>类型的参数。并且,类型R也是有限制的 —— 只允许基本类型以及数据对象类型。详情请参考官方文档。 ]
我们来看一下JobService的源码:
|
|
可以看到我们还为JobService接口添加了@VertxGen注解,Vert.x Codegen可以处理此注解生成多种语言版本的服务。
在JobService接口中我们还定义了两个静态方法:create用于创建一个任务服务实例,createProxy用于创建一个服务代理。
JobService接口中包含一些任务操作和统计的相关逻辑,每个方法的功能都已经在注释中阐述了,因此我们就直接来看它的实现吧~
JobService接口的实现位于JobServiceImpl类中,代码非常长,因此这里就不贴代码了。。。大家可以对照GitHub中的代码读下面的内容。
getJob: 获取任务的方法非常简单。直接利用hgetall命令从Redis中取出对应的任务即可。removeJob: 我们可以将此方法看作是getJob和Job#remove两个方法的组合。existsJob: 使用exists命令判断对应id的任务是否存在。getJobLog: 使用lrange命令从vertx_kue:job:{id}:log列表中取出日志。rangeGeneral: 使用zrange命令获取一定范围内的任务,这是一个通用方法。[NOTE zrange 操作 | zrange 返回某一有序集合中某个特定范围内的元素。详情请见ZRANGE - Redis。 ]
以下三个方法复用了rangeGeneral方法:
jobRangeByState: 指定状态,对应的key为vertx_kue:jobs:{state}。jobRangeByType: 指定状态和类型,对应的key为vertx_kue:jobs:{type}:{state}。jobRange: 对应的key为vertx_kue:jobs。这两个通用方法用于任务数量的统计:
cardByType: 利用zcard命令获取某一指定状态和类型下任务的数量。card: 利用zcard命令获取某一指定状态下任务的数量。下面五个辅助统计方法复用了上面两个通用方法:
completeCountfailedCountdelayedCountinactiveCountactiveCount接着看:
getAllTypes: 利用smembers命令获取vertx_kue:job:types集合中存储的所有的任务类型。getIdsByState: 使用zrange获取某一指定状态下所有任务的ID。getWorkTime: 使用get命令从vertx_kue:stats:work-time中获取Vert.x Kue的工作时间。既然完成了JobService的实现,接下来我们来看一下如何利用Service Proxy将服务注册至Event Bus上。这里我们还需要一个KueVerticle来创建要注册的服务实例,并且将其注册至Event Bus上。
打开io.vertx.blueprint.kue.queue.KueVerticle类的源码:
|
|
首先我们需要定义一个地址用于服务注册 (1)。在start方法中,我们创建了一个任务服务实例 (2),然后通过ping命令测试Redis连接 (3)。如果连接正常,那么我们就可以通过ProxyHelper类中的registerService辅助方法来将服务实例注册至Event Bus上 (4)。
这样,一旦我们在集群模式下部署KueVerticle,服务就会被发布至Event Bus上,然后我们就可以在其他组件中去远程调用此服务了。很奇妙吧!
Kue类代表着工作队列。我们来看一下Kue类的实现。首先先看一下其构造函数:
|
|
这里我们需要注意两点:第一点,我们通过createProxy方法来创建一个JobService的服务代理;第二点,之前提到过,我们需要在这里初始化Job类中的静态成员变量。
我们的JobService是基于回调的,这是服务代理组件所要求的。为了让Vert.x Kue更加响应式,使用起来更加方便,我们在Kue类中以基于Future的异步模式封装了JobService中的所有异步方法。这很简单,比如这个方法:
|
|
可以这么封装:
|
|
其实就是加一层Future。其它的封装过程也类似所以我们就不细说了。
process和processBlocking方法用于处理任务:
|
|
两个process方法都类似 —— 它们都是使用Event Loop线程处理任务的,其中第一个方法还可以指定同时处理任务数量的阈值。我们来回顾一下使用Event Loop线程的注意事项 —— 我们不能阻塞Event Loop线程。因此如果我们需要在处理任务时做一些耗时的操作,我们可以使用processBlocking方法。这几个方法的代码看起来都差不多,那么区别在哪呢?之前我们提到过,我们设计了一种Verticle - KueWorker,用于处理任务。因此对于process方法来说,KueWorker就是一种普通的Verticle;而对于processBlocking方法来说,KueWorker是一种Worker Verticle。这两种Verticle有什么不同呢?区别在于,Worker Verticle会使用Worker线程,因此即使我们执行一些耗时的操作,Event Loop线程也不会被阻塞。
创建及部署KueWorker的逻辑在processInternal方法中,这三个方法都使用了processInternal方法:
|
|
首先我们创建一个KueWorker实例 (1)。我们将在稍后详细介绍KueWorker的实现。然后我们根据提供的配置来部署此KueWorker (2)。processInternal方法的第三个参数代表此KueWorker是否为worker verticle。如果部署成功,我们就监听complete事件。每当接收到complete事件的时候,我们获取收到的信息(处理任务消耗的时间),然后用incrby增加对应的工作时间 (3)。
再回到前面三个处理方法中。除了部署KueWorker以外,我们还调用了setupTimers方法,用于设定定时器以监测延时任务以及监测活动任务TTL。
Vert.x Kue支持延时任务,因此我们需要在任务延时时间到达时将任务“提升”至工作队列中等待处理。这个工作是在checkJobPromotion方法中实现的:
|
|
首先我们从配置中获取监测延时任务的间隔(job.promotion.interval,默认1000ms)以及提升数量阈值(job.promotion.limit,默认1000)。然后我们使用vertx.setPeriodic方法设一个周期性的定时器 (3),每隔一段时间就从Redis中获取需要被提升的任务 (4)。这里我们通过zrangebyscore获取每个需要被提升任务的id。我们来看一下zrangebyscore方法的定义:
|
|
key: 某个有序集合的key,即vertx_kue:jobs:DELAYEDmin and max: 最小值以及最大值(按照某种模式)。这里min是0,而max是当前时间戳我们来回顾一下Job类中的state方法。当我们要把任务状态设为DELAYED的时候,我们将score设为promote_at时间:
|
|
因此我们将max设为当前时间(System.currentTimeMillis()),只要当前时间超过需要提升的时间,这就说明此任务可以被提升了。
options: range和limit配置。这里我们需要指定LIMIT值所以我们用new RangeLimitOptions(new JsonObject().put("offset", 0).put("count", limit)创建了一个配置zrangebyscore的结果是一个JsonArray,里面包含着所有等待提升任务的zid。获得结果后我们就将每个zid转换为id,然后分别获取对应的任务实体,最后对每个任务调用inactive方法来将任务状态设为INACTIVE (5)。如果任务成功提升至工作队列,我们就发送promotion事件 (6)。
我们知道,Vert.x支持多种语言(如JS,Ruby),因此如果能让我们的Vert.x Kue支持多种语言那当然是极好的!这没有问题~Vert.x Codegen可以处理含@VertxGen注解的异步接口,生成多语言版本。@VertxGen注解同样限制异步方法 —— 需要基于回调,因此我们设计了一个CallbackKue接口用于提供多语言支持。CallbackKue的设计非常简单,其实现复用了Kue和jobService的代码。大家可以直接看源码,一目了然,这里就不细说了。
注意要生成多语言版本的代码,需要添加相应的依赖。比如要生成Ruby版本的代码就要向build.gradle中添加compile("io.vertx:vertx-lang-ruby:${vertxVersion}")。
好啦,我们已经对Vert.x Kue Core的几个核心部分有了大致的了解了,现在是时候探索一下任务处理的本源 - KueWorker了~
每一个worker都对应一个特定的任务类型,并且绑定着特定的处理函数(Handler),所以我们需要在创建的时候指定它们。
在KueWorker中,我们使用prepareAndStart方法来准备要处理的任务并且开始处理任务的过程:
|
|
代码比较直观。首先我们通过getJobFromBackend方法从Redis中按照优先级顺序获取任务 (1)。如果成功获取任务,我们就把获取到的任务保存起来 (2) 然后通过process方法处理任务 (3)。如果中间出现错误,我们需要发送error错误事件,其中携带错误信息。
我们来看一下我们是如何从Redis中按照优先级顺序获取任务实体的:
|
|
之前我们已经了解到,每当我们保存一个任务的时候,我们都会向vertx_kue:{type}:jobs列表中插入一个新元素表示新的任务可供处理。因此这里我们通过blpop命令来等待可用的任务 (1)。一旦有任务可供处理,我们就利用zpop方法取出高优先级的任务的zid (2)。zpop命令是一个原子操作,用于从有序集合中弹出最小score值的元素。注意Redis没有实现zpop命令,因此我们需要自己实现。
Redis官方文档介绍了一种实现zpop命令的简单方法 - 利用 WATCH。这里我们利用另外一种思路实现zpop命令:
|
|
在我们的zpop的实现中,我们首先开始了一个事务块,然后依次执行zrange和zremrangebyrank命令。有关这些命令的详情我们就不细说了,可以参考Redis官方文档。然后我们提交事务,如果提交成功,我们会获得一个JsonArray类型的结果。正常情况下我们都可以通过res.getJsonArray(0).getString(0)获取到对应的zid值。获取到zid值以后我们就可以将其转换为任务的id了,最后我们将id置于Future内(因为zpop也是一个异步方法)。
接着回到getJobFromBackend方法中。获取到对应的id之后,我们就可以通过Kue的getJob函数获取任务实体了 (3)。由于getJobFromBackend也是一个异步方法,因此我们同样将结果置于Future中。
前边讲了那么多,都是在为处理任务做准备。。。不要着急,现在终于到了真正的“处理”逻辑咯!我们看一下process方法的实现:
|
|
到了最核心的函数了!首先我们先给开始时间赋值 (1) 然后将任务状态置为ACTIVE (2)。如果这两个操作成功的话,我们就向Event Bus发送任务开始(start)事件 (3)。接下来我们调用真正的处理逻辑 - 之前绑定的jobHandler (4)。如果处理过程中抛出异常的话,Vert.x Kue就会调用job.done(ex)方法发送done_fail内部事件来通知worker任务处理失败。但是似乎没有看到在哪里接收并处理done和done_fail事件呢?就在这 (5)!一旦Vert.x Kue接收到这两个事件,它就会调用对应的handler去进行任务完成或失败的相应操作。这里的handler是由createDoneCallback方法生成的:
|
|
任务处理有两种情况:完成和失败,因此我们先来看任务成功处理的情况。我们首先给任务的用时(duration)赋值 (2),并且如果任务产生了结果,也给结果(result)赋值 (3)。然后我们调用job.complete方法将状态设置为COMPLETE (4)。如果成功的话,我们就检查removeOnComplete标志位 (5) 并决定是否将任务从Redis中移除。然后我们向Event Bus发送任务完成事件(complete)以及队列事件job_complete (6)。现在这个任务的处理过程已经结束了,worker需要准备处理下一个任务了,因此最后我们调用prepareAndStart方法准备处理下一个Job。
人生不如意事十之八九,任务处理过程中很可能会遇见各种各样的问题而失败。当任务处理失败时,我们调用KueWorker中的fail方法:
|
|
面对失败时,我们首先通过failedAttempt方法尝试从错误中恢复 (1)。如果恢复失败(比如没有重试次数了)就向Event Bus发送error队列事件 (2)。如果恢复成功,我们就根据是否还有剩余重试次数来发送对应的事件(failed或者failed_attempt)。搞定错误以后,worker同样需要准备处理下一个任务了,因此最后我们调用prepareAndStart方法准备处理下一个Job (5)。
这就是KueWorker的全部实现,是不是很有趣呢?看了这么久的代码也有些累了,下面是时候来写个Kue应用跑一下咯~
在io.vertx.blueprint.kue.example包下(kue-example子工程)创建一个LearningVertxVerticle类,然后编写如下代码:
|
|
通常情况下,一个Vert.x Kue应用可以分为几部分:创建工作队列、创建任务、保存任务以及处理任务。我们推荐开发者把应用写成Verticle的形式。
在这个例子中,我们要模拟一个学习Vert.x的任务!首先我们通过Kue.createQueue方法创建一个工作队列并且通过on(error, handler)方法监听全局错误(error)事件。接着我们通过kue.createJob方法创建学习任务,将优先级设定为HIGH,并且监听complete、failed以及progress事件。然后我们需要保存任务,保存完毕以后我们就可以通过processBlocking方法来执行耗时任务了。在处理逻辑中,我们首先通过job.progress方法将进度设为10,然后使用vertx.setTimer方法设一个3秒的定时器,定时器时间到以后赋予结果并完成任务。
像往常一样,我们还需要在build.gradle中配置一下。我们需要将kue-example子工程中的Main-Verticle属性设为刚才写的io.vertx.blueprint.kue.example.LearningVertxVerticle:
|
|
好了,到了展示时间了!打开终端,构建项目:
gradle build
当然不要忘记运行Redis:
redis-server
然后我们先运行Vert.x Kue Core部分:
java -jar kue-core/build/libs/vertx-blueprint-kue-core.jar -cluster -ha -conf config/config.json
然后再运行我们的实例:
java -jar kue-example/build/libs/vertx-blueprint-kue-example.jar -cluster -ha -conf config/config.json
这时终端应该会依次显示输出:
|
|
当然你也可以在Vert.x Kue的Web端查看任务情况。
棒极了!我们终于结束了我们的Vert.x Kue核心部分探索之旅~~!从这篇超长的教程中,你学到了如何利用Vert.x去开发一个基于消息的应用!太酷了!
如果想了解kue-http的实现,请移步Vert.x 蓝图 | Vert.x Kue 教程(Web部分)。如果想了解更多的关于Vert.x Kue的特性,请移步Vert.x Kue 特性介绍。
Vert.x能做的不仅仅是这些。想要了解更多的关于Vert.x的知识,请参考Vert.x 官方文档 —— 这永远是资料最齐全的地方。
本文章是 Vert.x 蓝图系列 的第一篇教程。全系列:
在本教程中,我们会使用Vert.x来一步一步地开发一个REST风格的Web服务 - Todo Backend,你可以把它看作是一个简单的待办事项服务,我们可以自由添加或者取消各种待办事项。
通过本教程,你将会学习到以下的内容:
Verticle是什么,以及如何使用Verticle本教程是 Vert.x 蓝图系列 的第一篇教程,对应的Vert.x版本为3.3.3。本教程中的完整代码已托管至GitHub。
朋友,欢迎来到Vert.x的世界!初次听说Vert.x,你一定会非常好奇:这是啥?让我们来看一下Vert.x的官方解释:
Vert.x is a tool-kit for building reactive applications on the JVM.
(⊙o⊙)哦哦。。。翻译一下,Vert.x是一个在JVM上构建 响应式 应用的 工具集 。这个定义比较模糊,我们来简单解释一下:工具集 意味着Vert.x非常轻量,可以嵌入到你当前的应用中而不需要改变现有的结构;另一个重要的描述是 响应式 —— Vert.x就是为构建响应式应用(系统)而设计的。响应式系统这个概念在 Reactive Manifesto 中有详细的定义。我们在这里总结4个要点:
500 错误等等)的时候保持响应的能力,所以它必须要为 异常处理 而设计。Vert.x是 事件驱动的,同时也是非阻塞的。首先,我们来介绍 Event Loop 的概念。Event Loop是一组负责分发和处理事件的线程。注意,我们绝对不能去阻塞Event Loop线程,否则事件的处理过程会被阻塞,我们的应用就失去了响应能力。因此当我们在写Vert.x应用的时候,我们要时刻谨记 异步非阻塞开发模式 而不是传统的阻塞开发模式。我们将会在下面详细讲解异步非阻塞开发模式。
我们的应用是一个REST风格的待办事项服务,它非常简单,整个API其实就围绕着 增删改查 四种操作。所以我们可以设计以下的路由:
POST /todosGET /todos/:todoIdGET /todosPATCH /todos/:todoIdDELETE /todos/:todoIdDELETE /todos注意我们这里不讨论REST风格API的设计规范(仁者见仁,智者见智),因此你也可以用你喜欢的方式去定义路由。
下面我们开始开发我们的项目!High起来~~~
Vert.x Core提供了一些较为底层的处理HTTP请求的功能,这对于Web开发来说不是很方便,因为我们通常不需要这么底层的功能,因此Vert.x Web应运而生。Vert.x Web基于Vert.x Core,并且提供一组更易于创建Web应用的上层功能(如路由)。
首先我们先来创建我们的项目。在本教程中我们使用Gradle作为构建工具,当然你也可以使用其它诸如Maven之类的构建工具。我们的项目目录里需要有:
src/main/java 文件夹(源码目录)src/test/java 文件夹(测试目录)build.gradle 文件(Gradle配置文件)
|
|
我们首先来创建 build.gradle 文件,这是Gradle对应的配置文件:
|
|
你可能不是很熟悉Gradle,这不要紧。我们来解释一下:
targetCompatibility 和 sourceCompatibility 这两个值都设为1.8,代表目标Java版本是Java 8。这非常重要,因为Vert.x就是基于Java 8构建的。dependencies中,我们声明了我们需要的依赖。vertx-core 和 vert-web 用于开发REST API。搞定build.gradle以后,我们开始写代码!
首先我们需要创建我们的数据实体对象 - Todo 实体。在io.vertx.blueprint.todolist.entity包下创建Todo类,并且编写以下代码:
|
|
我们的 Todo 实体对象由序号id、标题title、次序order、地址url以及代表待办事项是否完成的一个标识complete组成。我们可以把它看作是一个简单的Java Bean。它可以被编码成JSON格式的数据,我们在后边会大量使用JSON(事实上,在Vert.x中JSON非常普遍)。同时注意到我们给Todo类加上了一个注解:@DataObject,这是用于生成JSON转换类的注解。
@DataObject注解被
@DataObject注解的实体类需要满足以下条件:拥有一个拷贝构造函数以及一个接受一个JsonObject对象的构造函数。
我们利用Vert.x Codegen来自动生成JSON转换类。我们需要在build.gradle中添加依赖:
|
|
由于Vert.x Codegen仅在编译期生成代码,因此我们这里使用了compileOnly(相当于Maven中的provided。需要Gradle 2.12及以上版本)。同时,我们需要在io.vertx.blueprint.todolist.entity包中添加package-info.java文件来指引Vert.x Codegen生成代码:
|
|
Vert.x Codegen本质上是一个注解处理器(annotation processing tool),因此我们还需要在build.gradle中配置apt。往里面添加以下代码:
|
|
这样,每次我们在编译项目的时候,Vert.x Codegen都会自动检测含有 @DataObject 注解的类并且根据配置生成JSON转换类。在本例中,我们应该会得到一个 TodoConverter 类,然后我们可以在Todo类中使用它。
下面我们来写我们的应用组件。在io.vertx.blueprint.todolist.verticles包中创建SingleApplicationVerticle类,并编写以下代码:
|
|
我们的SingleApplicationVerticle类继承了AbstractVerticle抽象类。那么什么是 Verticle 呢?在Vert.x中,一个Verticle代表应用的某一组件。我们可以通过部署Verticle来运行这些组件。如果你了解 Actor 模型的话,你会发现它和Actor非常类似。
当Verticle被部署的时候,其start方法会被调用。我们注意到这里的start方法接受一个类型为Future<Void>的参数,这代表了这是一个异步的初始化方法。这里的Future代表着Verticle的初始化过程是否完成。你可以通过调用Future的complete方法来代表初始化过程完成,或者fail方法代表初始化过程失败。
现在我们Verticle的轮廓已经搞好了,那么下一步也就很明了了 - 创建HTTP Client并且配置路由,处理HTTP请求。
我们来给start方法加点东西:
|
|
(⊙o⊙)…一长串代码诶。。是不是看着很晕呢?我们来详细解释一下。
首先我们创建了一个 Router 实例 (1)。这里的Router代表路由器,相信做过Web开发的开发者们一定不会陌生。路由器负责将对应的HTTP请求分发至对应的处理逻辑(Handler)中。每个Handler负责处理请求并且写入回应结果。当HTTP请求到达时,对应的Handler会被调用。
然后我们创建了两个Set:allowHeaders和allowMethods,并且我们向里面添加了一些HTTP Header以及HTTP Method,然后我们给路由器绑定了一个CorsHandler (2)。route()方法(无参数)代表此路由匹配所有请求。这两个Set的作用是支持 CORS,因为我们的API需要开启CORS以便配合前端正常工作。有关CORS的详细内容我们就不在这里细说了,详情可以参考这里。我们这里只需要知道如何开启CORS支持即可。
接下来我们给路由器绑定了一个全局的BodyHandler (3),它的作用是处理HTTP请求正文并获取其中的数据。比如,在实现添加待办事项逻辑的时候,我们需要读取请求正文中的JSON数据,这时候我们就可以用BodyHandler。
最后,我们通过vertx.createHttpServer()方法来创建一个HTTP服务端 (4)。注意这个功能是Vert.x Core提供的底层功能之一。然后我们将我们的路由处理器绑定到服务端上,这也是Vert.x Web的核心。你可能不熟悉router::accept这样的表示,这是Java 8中的 方法引用,它相当于一个分发路由的Handler。当有请求到达时,Vert.x会调用accept方法。然后我们通过listen方法监听8082端口。因为创建服务端的过程可能失败,因此我们还需要给listen方法传递一个Handler来检查服务端是否创建成功。正如我们前面所提到的,我们可以使用future.complete来表示过程成功,或者用future.fail来表示过程失败。
到现在为止,我们已经创建好HTTP服务端了,但我们还没有见到任何的路由呢!不要着急,是时候去声明路由了!
下面我们来声明路由。正如我们之前提到的,我们的路由可以设计成这样:
POST /todosGET /todos/:todoIdGET /todosPATCH /todos/:todoIdDELETE /todos/:todoIdDELETE /todos路径参数
在URL中,我们可以通过
:name的形式定义路径参数。当处理请求的时候,Vert.x会自动获取这些路径参数并允许我们访问它们。拿我们的路由举个例子,/todos/19将todoId映射为19。
首先我们先在 io.vertx.blueprint.todolist 包下创建一个Constants类用于存储各种全局常量(当然也可以放到其对应的类中):
|
|
然后我们将start方法中的TODO标识处替换为以下的内容:
|
|
代码很直观、明了。我们用对应的方法(如get,post,patch等等)将路由路径与路由器绑定,并且我们调用handler方法给每个路由绑定上对应的Handler,接受的Handler类型为Handler<RoutingContext>。这里我们分别绑定了六个方法引用,它们的形式都类似于这样:
|
|
我们将在稍后实现这六个方法,这也是我们待办事项服务逻辑的核心。
我们之前提到过,Vert.x是 异步、非阻塞的 。每一个异步的方法总会接受一个 Handler 参数作为回调函数,当对应的操作完成时会调用接受的Handler,这是异步方法的一种实现。还有一种等价的实现是返回Future对象:
|
|
其中,Future 对象代表着一个操作的结果,这个操作可能还没有进行,可能正在进行,可能成功也可能失败。当操作完成时,Future对象会得到对应的结果。我们也可以通过setHandler方法给Future绑定一个Handler,当Future被赋予结果的时候,此Handler会被调用。
|
|
Vert.x中大多数异步方法都是基于Handler的。而在本教程中,这两种异步模式我们都会接触到。
现在是时候来实现我们的待办事项业务逻辑了!这里我们使用 Redis 作为数据持久化存储。有关Redis的详细介绍请参照Redis 官方网站。Vert.x给我们提供了一个组件—— Vert.x-redis,允许我们以异步的形式操作Redis数据。
如何安装Redis?
请参照Redis官方网站上详细的安装指南。
Vert.x Redis允许我们以异步的形式操作Redis数据。我们首先需要在build.gradle中添加以下依赖:
|
|
我们通过RedisClient对象来操作Redis中的数据,因此我们定义了一个类成员redis。在使用RedisClient之前,我们首先需要与Redis建立连接,并且需要配置(以RedisOptions的形式),后边我们再讲需要配置哪些东西。
我们来实现 initData 方法用于初始化 RedisClient 并且测试连接:
|
|
当我们在加载Verticle的时候,我们会首先调用initData方法,这样可以保证RedisClient可以被正常创建。
我们知道,Redis支持各种格式的数据,并且支持多种方式存储(如list、hash map等)。这里我们将我们的待办事项存储在 哈希表(map) 中。我们使用待办事项的id作为key,JSON格式的待办事项数据作为value。同时,我们的哈希表本身也要有个key,我们把它命名为 VERT_TODO,并且存储到Constants类中:
|
|
正如我们之前提到的,我们利用了生成的JSON数据转换类来实现Todo实体与JSON数据之间的转换(通过几个构造函数),在后面实现待办事项服务的时候可以广泛利用。
我们首先来实现获取待办事项的逻辑。正如我们之前所提到的,我们的处理逻辑方法需要接受一个RoutingContext类型的参数。我们看一下获取某一待办事项的逻辑方法(handleGetTodo):
|
|
首先我们先通过getParam方法获取路径参数todoId (1)。我们需要检测路径参数获取是否成功,如果不成功就返回 400 Bad Request 错误 (2)。这里我们写一个函数封装返回错误response的逻辑:
|
|
这里面,end方法是非常重要的。只有我们调用end方法时,对应的HTTP Response才能被发送回客户端。
再回到handleGetTodo方法中。如果我们成功获取到了todoId,我们可以通过hget操作从Redis中获取对应的待办事项 (3)。hget代表通过key从对应的哈希表中获取对应的value,我们来看一下hget函数的定义:
|
|
第一个参数key对应哈希表的key,第二个参数field代表待办事项的key,第三个参数代表当获取操作成功时对应的回调。在Handler中,我们首先检查操作是否成功,如果不成功就返回503错误。如果成功了,我们就可以获取操作的结果了。结果是null的话,说明Redis中没有对应的待办事项,因此我们返回404 Not Found代表不存在。如果结果存在,那么我们就可以通过end方法将其写入response中 (4)。注意到我们所有的RESTful API都返回JSON格式的数据,所以我们将content-type头设为JSON。
获取所有待办事项的逻辑handleGetAll与handleGetTodo大体上类似,但实现上有些许不同:
|
|
这里我们通过hvals操作 (1) 来获取某个哈希表中的所有数据(以JSON数组的形式返回,即JsonArray对象)。在Handler中我们还是像之前那样先检查操作是否成功。如果成功的话我们就可以将结果写入response了。注意这里我们不能直接将返回的JsonArray写入response。想象一下返回的JsonArray包括着待办事项的key以及对应的JSON数据(字符串形式),因此此时每个待办事项对应的JSON数据都被转义了,所以我们需要先把这些转义过的JSON数据转换成实体对象,再重新编码。
我们这里采用了一种响应式编程思想的方法。首先我们了解到JsonArray类继承了Iterable<Object>接口(是不是感觉它很像List呢?),因此我们可以通过stream方法将其转化为Stream对象。注意这里的Stream可不是传统意义上讲的输入输出流(I/O stream),而是数据流(data flow)。我们需要对数据流进行一系列的变换处理操作,这就是响应式编程的思想(也有点函数式编程的思想)。我们将数据流中的每个字符串数据转换为Todo实体对象,这个过程是通过map算子实现的。我们这里就不深入讨论map算子了,但它在函数式编程中非常重要。在map过后,我们通过collect方法将数据流“归约”成List<Todo>。现在我们就可以通过Json.encodePrettily方法对得到的list进行编码了,转换成JSON格式的数据。最后我们将转换后的结果写入到response中 (3)。
经过了上面两个业务逻辑实现的过程,你应该开始熟悉Vert.x了~现在我们来实现创建待办事项的逻辑:
|
|
首先我们通过context.getBodyAsString()方法来从请求正文中获取JSON数据并转换成Todo实体对象 (1)。这里我们包装了一个处理Todo实例的方法,用于给其添加必要的信息(如URL):
|
|
对于没有ID(或者为默认ID)的待办事项,我们会给它分配一个ID。这里我们采用了自增ID的策略,通过AtomicInteger来实现。
然后我们通过Json.encodePrettily方法将我们的Todo实例再次编码成JSON格式的数据 (2)。接下来我们利用hset函数将待办事项实例插入到对应的哈希表中 (3)。如果插入成功,返回 201 状态码 (4)。
[NOTE 201 状态码? | 正如你所看到的那样,我们将状态码设为201,这代表CREATED(已创建)。另外,如果不指定状态码的话,Vert.x Web默认将状态码设为 200 OK。]
同时,我们接收到的HTTP请求首部可能格式不正确,因此我们需要在方法中捕获DecodeException异常。这样一旦捕获到DecodeException异常,我们就返回400 Bad Request状态码。
如果你想改变你的计划,你就需要更新你的待办事项。我们来实现更新待办事项的逻辑,它有点小复杂(或者说是,繁琐?):
|
|
唔。。。一大长串代码诶。。。我们来看一下。首先我们从 RoutingContext 中获取路径参数 todoId (1),这是我们想要更改待办事项对应的id。然后我们从请求正文中获取新的待办事项数据 (2)。这一步也有可能抛出 DecodeException 异常因此我们也需要去捕获它。要更新待办事项,我们需要先通过hget函数获取之前的待办事项 (3),检查其是否存在。获取旧的待办事项之后,我们调用之前在Todo类中实现的merge方法将旧待办事项与新待办事项整合到一起 (5),然后编码成JSON格式的数据。然后我们通过hset函数更新对应的待办事项 (6)(hset表示如果不存在就插入,存在就更新)。操作成功的话,返回 200 OK 状态。
这就是更新待办事项的逻辑~要有耐心哟,我们马上就要见到胜利的曙光了~下面我们来实现删除待办事项的逻辑。
删除待办事项的逻辑非常简单。我们利用hdel函数来删除某一待办事项,用del函数删掉所有待办事项(实际上是直接把那个哈希表给删了)。如果删除操作成功,返回204 No Content 状态。
这里直接给出代码:
|
|
啊哈!我们实现待办事项服务的Verticle已经完成咯~一颗赛艇!但是我们该如何去运行我们的Verticle呢?答案是,我们需要 部署并运行 我们的Verticle。还好Vert.x提供了一个运行Verticle的辅助工具:Vert.x Launcher,让我们来看看如何利用它。
要通过Vert.x Launcher来运行Verticle,我们需要在build.gradle中配置一下:
|
|
jar区块中,我们配置Gradle使其生成 fat-jar,并指定启动类。fat-jar 是一个给Vert.x应用打包的简便方法,它直接将我们的应用连同所有的依赖都给打包到jar包中去了,这样我们可以直接通过jar包运行我们的应用而不必再指定依赖的 CLASSPATHMain-Class属性设为io.vertx.core.Launcher,这样就可以通过Vert.x Launcher来启动对应的Verticle了。另外我们需要将Main-Verticle属性设为我们想要部署的Verticle的类名(全名)。配置好了以后,我们就可以打包了:
|
|
万事俱备,只欠东风。是时候运行我们的待办事项服务了!首先我们先启动Redis服务:
|
|
然后运行服务:
|
|
如果没问题的话,你将会在终端中看到 Succeeded in deploying verticle 的字样。下面我们可以自由测试我们的API了,其中最简便的方法是借助 todo-backend-js-spec 来测试。
键入 http://127.0.0.1:8082/todos:

测试结果:

当然,我们也可以用其它工具,比如 curl :
|
|
啊哈~我们的待办事项服务已经可以正常运行了,但是回头再来看看 SingleApplicationVerticle 类的代码,你会发现它非常混乱,待办事项业务逻辑与控制器混杂在一起,让这个类非常的庞大,并且这也不利于我们服务的扩展。根据面向对象解耦的思想,我们需要将控制器部分与业务逻辑部分分离。
下面我们来设计我们的业务逻辑层。就像我们之前提到的那样,我们的服务需要是异步的,因此这些服务的方法要么需要接受一个Handler参数作为回调,要么需要返回一个Future对象。但是想象一下很多个Handler混杂在一起嵌套的情况,你会陷入 回调地狱,这是非常糟糕的。因此,这里我们用Future实现我们的待办事项服务。
在 io.vertx.blueprint.todolist.service 包下创建 TodoService 接口并且编写以下代码:
|
|
注意到getCertain方法返回一个Future<Optional<Todo>>对象。那么Optional是啥呢?它封装了一个可能为空的对象。因为数据库里面可能没有与我们给定的todoId相对应的待办事项,查询的结果可能为空,因此我们给它包装上 Optional。Optional 可以避免万恶的 NullPointerException,并且它在函数式编程中用途特别广泛(在Haskell中对应 Maybe Monad)。
既然我们已经设计好我们的异步服务接口了,让我们来重构原先的Verticle吧!
我们创建一个新的Verticle。在 io.vertx.blueprint.todolist.verticles 包中创建 TodoVerticle 类,并编写以下代码:
|
|
很熟悉吧?这个Verticle的结构与我们之前的Verticle相类似,这里就不多说了。下面我们来利用我们之前编写的服务接口实现每一个控制器方法。
首先先实现 initData 方法,此方法用于初始化存储结构:
|
|
首先我们从配置中获取服务的类型,这里我们有两种类型的服务:redis和jdbc,默认是redis。接着我们会根据服务的类型以及对应的配置来创建服务。在这里,我们的配置都是从JSON格式的配置文件中读取,并通过Vert.x Launcher的-conf项加载。后面我们再讲要配置哪些东西。
接着我们给service.initData()方法返回的Future对象绑定了一个Handler,这个Handler将会在Future得到结果的时候被调用。一旦初始化过程失败,错误信息将会显示到终端上。
其它的方法实现也类似,这里就不详细解释了,直接放上代码,非常简洁明了:
|
|
是不是和之前的Verticle很相似呢?这里我们还封装了两个Handler生成器:resultHandler 和 deleteResultHandler。这两个生成器封装了一些重复的代码,可以减少代码量。
嗯。。。我们的新Verticle写好了,那么是时候去实现具体的业务逻辑了。这里我们会实现两个版本的业务逻辑,分别对应两种存储:Redis 和 MySQL。
之前我们已经实现过一遍Redis版本的服务了,因此你应该对其非常熟悉了。这里我们仅仅解释一个 update 方法,其它的实现都非常类似,代码可以在GitHub上浏览。
回想一下我们之前写的更新待办事项的逻辑,我们会发现它其实是由两个独立的操作组成 - get 和 insert(对于Redis来说)。所以呢,我们可不可以复用 getCertain 和 insert 这两个方法?当然了!因为Future是可组合的,因此我们可以将这两个方法返回的Future组合到一起。是不是非常方便呢?我们来编写此方法:
|
|
首先我们调用了getCertain方法,此方法返回一个Future<Optional<Todo>>对象。同时我们使用compose函数将此方法返回的Future与另一个Future进行组合(1),其中compose函数接受一个T => Future<U>类型的lambda。然后我们接着检查旧的待办事项是否存在,如果存在的话,我们将新的待办事项与旧的待办事项相融合,然后更新待办事项。注意到insert方法返回Future<Boolean>类型的Future,因此我们还需要对此Future的结果做变换,这个变换的过程是通过map函数实现的(2)。map函数接受一个T => U类型的lambda。如果旧的待办事项不存在,我们返回一个包含null的Future(3)。最后我们返回组合后的Future对象。
Future的本质在函数式编程中,
Future实际上是一种Monad。有关Monad的理论较为复杂,这里就不进行阐述了。你可以简单地把它看作是一个可以进行变换(map)和组合(compose)的包装对象。我们把这种特性叫做 monadic。
下面来实现MySQL版本的待办事项服务。
我们使用Vert.x-JDBC和MySQL来实现JDBC版本的待办事项服务。我们知道,数据库操作都是阻塞操作,很可能会占用不少时间。而Vert.x-JDBC提供了一种异步操作数据库的模式,很神奇吧?所以,在传统JDBC代码下我们要执行SQL语句需要这样:
|
|
而在Vert.x JDBC中,我们可以利用回调获取数据:
|
|
这种异步操作可以有效避免对数据的等待。当数据获取成功时会自动调用回调函数来执行处理数据的逻辑。
首先我们需要向build.gradle文件中添加依赖:
|
|
其中第二个依赖是MySQL的驱动,如果你想使用其他的数据库,你需要自行替换掉这个依赖。
在Vert.x JDBC中,我们需要从一个JDBCClient对象中获取数据库连接,因此我们来看一下如何创建JDBCClient实例。在io.vertx.blueprint.todolist.service包下创建JdbcTodoService类:
|
|
我们使用JDBCClient.createShared(vertx, config)方法来创建一个JDBCClient实例,其中我们传入一个JsonObject对象作为配置。一般来说,我们需要配置以下的内容:
jdbc:mysql://localhost/vertx_blueprintcom.mysql.cj.jdbc.Driver我们将会通过Vert.x Launcher从配置文件中读取此JsonObject。
现在我们已经创建了JDBCClient实例了,下面我们需要在MySQL中建这样一个表:
|
|
我们把要用到的数据库语句都存到服务类中(这里我们就不讨论如何设计表以及写SQL了):
|
|
OK!一切工作准备就绪,下面我们来实现我们的JDBC版本的服务~
所有的获取连接、获取执行数据的操作都要在Handler中完成。比如我们可以这样获取数据库连接:
|
|
由于每一个数据库操作都需要获取数据库连接,因此我们来包装一个返回Handler<AsyncResult<SQLConnection>>的方法,在此回调中可以直接使用数据库连接,可以减少一些代码量:
|
|
获取数据库连接以后,我们就可以对数据库进行各种操作了:
query : 执行查询(raw SQL)queryWithParams : 执行预编译查询(prepared statement)updateWithParams : 执行预编译DDL语句(prepared statement)execute: 执行任意SQL语句所有的方法都是异步的所以每个方法最后都接受一个Handler参数,我们可以在此Handler中获取结果并执行相应逻辑。
现在我们来编写初始化数据库表的initData方法:
|
|
此方法仅会在Verticle初始化时被调用,如果todo表不存在的话就创建一下。注意,最后一定要关闭数据库连接。
下面我们来实现插入逻辑方法:
|
|
我们使用updateWithParams方法执行插入逻辑,并且传递了一个JsonArray变量作为预编译参数。这一点很重要,使用预编译语句可以有效防止SQL注入。
我们再来实现getCertain方法:
|
|
在这个方法里,当我们的查询语句执行以后,我们获得到了ResultSet实例作为查询的结果集。我们可以通过getColumnNames方法获取字段名称,通过getResults方法获取结果。这里我们通过getRows方法来获取结果集,结果集的类型为List<JsonObject>。
其余的几个方法:getAll, update, delete 以及 deleteAll都遵循上面的模式,这里就不多说了。你可以在GitHub上浏览完整的源代码。
重构完毕,我们来写待办事项服务对应的配置,然后再来运行!
首先我们在项目的根目录下创建一个 config 文件夹作为配置文件夹。我们在其中创建一个config_jdbc.json文件作为 jdbc 类型服务的配置:
|
|
你需要根据自己的情况替换掉上述配置文件中相应的内容(如 JDBC URL,JDBC 驱动 等)。
再建一个config.json文件作为redis类型服务的配置(其它的项就用默认配置好啦):
|
|
我们的构建文件也需要更新咯~这里直接给出最终的build.gradle文件:
|
|
好啦好啦,迫不及待了吧?~打开终端,构建我们的应用:
|
|
然后我们可以运行Redis版本的待办事项服务:
|
|
我们也可以运行JDBC版本的待办事项服务:
|
|
同样地,我们也可以使用todo-backend-js-spec来测试我们的API。由于我们的API设计没有改变,因此测试结果应该不会有变化。
我们也提供了待办事项服务对应的Docker Compose镜像构建文件,可以直接通过Docker来运行我们的待办事项服务。你可以在仓库的根目录下看到相应的配置文件,并通过 docker-compose up -- build 命令来构建并运行。

哈哈,恭喜你完成了整个待办事项服务,是不是很开心?~在整个教程中,你应该学到了很多关于 Vert.x Web、 Vert.x Redis 和 Vert.x JDBC 的开发知识。当然,最重要的是,你会对Vert.x的 异步开发模式 有了更深的理解和领悟。
另外,Vert.x 蓝图系列已经发布至Vert.x官网:Vert.x Blueprint Tutorials。其中第二个Blueprint是关于消息应用的,第三个Blueprint是关于微服务的,有兴趣的朋友可以参考后面几篇蓝图教程。
更多关于Vert.x的文章,请参考Blog on Vert.x Website。官网的资料是最全面的 :-)
之前你可能用过其它的框架,比如Spring Boot。这一小节,我将会用类比的方式来介绍Vert.x Web的使用。
在Spring Boot中,我们通常在控制器(Controller)中来配置路由以及处理请求,比如:
|
|
在Spring Boot中,我们使用 @RequestMapping 注解来配置路由,而在Vert.x Web中,我们是通过 Router 对象来配置路由的。并且因为Vert.x Web是异步的,我们会给每个路由绑定一个处理器(Handler)来处理对应的请求。
另外,在Vert.x Web中,我们使用 end 方法来向客户端发送HTTP response。相对地,在Spring Boot中我们直接在每个方法中返回结果作为response。
如果之前用过Play Framework 2的话,你一定会非常熟悉异步开发模式。在Play Framework 2中,我们在 routes 文件中定义路由,类似于这样:
|
|
而在Vert.x Web中,我们通过Router对象来配置路由:
|
|
this::handleGetCertain是处理对应请求的方法引用(在Scala里可以把它看作是一个函数)。
Play Framework 2中的异步开发模式是基于Future的。每一个路由处理函数都返回一个Action对象(实质上是一个类型为Request[A] => Result的函数),我们在Action.apply(或Action.async)闭包中编写我们的处理逻辑,类似于这样:
|
|
而在Vert.x Web中,异步开发模式基本上都是基于回调的(当然也可以用Vert.x RxJava)。我们可以这么写:
|
|
你可能想在Vert.x中使用其它的持久化存储框架或库,比如MyBatis ORM或者Jedis,这当然可以啦!Vert.x允许开发者整合任何其它的框架和库,但是像MyBatis ORM这种框架都是阻塞型的,可能会阻塞Event Loop线程,因此我们需要利用blockingHandler方法去执行阻塞的操作:
|
|
Vert.x会使用Worker线程去执行blockingHandler方法(或者Worker Verticles)中的操作,因此不会阻塞Event Loop线程。
在分布式系统中,一份数据可能有多份副本(冗余数据)。为了保证数据读写的正确性,同一时刻一份数据的多份副本只能用于读或用于写,而不能同时被超过两个访问对象并发读写。Quorum机制就可以保证这一点,我们来看一下它的思想。
一个分布式系统中,我们给每个数据副本都赋予一票。假设一共有 V 个数据副本,那么总共就有 V 个票数。每个操作必须要获得读票数(完成读操作所需要读取的最小副本数,read quorum, V(r) )或写票数(完成写操作所需要读取的最小副本数write quorum, V(w) )才能够对数据进行读或写。票数需要遵循以下规则:
第一条规则有两个作用:第一个作用是保证了一个数据不会被同时读写。当请求一个写操作时,它需要的得到 V(w) 读票数,而剩下的票数为 V - V(w) < V(r),因此不再允许读操作。请求读操作时也是同理;第二个作用是保证了强一致性。根据 鸽巢原理,写数据操作与读新数据操作之间是有重叠的,这就确保至少有一个读操作是可以读到最新数据的。
第二条规则保证了数据的串行化修改,同一个数据不能同时被两个写操作并发修改。
Quorum投票机制非常有用。比如一份数据在5个结点上存有副本,进行一次写操作的时候,必须等待五个结点的写操作都完成,整个写操作才返回(因为可以从任意结点读取)。这样会导致写操作负载太高,而有了Quorum机制以后,我们可以让写操作在至少3个结点上完成就可以返回,另外的结点可以等待后台同步,而读操作V(r)也需要大于 V-V(w) 才能确保至少一个读操作可以读到最新数据。
2017-12-04:待重新总结。。。
这篇文章里我们来总结一下 Netflix Hystrix 的工作流程(版本为 1.4.x)。这是官方提供的流程图(来自 GitHub):
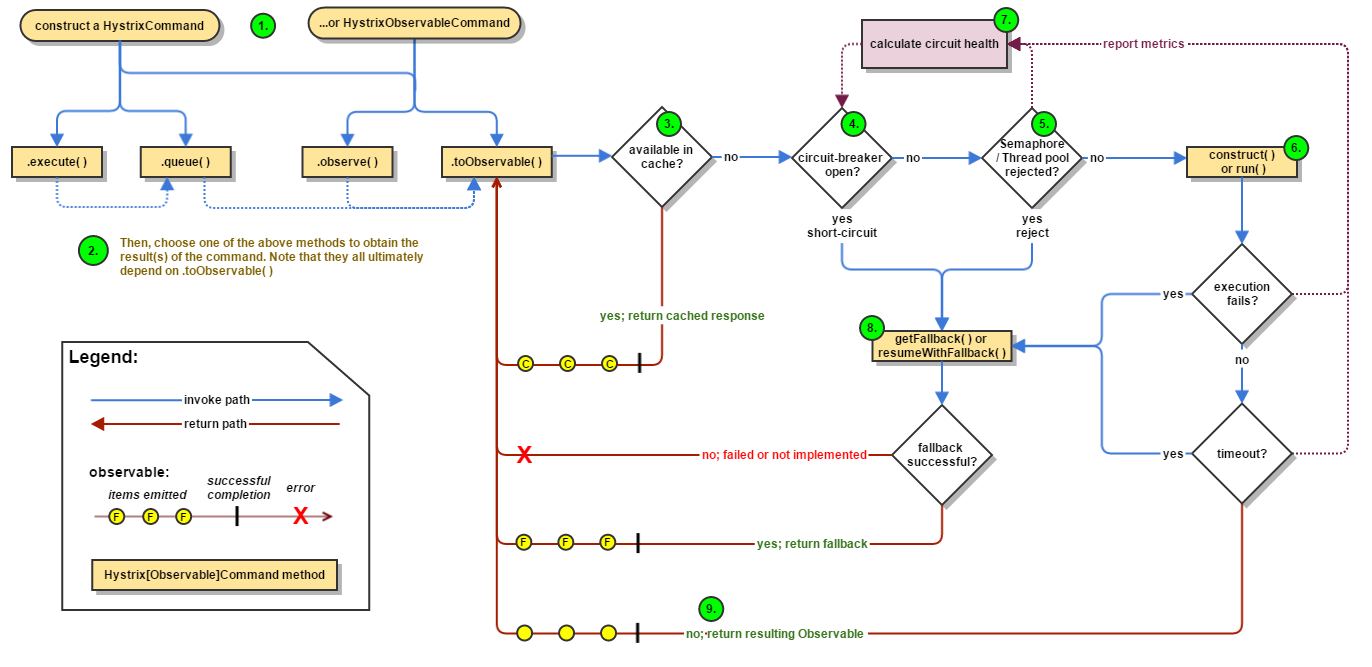
我们来根据流程图来分析一下工作流程。
首先我们需要创建一个 HystrixCommand 或 HystrixObservableCommand 实例来代表向其它组件发出的操作请求(指令),然后通过相关的方法执行操作指令。这里有4个方法,前两个对应HystrixCommand,后两个对应HystrixObservableCommand:
execute():阻塞型方法,返回单个结果(或者抛出异常)queue():异步方法,返回一个 Future 对象,可以从中取出单个结果(或者抛出异常)observe() 和 toObservable() 都返回对应的 Observable 对象,代表(多个)操作结果。注意 observe 方法在调用的时候就开始执行对应的指令(hot observable 加了层 buffer 代理),而 toObservable 方法相当于是 observe 方法的lazy版本,当我们去 subscribe 的时候,对应的指令才会被执行并产生结果
|
|
从底层实现来讲,HystrixCommand也是利用Observable实现的(看Hystrix源码的话可以发现里面大量使用了RxJava),尽管它只返回单个结果。HystrixCommand的queue方法实际上是调用了toObservable().toBlocking().toFuture(),而execute方法实际上是调用了queue().get()。
执行操作指令时,Hystrix首先会检查缓存内是否有对应指令的结果,如果有的话,将缓存的结果直接以Observable对象的形式返回。如果没有对应的缓存,Hystrix会检查Circuit Breaker的状态。如果Circuit Breaker的状态为开启状态,Hystrix将不会执行对应指令,而是直接进入失败处理状态(图中8 Fallback)。如果Circuit Breaker的状态为关闭状态,Hystrix会继续进行线程池、任务队列、信号量的检查(图中5),确认是否有足够的资源执行操作指令。如果资源满,Hystrix同样将不会执行对应指令并且直接进入失败处理状态。
如果资源充足,Hystrix将会执行操作指令。操作指令的调用最终都会到这两个方法:
HystrixCommand.run()HystrixObservableCommand.construct()如果执行指令的时间超时,执行线程会抛出TimeoutException异常。Hystrix会抛弃结果并直接进入失败处理状态。如果执行指令成功,Hystrix会进行一系列的数据记录,然后返回执行的结果。
同时,Hystrix会根据记录的数据来计算失败比率,一旦失败比率达到某一阈值将自动开启Circuit Breaker。
最后我们再来看一下Hystrix是如何处理失败的。如果我们在Command中实现了HystrixCommand.getFallback()方法(或HystrixObservableCommand.resumeWithFallback()方法,Hystrix会返回对应方法的结果。如果没有实现这些方法的话,从底层看Hystrix将会返回一个空的Observable对象,并且可以通过onError来终止并处理错误。从上层看:
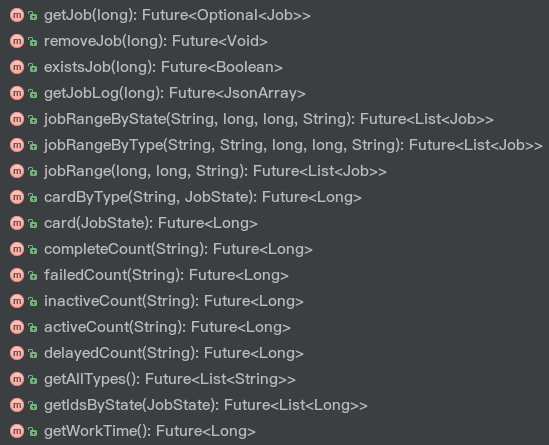
execute方法将会抛出异常queue方法将会返回一个失败状态的Future对象observe()和toObservable()方法都会返回上述的Observable对象Hystrix中的Circuit Breaker的实现比较明了。整个HystrixCircuitBreaker接口一共有三个方法和三个静态类:
其中allowRequest()方法表示是否允许指令执行,isOpen()方法表示断路器是否为开启状态,markSuccess()用于将断路器关闭。
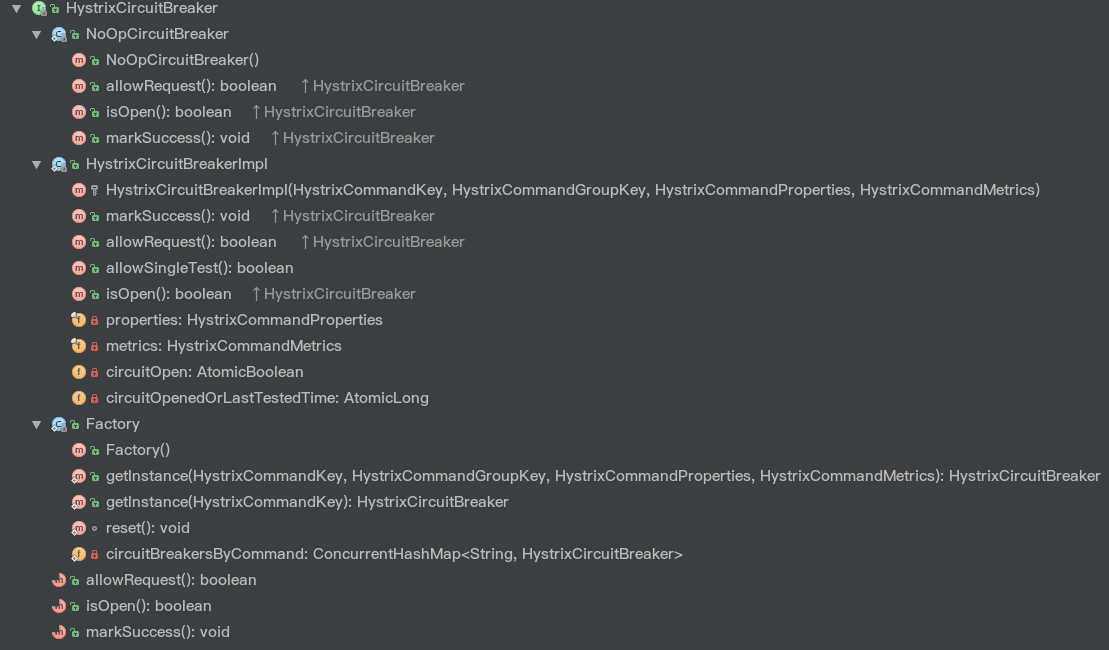
Factory静态类相当于Circuit Breaker Factory,用于获取相应的HystrixCircuitBreaker。我们来看一下其实现:
|
|
Hystrix在Factory类中维护了一个ConcurrentHashMap用于存储与每一个HystrixCommandKey相对应的HystrixCircuitBreaker。每当我们通过getInstance方法从中获取HystrixCircuitBreaker的时候,Hystrix首先会检查ConcurrentHashMap中有没有对应的缓存的断路器,如果有的话直接返回。如果没有的话就会新创建一个HystrixCircuitBreaker实例,将其添加到缓存中并且返回。
HystrixCircuitBreakerImpl静态类是HystrixCircuitBreaker接口的实现。我们可以看到HystrixCircuitBreakerImpl类中有四个成员变量。其中properties是对应HystrixCommand的属性类,metrics是对应HystrixCommand的度量数据类。由于会工作在并发环境下,我们用一个AtomicBoolean类型的变量circuitOpen来代表断路器的状态(默认是false代表关闭,这里没有特意实现Half-Open这个状态),并用一个AtomicLong类型的变量circuitOpenedOrLastTestedTime记录着断路恢复计时器的初始时间,用于Open状态向Close状态的转换。
我们首先来看一下isOpen方法的实现:
|
|
首先通过circuitOpen.get()获取断路器的状态,如果是开启状态(true)则返回true。否则,Hystrix会从Metrics数据中获取HealthCounts对象,然后检查对应的请求总数(totalCount)是否小于属性中的请求容量阈值(circuitBreakerRequestVolumeThreshold),如果是的话表示断路器可以保持关闭状态,返回false。如果不满足请求总数条件,就再检查错误比率(errorPercentage)是否小于属性中的错误百分比阈值(circuitBreakerErrorThresholdPercentage,默认 50),如果是的话表示断路器可以保持关闭状态,返回 false;如果超过阈值,Hystrix会判定服务的某些地方出现了问题,因此通过CAS操作将断路器设为开启状态,并记录此时的系统时间作为定时器初始时间,最后返回 true。
我们再来看一下判断Open状态下计时器的实现方法allowSingleTest:
|
|
首先获取断路恢复计时器记录的初始时间circuitOpenedOrLastTestedTime,然后判断以下两个条件是否同时满足:
circuitOpen.get() == true)circuitBreakerSleepWindowInMilliseconds(默认为 5 秒)如果同时满足的话,表示可以从Open状态向Close状态转换。Hystrix会通过CAS操作将circuitOpenedOrLastTestedTime设为当前时间,并返回true。如果不同时满足,返回false,代表断路器关闭或者计时器时间未到。
有了这个函数以后,我们再来看一下allowRequest的实现:
|
|
非常直观。首先先读取属性中的强制设定值(可以强制设定状态),如果没有设定的话,就判断断路器是否关闭或者断路恢复计时器是否到达时间,只要满足其中一个条件就返回true,即允许执行操作指令。
最后就是markSuccess方法了,它用于关闭断路器并重置统计数据。代码非常直观,就不多说了:
|
|
Hystrix的Circuit Breaker可以用以下的图来总结:
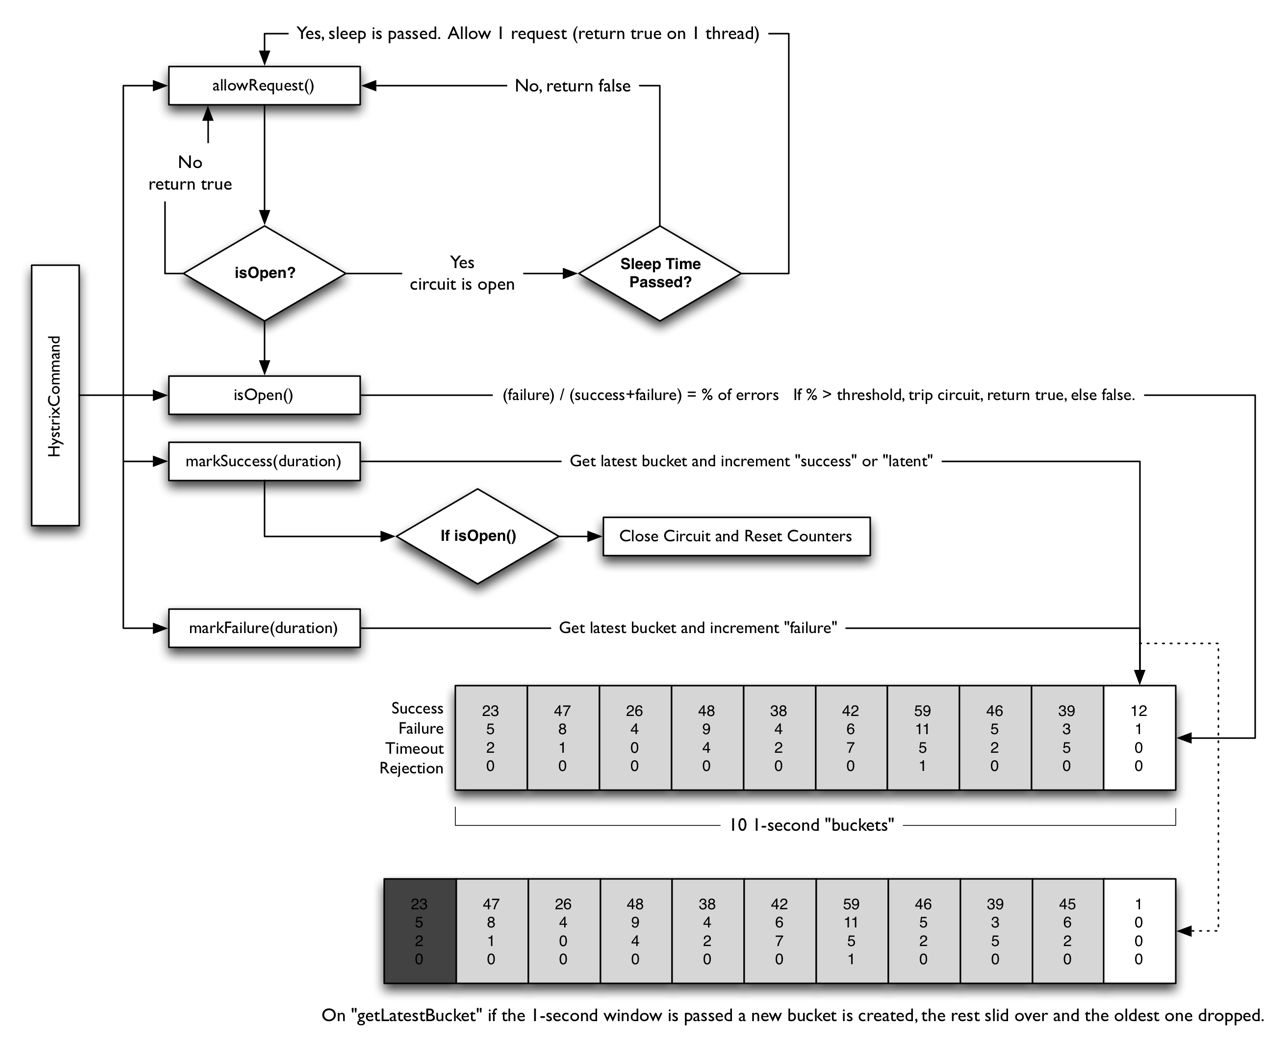
至于Hystrix在底层执行Command时是如何利用HystrixCircuitBreaker的,可以看AbstractCommand类中toObservable方法和getRunObservableDecoratedForMetricsAndErrorHandling方法的源码,后边再总结。
多线程环境下各种数据结构的实现有了很大的变化,每当我们更新某个数据的时候,我们都要考虑其它线程是否对其进行了修改。最简单的一种方法就是加锁,不过加锁会导致性能低下,而且可能阻塞其他线程。因此,我们引入了非阻塞 (non-blocking) 的算法 —— 通过 CAS 操作保证操作的原子性,同时我们还引入了 lock-free 的概念,它指的是一个线程出现问题(如阻塞,失败)但不影响其他线程(从总体看程序仍然是在运行的)。这里就来看一下 Non-blocking stack 的一个实现 —— Treiber Stack。
这里给出的是 Treiber Stack 的一个简化版的 Java 实现:
|
|
我们使用了 AtomicReference 来实现 Treiber Stack。每当我们 push 进去一个元素的时候,我们首先根据要添加的元素创建一个 Node,然后获取原栈顶结点,并将新结点的下一个结点指向原栈顶结点。此时我们使用 CAS 操作来更改栈顶结点,如果此时的栈顶和之前的相同,代表 CAS 操作成功,那么就把新插入的元素设为栈顶;如果此时的栈顶和之前的不同(即其他线程改变了栈顶结点),CAS 操作失败,那么需要重复上述操作(更新当前的栈顶元素并且重设 next),直到成功。pop 操作的原理也相似。
从大一就一直在搞分布式系统,Hadoop, Spark, Kafka, ZooKeeper之类的都玩过,然而以前只是简单地用用各个开源组件实现,并没有系统地学习其中的原理和算法。最近在跟着MIT 6.824课程学习分布式系统的各种理论原理,这里就来简单总结下分布式系统中的一些基础内容吧~
CAP Theory阐述了分布式系统中的一个事实:一致性(Consistency)、可用性(Availability)和分区容错性(Partition Tolerance)不能同时保证。三个只能选择两个
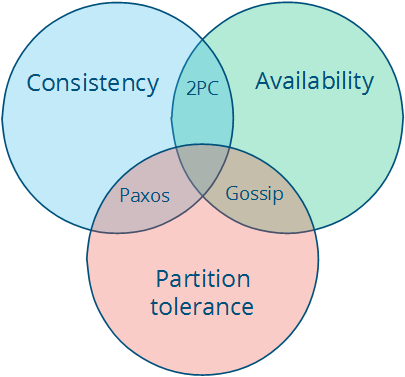
假设有两台机器A、B,两者之间互相同步保持数据的一致性。现在B由于网络原因不能与A通信(Network Partition),假设某个client向A写入数据,现在有两种选择:
Network Partition是必然的,网络非常可能出现问题(断线、超时),因此CAP理论一般只能AP或CP,而CA一般较难实现。
当然,在上面的例子中,A可以先允许写入,等B的网络恢复以后再同步至B(根据CAP原理这样不能保证强一致性了,但是可以考虑实现最终一致性)。
分布式Key-Value Store中的key映射问题。
hash(x) % N算法的弊端:不利于架构的伸缩性最复杂的情况:自己发的包被截;对方发的包自己收不到;内部有节点捣乱,造成不一致。
Impossibility of Distributed Consensus with One Faulty Process 这篇论文提到:
No completely asynchronous consensus protocol can tolerate even a single unannounced process death.
假设节点只有崩溃这一种异常行为,网络是可靠的,并且不考虑异步通信下的时序差异。FLP Impossibility指出在异步网络环境中只要有一个故障节点, 任何Consensus算法都无法保证行为正确。
Lease(租约)机制应用非常广泛:
租约的一个关键点就是有效期,过了有效期可以续约。如果不可用就收回租约,给另一台服务器权限。
实际应用:
思考:Lease == Lock?
多数表决机制在分布式系统中通常有两个应用场景:
理论基础:鸽巢原理
2PC在proposer和某个voter都挂掉的时候会阻塞(原因:别的节点没有对应voter的消息,只能阻塞等待此voter恢复)
3PC添加了一个 prepare-commit 阶段用于准备提交工作,这里面可以实现事务的回滚。
缺点:效率貌似很低。。。分布式事务用2PC会特别蛋疼
推演:
Paxos引入了Log ID (num, value),共有三个角色,两个阶段。
分布式一致性算法(Paxos, Raft, Chubby, Zab)待详细总结。。。
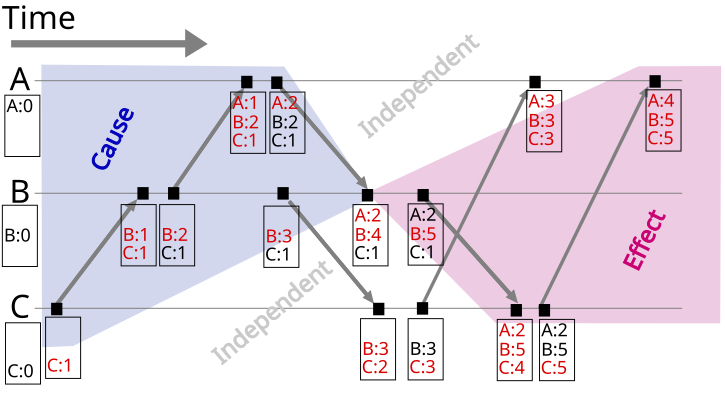
一般我们不关心分布式系统中某个过程的绝对时间,而只关注两个事件之间的相对时间。
在一个系统的事件集合E上定义一种偏序关系->,满足:
a -> ba -> ba -> b, b -> c,则a -> c定义并发:a -> b与b -> a均不成立则为并发情况
引入Lamport逻辑时钟。一个时钟本质上是一个事件到实数的映射(假设时间是连续的)。对于每一个进程Pi,都有其对应的时钟Ci。
分布式系统中的全局信息实际上是对各个实体信息的叠加(Q:重合怎么办?)
可以看到Lamport Timestamp必须要求两个事件有先后顺序关系,因而在时序图上不好表示concurrent。由此引入Vector Clock。
Vector Clock是对Lamport Timestamp的演进。它不仅保存了自身的timestamp,而且还保留了根节点的timestamp。
Vector Clock(Version Vector)只能用于发现数据冲突,但是想要解决数据冲突还要留给用户去定夺(就好比git commit出现conflicts,需要手工解决一样),当然也可以设置某种策略来直接解决冲突(保留最新或集群内多数表决)。
结合时序图理解会更好(图来自维基百科):
可能出现的问题:Vector Clock过多。解决方案:剪枝(如果超过某个阈值就把最初的那个给扔掉;要是现在还依赖最初的那个clock的话可能就会造成一些问题(思考:如何解决?)
对应论文:Dynamo: Amazon’s Highly Available Key-value Store, Section 4.4.
Docker Compose可以让我们方便、快速地编排容器集群,有利于分布式架构的实现。
假设我们有一个应用以MySQL作为数据存储,如果没有编排工具的话,我们在构建此应用的Docker镜像时必须将MySQL一同打包进镜像中,这样不仅会使镜像体积臃肿,而且不利于分布式架构的实现(假如要做读写分离、主从复制之类的)。而有了Docker Compose,我们就可以创建两个镜像:单独的应用镜像和MySQL镜像。在运行时,分别创建两个容器,并且将两个容器链接(link)在一起,使它们之间可以按照配置相互通信。这样就将我们的单体应用拆分成了多个组件构成的应用(其实这就是微服务的思想),从而更有利于服务间的解耦以及分布式架构的实现。
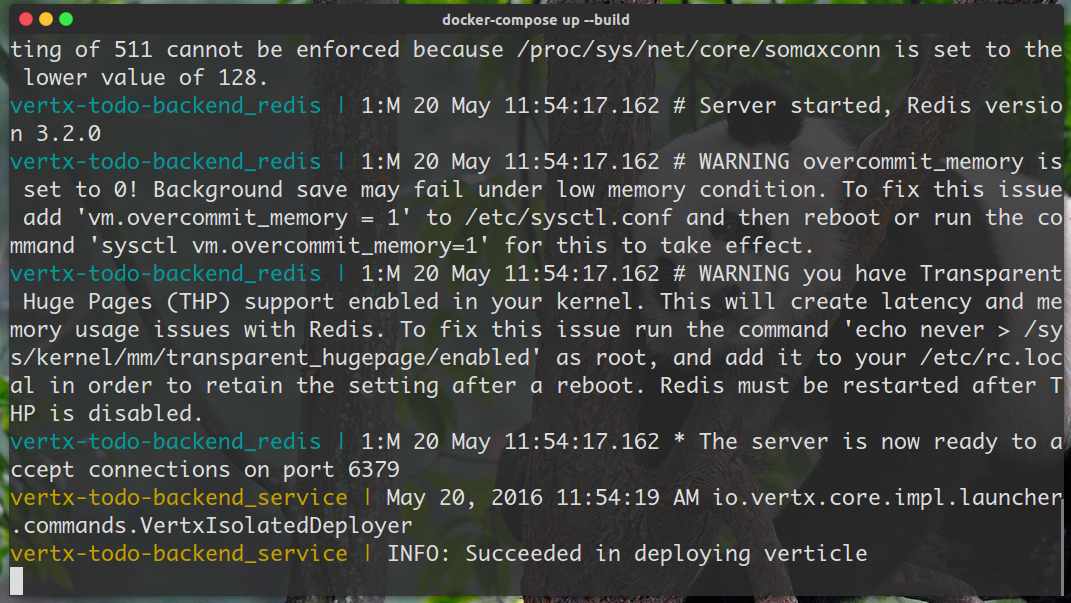
下面举一个例子,完整实现可见vertx-blueprint-todo-backend | GitHub。现有一服务Vert.x Blueprint Todo Backend已打包成jar包,该服务以Redis作为数据存储。该服务以及Redis监听的地址和端口通过JSON配置文件来提供。我们可以设计两个镜像:服务镜像(通过Dockerfile构建)以及官方Redis镜像,运行时分别创建一个容器实例,然后通过Docker Compose将两个容器组合起来。首先来看一下我们的Dockerfile:
|
|
服务容器运行时对外暴露8082端口。再看一下服务配置文件:
|
|
注意我们将Redis的host设为redis,这个redis是对应的访问路径,后面会提到。下面来看Docker Compose的配置文件docker-compose.yml:
|
|
其中version: "2"代表对应镜像版本,最新的需要Docker 1.10.0支持。在services中,我们定义了两个service:redis和vertx-todo-backend。
先来看redis中的配置。container_name代表容器名称,image代表对应的镜像,expose代表在集群内暴露的端口号(不对外暴露)。其它容器通过服务名redis访问此镜像。
再来看vertx-todo-backend。我们的服务需要依赖Redis,因此容器的启动顺序应该是redis -> vertx-todo-backend,因此我们配置了depends_on选项,此选项下的所有容器都将会在本容器启动之前启动(注意只是启动,并不是其它容器初始化完成后本容器才启动。如果需要等待其它容器初始化完毕,则需要另写脚本)。build对应着Dockerfile文件的路径,links代表链接的镜像,ports代表对外暴露的端口。
配置好以后,我们在目录下执行docker-compose up --build,一会就可以看到容器集群运行起来了,非常方便。
更多的有关Docker Compose的信息,参考官方文档。