在 Gradle 中使用 Annotation Processing Tool | Vert.x Codegen 示例

在 Maven 中,我们可以很方便地利用 Annotation Processing Tool(APT) 来生成代码,配置简洁明了。比如在 Maven 中配置 Vert.x Codegen

1
2
3
4
5
6
7
8
9
10
11
12
13
14
15
16
17
18
19
20
21
22
23
24
25
26
27
<pluginManagement>
<plugins>
<!-- Configure the execution of the compiler to execute the codegen processor -->
<plugin>
<artifactId>maven-compiler-plugin</artifactId>
<version>3.1</version>
<configuration>
<source>1.8</source>
<target>1.8</target>
<encoding>${project.build.sourceEncoding}</encoding>
</configuration>
<executions>
<execution>
<id>default-compile</id>
<configuration>
<annotationProcessors>
<annotationProcessor>io.vertx.codegen.CodeGenProcessor</annotationProcessor>
</annotationProcessors>
<compilerArgs>
<arg>-AoutputDirectory=${project.basedir}/src/main</arg>
</compilerArgs>
</configuration>
</execution>
</executions>
</plugin>
</plugins>
</pluginManagement>

而 Gradle 就不是那么方便了,官方文档里没有讲,各种插件又不太好使,因此自己摸索了摸索。其实,我们只要搞明白APT的处理过程,一切问题就迎刃而解了。在编译阶段,我们可以通过-processor来配置对应的注解处理器,并将注解处理器的包文件加到CLASSPATH中。因此,我们可以在Gradle中写一个task来处理注解:

1
2
3
4
5
6
7
8
9
task annotationProcessing(type: JavaCompile, group: 'build') {
source = sourceSets.main.java
classpath = configurations.compile + configurations.compileOnly
destinationDir = project.file('src/main/generated')
options.compilerArgs = [
"-proc:only",
"-processor", "xxx.yyy.zzzProcessor"
]
}

其中source代表源代码目录,classpath设为所有的依赖,destinationDir代表输出路径,options.compilerArgs代表javac的配置项。注意编译期依赖可以用compileOnly表示(Gradle 2.12及以上版本支持)。

下面我们来看一个例子:如何在Gradle中使用Vert.x Codegen。首先先写处理注解的task:

1
2
3
4
5
6
7
8
9
10
task annotationProcessing(type: JavaCompile, group: 'build') {
source = sourceSets.main.java
classpath = configurations.compile + configurations.compileOnly
destinationDir = project.file('src/main/generated')
options.compilerArgs = [
"-proc:only",
"-processor", "io.vertx.codegen.CodeGenProcessor",
"-AoutputDirectory=${destinationDir.absolutePath}"
]
}

注意Vert.x Codegen要设定outputDirectory项(输出路径)方可生成代码。

下面我们在 compileJava 中引用 annotationProcessing

1
2
3
4
5
6
compileJava {
targetCompatibility = 1.8
sourceCompatibility = 1.8
dependsOn annotationProcessing
}

这样在进行构建的时候,Gradle就可以利用APT来处理注解,生成代码了。如果要引用这些生成的代码,还要把它们加到源码路径中:

1
2
3
4
5
6
7
sourceSets {
main {
java {
srcDirs += 'src/main/generated'
}
}
}

题外话:安卓开发中也需要处理一些Android SDK中特定的注解,不过Jack发布后一般都有专门的插件,不需要自己写task。

微服务设计模式 | Circuit Breaker Pattern

在分布式环境中,我们的应用可能会面临着各种各样的可恢复的异常(比如超时,网络环境异常),此时我们可以利用不断重试的方式来从异常中恢复(Retry Pattern),使整个集群正常运行。

然而,也有一些异常比较顽固,突然发生,无法预测,而且很难恢复,并且还会导致级联失败(举个例子,假设一个服务集群的负载非常高,如果这时候集群的一部分挂掉了,还占了很大一部分资源,整个集群都有可能遭殃)。如果我们这时还是不断进行重试的话,结果大多都是失败的。因此,此时我们的应用需要立即进入失败状态(fast-fail),并采取合适的方法进行恢复。

Circuit Breaker Pattern(熔断器模式)就是这样的一种设计思想。它可以防止一个应用不断地去尝试一个很可能失败的操作。一个Circuit Breaker相当于一个代理,用于监测某个操作对应的失败比率(fail / fail + success)。它会根据得到的数据来决定是否允许执行此操作,或者是立即抛出异常。

Circuit Breaker原理

我们可以用状态机来实现 Circuit Breaker,它有以下三种状态:

  • 关闭(Closed):默认情况下Circuit Breaker是关闭的,此时允许操作执行。Circuit Breaker内部记录着最近失败的次数,如果对应的操作执行失败,次数就会续一次。如果在某个时间段内,失败次数(或者失败比率)达到阈值,Circuit Breaker会转换到开启(Open)状态。在开启状态中,Circuit Breaker会启用一个超时计时器,设这个计时器的目的是给集群相应的时间来恢复故障。当计时器时间到的时候,Circuit Breaker会转换到半开启(Half-Open)状态。
  • 开启(Open):在此状态下,执行对应的操作将会立即失败并且立即抛出异常。
  • 半开启(Half-Open):在此状态下,Circuit Breaker 会允许执行一定数量的操作。如果所有操作全部成功,Circuit Breaker就会假定故障已经恢复,它就会转换到关闭状态,并且重置失败次数。如果其中 任意一次 操作失败了,Circuit Breaker就会认为故障仍然存在,所以它会转换到开启状态并再次开启计时器(再给系统一些时间使其从失败中恢复)。

Circuit Breaker 的状态图:

Circuit Breaker Pattern States


References

类型系统 | Existential Type | Scala ++ Java ++ Haskell

Existential type (存在类型)提供了一种在类型系统上抽象的方式,其中 existential type 这个名称源于 existential quantification (存在量词,数学符号)。可以这样理解:某种形式的类型存在,但是在上下文中不知道它的具体类型。比如我们定义一种类型 type T = ∃x {a: x; f: (x => Int);},它可以表示这种类型有一个类型为 x 的成员变量a,一个类型为 x => Int 的成员函数 f,而类型 x 是任意的。

这篇文章我们来探讨一下 existential type 在 Java、Scala 和 Haskell 中的运用。

Existential type in Java

Existential Type 在 Java 如此烂的类型系统中发挥着重要的作用。Java 泛型中的 Wildcards(占位符)其实就是一种existential type,比如 java.util.List<?>

由于JVM在编译时会对type parameters进行类型擦除,让它们回归为raw types,因此很多人认为existential type就相当于raw types,比如List =:= List<?>,这是不正确的。它们两种类型最大的区别就是existential type是type safe的,而raw types则不是。在将一个具化的泛型扒掉所有的type parameters的时候,后者是不安全的。我们测试一下:

1
2
3
4
5
6
7
8
9
10
11
12
13
14
15
16
17
18
19
20
21
22
23
24
import java.util.Arrays;
import java.util.List;
import java.util.ArrayList;
public class Existential {
public static List<String> list = new ArrayList<>(Arrays.asList("Java", "sucks"));
public static void t1() {
List a = list;
a.forEach(System.out::println);
}
public static void t2() {
List<?> b = list;
b.forEach(System.out::println);
}
public static void main(String[] args) {
t1();
t2();
}
}

编译一下,编译器会提示t1方法不安全,而t2则无警告:

1
2
3
4
5
6
7
λ javac ./Existential.java -Xlint:unchecked
./Existential.java:11: 警告: [unchecked] 对作为原始类型Iterable的成员的forEach(Consumer<? super T>)的调用未经过检查
a.forEach(System.out::println);
^
其中, T是类型变量:
T扩展已在接口 Iterable中声明的Object
1 个警告

因此我们要避免使用原始类型。(貌似越写越偏了。。那就顺便总结一下Java的Bounded Wildcards吧:)

Java通过 Bounded Wildcards(限定通配符)来实现有限的可变性(variance),比如

  • List<? extends Object>(协变, covariance)
  • List<? super User>(逆变, contravariance)
  • List<?>(不可变, invariance)

注意我们无法给限定通配符的List添加任何对象,因为它的类型参数无法确定(这即是existential的含义)。我们可以在方法参数中使用Bounded Wildcards来达到协变和逆变的效果,使用时遵循 PECS原则 (Producer Extends, Consumer Super)。

注:这里的variance其实是一种 use-site variance,后边有时间探究一下它与 declaration-site variance 的区别。

Existential type in Scala

Scala同样兼容Java的这种use-site variance,语法有两种。一种和Java类似,一种是完整表示方法(forSome关键字)。举个例子:

简单表示 完整表示 含义
Seq[_] Seq[T] forSome {type T} T可以是Any类型的任意子类
Seq[_ <: A] Seq[T] forSome {type T <: A} T可以是A类型的任意子类
Seq[_ >: Z <: A] Seq[T] forSome {type T >: Z <: A} T可以是A类型的任意子类,同时需要是Z类型的父类

Existential type in Haskell

在GHC中使用Existential Types需要开启扩展(-XExistentialQuantification)。Haskell中的Existential Type通过forall关键字来实现。但是,forall代表全称量词,这似乎和existential type的含义是对立的,是不是很神奇呢?我们将在稍后解释。这里我们先来看一下我们最熟悉的map函数:

1
map :: (a -> b) -> [a] -> [b]

我们还可以通过全称量化的方法构造map:

1
map :: forall a b. (a -> b) -> [a] -> [b]

这两个map的定义是等价的。其实在Haskell中,很多类型的定义都是隐式地使用了forall

再比如下边的例子定义了可以show的existential type:

1
2
3
4
5
6
7
8
9
10
11
12
13
14
{-# LANGUAGE ExistentialQuantification #-}
data ShowObj = forall a. Show a => S a
instance Show ShowObj where
show (S a) = show a
li :: [ShowObj]
li = [S 1, S "Java", S "sucks", S True, S ()]
f :: [ShowObj] -> IO ()
f xs = mapM_ print xs
main = f li

下面我们来探究一下existentialforall的真正含义。我们可以将类型看作是某些值的集合,比如Bool类型对应集合{True, False, ⊥}Integer对应数的集合。注意bottom()属于每一个类型。

forall代表这些集合的交集。我们举一些例子:

  • forall a. a是所有类型的交集,也就是{⊥}
  • [forall a. Show a => a]代表一种所含元素均为forall a. Show a => a类型的列表类型,Show Typeclass限定了只能在Show的instance里取交集

我们随便定义一个existential datatype(下面我们用代替forall,用代替exists):

1
data T = ∀ a. MkT a

其中MkT的含义是产生一个T类型:

1
2
MkT :: forall a. a -> T
MkT :: a -> T {- 等价 -}

那么当我们对MkT进行解构的时候又会发生什么呢?比如进行模式匹配的时候:

1
f (MkT x) = ...

此时x的类型可以是任意的,也就是说我们可以用存在量词来表示x:x :: ∃ a. a。我们知道存在这种类型x,但不清楚x的真正类型。这样的定义同构于上边我们用全称量词的定义,即这两种定义等价:

1
2
3
data T = ∀ a. MkT a
data T = MkT (∃ a. a)

而Haskell选择了前者的表达方式(forall),即在Haskell中existential type通过forall关键字来实现。(为何不用exists?我也不清楚。。)

所以现在再回头来看我们之前定义的ShowObj类型,我们可以把它转化为用存在量词表达的existential type:

1
2
3
data ShowObj = forall a. Show a => S a
data ShowObj' = S' (exists a. Show a => a) {- Haskell里不能这么写 -}

在Haskell各种类库中existential type用的非常多,例如Control.Monad.ST中的runST

1
runST :: forall α. (forall s. ST s α) -> α

这里先不展开写了,后边有时间多实践实践再说。。。

Heterogeneous List

待填坑。。Miles Sabin大神的Shapeless库中的 Heterogeneous List(HList) 值得一读。。


References

类型系统 | Refinement Type

最近在看某个Slide的时候里了解到了Refinement type这个玩意儿,今天拿来总结总结。

何为Refinement Type

言简意赅的讲:

Refinement Types = Types + Logical Predicates

即Refinement Type是由类型和谓词逻辑组合而成的,其中谓词逻辑可以对类型的值域进行约束。也就是说,我们可以在原有类型的基础上给它加个值的限定,并且可以在编译时检测是否符合谓词逻辑限定。

下面我们来玩一下Haskell和Scala中典型的Refinement Type库。

LiquidHaskell

LiquidHaskell是Haskell上一个基于Liquid Types的静态分析器,可以通过Refinement Type进行静态检查。安装的时候注意需要系统环境中有logic solvers(比如z3)。

下边我们来看看如何使用LiquidHaskell:

1
2
3
4
5
6
7
8
9
module RfT where
{-@ zero'' :: {v: Int | v >= 0 && v < 24 } @-}
zero' :: Int
zero' = 0
{-@ zero'' :: {v: Int | v > 5 } @-}
zero'' :: Int
zero'' = 0

我们定义了两个函数zero'zero'',这两个函数的值都是0。我们在每个函数的声明前都加了一行谓词逻辑的限定,语法类似于:

1
{-@ f :: {x: T | predicate } @-}

比如{-@ zero'' :: {v: Int | v > 5 } @-}代表zero''函数有一个类型为Int的参数,而且接受的值必须大于5,这就是谓词逻辑限定。我们运行一下看看结果:

1
$ liquid --diff rft1.hs
1
2
3
4
5
6
7
8
9
10
11
12
13
14
15
16
17
18
19
20
21
22
23
24
25
26
27
28
29
30
31
32
33
34
35
36
LiquidHaskell Copyright 2009-15 Regents of the University of California. All Rights Reserved.
**** DONE: Parsed All Specifications ******************************************
**** DONE: Loaded Targets *****************************************************
**** DONE: Extracted Core using GHC *******************************************
**** DONE: generateConstraints ************************************************
Done solving.
Safe
**** DONE: solve **************************************************************
**** DONE: annotate ***********************************************************
**** Checked Binders: None *****************************************************
**** RESULT: UNSAFE ************************************************************
rft1.hs:10:1-6: Error: Liquid Type Mismatch
Inferred type
VV : {VV : GHC.Types.Int | VV == (0 : int)}
not a subtype of Required type
VV : {VV : GHC.Types.Int | VV > 5}
In Context

LiquidHaskell成功地检测出了错误 —— zero''函数不符合谓词逻辑限定。

下边再举个对函数参数和返回值进行refine的例子:

1
2
3
4
5
6
7
8
9
10
11
12
13
14
15
16
17
{- Preconditions -}
{-@ divide :: Int -> {v: Int | v != 0 } -> Int @-}
divide :: Int -> Int -> Int
divide n d = n `div` d
f1 :: Int
f1 = divide 1 0
f2 :: Int
f2 = divide 1 1
{- Postconditions -}
{-@ abs' :: Int -> {v: Int | v >= 0 } @-}
abs' :: Int -> Int
abs' n | n > 0 = n
| otherwise = 0 - n

验证结果符合我们的期望:

1
2
3
4
5
6
7
8
9
10
11
12
13
rft1.hs:19:6-15: Error: Liquid Type Mismatch
19 | f1 = divide 1 0
^^^^^^^^^^
Inferred type
VV : {VV : GHC.Types.Int | VV == ?a}
not a subtype of Required type
VV : {VV : GHC.Types.Int | VV /= 0}
In Context
?a := {?a : GHC.Types.Int | ?a == (0 : int)}

可以看到LiquidHaskell可以验证函数的先验条件和后验条件。

至于其中的实现原理,可以参考这篇论文:Liquid Types(数学推导太多,没看懂>_<)

refined(Scala)

refined是Scala中一个Refinement Type的实现(貌似也是借鉴的Haskell的库,连名字都抄过来了)。我们在REPL里玩玩,首先导入相关的包:

1
2
3
4
5
6
7
8
9
10
import eu.timepit.refined._
import eu.timepit.refined.api.Refined
import eu.timepit.refined.auto._
import eu.timepit.refined.numeric._
import eu.timepit.refined.boolean._
import eu.timepit.refined.char._
import eu.timepit.refined.collection._
import eu.timepit.refined.generic._
import eu.timepit.refined.string._
import shapeless.{ ::, HNil }

refined这个库直接在类型系统上进行限定,通过一个Refined[T, P]类型(aka T Refined P, T - 类型, P - 谓词逻辑)来表示,比如正整数可以表示为Int Refined Positive,非空字符串可以表示为String Refined NonEmpty。几个例子:

1
2
3
4
5
6
7
8
9
10
11
12
13
14
15
16
scala> val i1: Int Refined Positive = 5
i1: eu.timepit.refined.api.Refined[Int,eu.timepit.refined.numeric.Positive] = 5
scala> val i2: Int Refined Positive = -5
<console>:21: error: Predicate failed: (-5 > 0).
val i2: Int Refined Positive = -5
scala> val i3: String Refined NonEmpty = ""
<console>:37: error: Predicate isEmpty() did not fail.
val i3: String Refined NonEmpty = ""
^
scala> val u1: String Refined Url = "htp://example.com"
<console>:37: error: Url predicate failed: unknown protocol: htp
val u1: String Refined Url = "htp://example.com"
^

可以看到refined内置不少Predicate,也可以自己自定义Predicate。


References

Play Framework 2.5 | Web 开发总结

Samsara Aquarius已完成,是时候总结一下Play Framework的一些有用的东西和一些坑了~这里对应的Play版本为 2.5.2

Action, Controller 和 Result

在Play的Web开发中,Action, ControllerResult 这三个东西最为重要了。我们一个一个来解释:

Result

Result代表HTTP请求的结果,它包含header和body两部分。Play内部封装了常见的HTTP response状态,可以在这些Status的基础上生成Result,比如200 OK

1
2
/** Generates a ‘200 OK’ result. */
val Ok = new Status(OK)

Action

每个Action相当于一个Request => Result类型(处理请求并返回结果)的函数,即每个Action都接受一个Request对象(代表HTTP请求),并产生Result对象(代表HTTP回应)。

Play Framework 2底层是基于Netty实现的,因此Action经过处理以后会在Netty通信层执行(Reactor模式)。关于Action的详细实现,后边我还会专门写一篇文章分析。

Controller

在Play中,Controller里的函数用于生成Action。其实Action就相当于处理请求的函数,只不过将普通的函数包装了一层而已(继承关系:Action <:< EssentialAction <:< (RequestHeader => Accumulator[ByteString, Result])),因此调用这些函数其实就是在调用Action中包装的函数。

Session、Cookie与Flash

Play中处理Session、Cookie的语法都比较简洁。比如Cookie的添加与删除:

1
2
val res1 = Ok("Good Scala") withCookies Cookie("fuck", "shit")
val res2 = res1.discardingCookies(DiscardingCookie("fuck"))

Session的使用也类似:

1
2
val res2 = Ok("Good Scala") withSession Session("fuck", "shit")
val res_rm = res2 withNewSession // clear session

但是Play里的session有个坑,它没实现expiration的功能,因此需要我们自己在session中加个时间戳,然后自己实现expiration的逻辑。

另外还有个大坑!如果需要添加session的话,需要这样:

1
Ok("Good Scala") withSession (request.session + Session("fuck", "shit"))

因为withSession(s)方法会将s设为当前的session,原先的session将会被抹掉。
。所以一定要把原先的session加上,要不然原先的session会丢失。

Flash和Session类似,但Flash只在一个request内有效,多用于request之间数据的传递:

1
Ok("Good Scala") flashing "fuck" -> "shit"

自定义Action

比如有一些逻辑中,我们需要验证用户是否登录,如果没有登录就自动跳转到登录界面。如果在每个Action中都写上登录验证逻辑的话会非常不优美,因此我们可以自定义一个AuthenticatedAction,里面包装了权限验证的逻辑:

1
2
3
4
5
6
7
8
9
10
11
12
13
object AuthenticatedAction extends ActionBuilder[Request] {
override def invokeBlock[A](request: Request[A],
block: (Request[A]) => Future[Result]): Future[Result] = {
utils.DateUtils.ensureSession(request)
request.session.get("user_token") match {
case Some(u) =>
block(request)
case None =>
Future.successful(Redirect(routes.UserController.loginIndex()))
}
}
}

我们自定义的Action需要实现ActionBuilder[Request]接口,并重写invokeBlock函数。

拦截器

在Play中使用Filter也非常方便。比如我们想给应用添加安全拦截器,我们可以写一个Filter:

1
2
3
4
5
6
7
8
9
10
11
12
package filters
import javax.inject.Inject
import play.api.http.HttpFilters
import play.filters.headers.SecurityHeadersFilter
class Filters @Inject() (security: SecurityHeadersFilter) extends HttpFilters {
override def filters = Seq(security)
}

其中我们通过依赖注入获取安全拦截器SecurityHeadersFilter实例。然后,我们在application.conf中配置拦截器:

1
play.http.filters=filters.Filters

依赖注入

Play Framework 2.4.0开始又引入了依赖注入(学习Spring大乱炖的节奏)。之前写了一篇总结:Play Framework 2.5 | Dependency Injection总结

Twirl模板引擎

这次开发还顺便玩了玩Play 2的Twirl模板引擎,用起来还比较顺手~不过现在一般都用前后端分离的架构了,后端模板引擎也用的少了。

微服务架构思考

用Play做微服务应用是一个不错的选择,那么如何将单体架构重构成微服务架构呢?这里面就有一个主要的问题:如何将各个组件解耦。一种最简单的思路就是用Play实现一个API Gateway作为网关服务(需要多实例部署+负载均衡+高可用),API Gateway将请求分派到各个组件中,组件之间通过Actor进行通信。可以总结为两点:事件驱动+异步通信。事件驱动可以使整个微服务架构更加灵活,各个组件的耦合度降低,而基于Akka Actor的异步通信可以提高并发性能,提高吞吐量。当然实际生产环境中还要考虑容错、高可用等等的问题,设计起来会更加复杂。


TODO

  • Play 2.5 Streaming(Iteratees/Enumerator/Akka Stream)

Scala | Type Lambda

这里来总结一下Scala类型系统中的Type Lambda,这是一个神奇的Trick,可以在类型上做有限的类似于Lambda Calculus的运算。

Type Lambda

为了便于理解,这里就以熟悉的Monad开始。首先定义我们的Monad Typeclass:

1
2
3
4
5
6
7
trait Monad[M[_]] {
def unit[A](a: A): M[A]
def >>=[A, B](m: M[A])(f: A => M[B]): M[B]
}

可以看出Monad的kind为(* -> *) -> *

假如我们想为Either[+A, +B]类型的右投影(Right Projection)实现对应的Monad,这里就会出现一个问题:Either[+A, +B]类型的kind为* -> * -> *,而Monad最多接受kind为* -> *的type constructor,因此如果我们想把Either塞进Monad里,就必须将其kind化为* -> *。是不是很像在类型系统上进行Currying(柯里化)呢?这就是type lambda的作用。我们可以这样写:

1
2
3
4
5
6
trait EitherMonad[A] extends Monad[({type λ[α] = Either[A, α]})#λ] {
override def unit[B](a: B): Either[A, B]
override def >>=[B, C](m: Either[A, B])(f: B => Either[A, C]): Either[A, C]
}

下面我们来分析一下此Monad对应的type parameter是什么玩意儿。首先,{type λ[α] = Either[A, α]}这一块是一个structural type,在其内部定义了一个类型λ,接受一个类型参数α,此类型与Either[A, α]类型相对应。也就是说这个类型相当于Either[A, _]这个type constructor,它再接受一个类型参数从而构造出完整的Either[A, B]类型(kind为*)。接着我们通过类型投影(#操作符)得到这个λ类型(通过反射),它的kind为* -> *,从而符合Monad类型参数的要求。

这样的trick就是Type Lambda,它相当于在类型系统上(对type constructor)进行Currying。我们可以看到它的实现非常巧妙,巧妙地利用了structural type和type projection。

我们类比一下Currying。比如有函数(为了表示方便,这里用Haskell函数表示):

1
f :: (Int a) => a -> b -> c

我们可以对其进行Currying:

1
2
3
4
f :: (Int a) => a -> (b -> c)
g :: b -> c
g = f 0 {- eta reduction -}

同样,在类型系统上我们也可以这么干,比如我们要将kind为* -> * -> *Either[A, B]化为kind为* -> *Either[A, _],这时候我们就可以利用type lambda来进行转化。

题外话(关于Haskell):这样的操作其实属于类型组合(type composition)。Haskell中的Control.Compose模块提供了一系列的用于类型组合的玩意,有兴趣的可以看看Hackage中的文档玩一玩~


References

Akka Actor | 注意 sender 的闭包范围

Akka Actor 里都有一个 sender 方法返回此消息的发送方 Actor,进行消息回复非常方便。但是在使用 sender 时,需要注意一点:不要在可能运行于其它线程的闭包中调用 sender 方法,也就是说一定要在当前 Actor 范围内调用 sender 方法,否则会出现各种问题。正好写 Aquarius 的时候用到了 Actor,就用它演示一下。假设我们收到请求收藏的消息,并调用相关业务逻辑进行异步操作,并向 sender 返回操作结果。假如我们这样写:

1
2
3
4
5
6
7
8
9
10
override def receive: Receive = {
case go @ FavoriteOn(a, u) =>
service ❤ go onComplete {
case Success(x) =>
sender ! FAVORITE_PROCESS_SUCCESS
case Failure(ex) =>
sender ! FAVORITE_PROCESS_FAIL
}
// 其他代码略
}

这是对应的请求逻辑:

1
2
3
4
5
6
7
8
implicit val timeout = Timeout(5 seconds)
def like(aid: Int, uid: Int) = Action.async { implicit request =>
// 省略其它逻辑
(alActor ? FavoriteOn(aid, uid.toInt)).mapTo[ProcessResult] map { reply =>
Ok(Json.toJson(reply))
}
}

我们会发现,发出请求5s后抛出AskTimeoutException异常,表明Actor没有发送回reply:

1
2
3
4
5
6
7
8
9
play.api.http.HttpErrorHandlerExceptions$$anon$1: Execution exception[[AskTimeoutException: Ask timed out on [Actor[akka://application/user/article-favorite-actor#377237056]] after [5000 ms]. Sender[null] sent message of type "message.FavoriteMessageActor$FavoriteOn".]]
at play.api.http.HttpErrorHandlerExceptions$.throwableToUsefulException(HttpErrorHandler.scala:269)
at play.api.http.DefaultHttpErrorHandler.onServerError(HttpErrorHandler.scala:195)
at play.core.server.netty.PlayRequestHandler$$anonfun$2$$anonfun$apply$1.applyOrElse(PlayRequestHandler.scala:99)
at play.core.server.netty.PlayRequestHandler$$anonfun$2$$anonfun$apply$1.applyOrElse(PlayRequestHandler.scala:98)
...
Caused by: akka.pattern.AskTimeoutException: Ask timed out on [Actor[akka://application/user/article-favorite-actor#377237056]] after [5000 ms]. Sender[null] sent message of type "message.FavoriteMessageActor$FavoriteOn".
at akka.pattern.PromiseActorRef$$anonfun$1.apply$mcV$sp(AskSupport.scala:604)
...

在对应Actor中检测sender的path,结果为deadLetters,表明我们此处获得的sender并不是消息发送方。这是因为上面的代码在Future的onComplete闭包中调用了sender方法,而onComplete闭包代码会异步执行(在另一个线程内),从而获得的sender并不是消息接收时对应的sender,行为是未定义,线程不安全的(可能会导致资源争用)。因此我们需要在Actor作用域内获取sender actor:

1
2
3
4
5
6
7
8
9
10
11
override def receive: Receive = {
val sender = super.sender()
case go @ FavoriteOn(a, u) =>
service ❤ go onComplete {
case Success(x) =>
sender ! FAVORITE_PROCESS_SUCCESS
case Failure(ex) =>
sender ! FAVORITE_PROCESS_FAIL
}
// 其他代码略
}

这样就确保 sender 是消息接收时对应的发送方 Actor,从而可以正常的发送 reply。

总结几种典型情况及解决方法:

  • 可变状态,如以下代码会导致未定义行为(由于资源争用),因此在 Actor 中不要使用共享的可变状态(一切都 val),或使用DynamicVariable
1
2
3
4
5
6
7
8
class MyActor extends Actor {
var state = State()
def receive = {
case _ =>
Future { state = newState }
otherActor ? message onSuccess { r => state = r }
}
}
  • Future的 onCompleteonSuccessonFailure。在这些回调中必须正确地引用 sender(在 Actor 作用域内获取或通过self

目前来说,编译器不能在编译期检查出 sender 的问题,因此写代码的时候一定要头脑清醒,注意 sender 的闭包范围。

在 Linux 环境下玩转 MIDI

今天在Ubuntu下搭了各种MIDI环境,为后边玩 Haskell School of Music 中讲的Euterpea音乐库做准备。网上相关的文章比较少,这里就写篇文章记录一下吧。。。

ASLA

首先介绍一下ASLA(Advanced Linux Sound Architecture),它为Linux提供了MIDI和音频功能,相当于Linux下音频的基础。Ubuntu应该自带ALSA。

查看一下当前系统的内核:

1
2
sczyh30@sczyh30-workshop:~$ uname -a
Linux sczyh30-workshop 3.19.0-49-generic #55-Ubuntu SMP Fri Jan 22 02:10:24 UTC 2016 x86_64 x86_64 x86_64 GNU/Linux

由于玩MIDI对时间要求严格,不能卡顿,因此推荐用低延时的内核(Low Latency Kernel),可以通过sudo apt-get install linux-lowlatency安装然后调整CONFIG_HZ参数。

然后我们来查看一下ALSA设备:

1
2
3
4
5
sczyh30@sczyh30-workshop:~$ cat /proc/asound/cards
0 [HDMI ]: HDA-Intel - HDA Intel HDMI
HDA Intel HDMI at 0xf7b14000 irq 34
1 [PCH ]: HDA-Intel - HDA Intel PCH
HDA Intel PCH at 0xf7b10000 irq 33

从出现的列表看不出哪个是声卡设备,因此再用aplay命令看一下详细信息:

1
2
3
4
5
6
7
8
9
10
11
12
13
14
15
16
17
sczyh30@sczyh30-workshop:~$ aplay -l
**** PLAYBACK 硬體裝置清單 ****
card 0: HDMI [HDA Intel HDMI], device 3: HDMI 0 [HDMI 0]
子设备: 1/1
子设备 #0: subdevice #0
card 0: HDMI [HDA Intel HDMI], device 7: HDMI 1 [HDMI 1]
子设备: 1/1
子设备 #0: subdevice #0
card 0: HDMI [HDA Intel HDMI], device 8: HDMI 2 [HDMI 2]
子设备: 1/1
子设备 #0: subdevice #0
card 1: PCH [HDA Intel PCH], device 0: ALC892 Analog [ALC892 Analog]
子设备: 0/1
子设备 #0: subdevice #0
card 1: PCH [HDA Intel PCH], device 1: ALC892 Digital [ALC892 Digital]
子设备: 1/1
子设备 #0: subdevice #0

可以看到card 1位置为声卡,在ALSA设备里表示为hw:1,当然card 1处有两个子设备,可以分别用hw:1,0hw:1,1表示。在下边调用ALSA设备的时候都会用到hw:1

下面来测试一下ALSA音频功能。首先通过sox命令生成一段音频,然后用aplay播放:

1
2
sox -b 16 -n test.wav rate 44100 channels 2 synth 1 sine 440
aplay -D hw:1 test.wav

正常情况下会听到”滴”的一声,代表设备正常,否则就是设备设置的不对。如果提示设备忙,那么可能是其它程序(比如pulseaudio)占用了。

FluidSynth

下面来玩一下 FluidSynth ,它是一个音频合成器。它可以将MIDI数据通过soundfont转化为音频。先安装:sudo apt-get install fluidsynth

fluidsynth可以用来播放MIDI文件,命令:

1
fluidsynth --audio-driver=alsa -o audio.alsa.device=hw:1 /usr/share/sounds/sf2/FluidR3_GM.sf2 song.mid

当然fluidsynth也可以接受其它程序传输的MIDI数据并转化为音频。这时候fluidsynth将作为一个“音频服务器”。它会等待其它程序与它建立连接,并发送MIDI数据。命令:

1
fluidsynth --server --audio-driver=alsa -o audio.alsa.device=hw:1 /usr/share/sounds/sf2/FluidR3_GM.sf2

此时fluidsynth已开始运行,用aplaymidi -l命令可以看到fluidsynth正在监听的端口:

1
2
3
4
sczyh30@sczyh30-workshop:~$ aplaymidi -l
Port Client name Port name
14:0 Midi Through Midi Through Port-0
128:0 FLUID Synth (26298) Synth input port (26298:0)

然后就可以往这个端口传输MIDI数据,比如MIDI文件:aplaymidi -p 128:0 song.mid

再来玩一下VMPK(Virtual MIDI Pinao Keyboard),它是个MIDI Piano,产生MIDI数据。首先先安装:sudo apt-get install vmpk,然后启动。

这时候由于没有与音频设备建立连接,按琴键的时候不会有声音。我们需要通过aconnect命令与fluidsynth建立连接。首先查看一下当前的Audio IO:

1
2
3
4
5
6
7
8
9
10
11
12
13
14
15
sczyh30@sczyh30-workshop:~$ aconnect -i
client 0: 'System' [type=内核]
0 'Timer '
1 'Announce '
client 14: 'Midi Through' [type=内核]
0 'Midi Through Port-0'
client 129: 'VMPK Output' [type=用户]
0 'VMPK Output '
sczyh30@sczyh30-workshop:~$ aconnect -o
client 14: 'Midi Through' [type=内核]
0 'Midi Through Port-0'
client 128: 'FLUID Synth (26298)' [type=用户]
0 'Synth input port (26298:0)'
client 130: 'VMPK Input' [type=用户]
0 'VMPK Input '

我们需要将MIDI转化为Audio,即从VMPKFLUID Synth。建立连接:aconnect 129:0 128:0,然后再测试一下VMPK,有声音输出了。

FluidSynth也有GUI版本Qsynth,可以很方便地合成声音。

Euterpea依赖

Euterpea需要asound:

1
apt-get install libasound2-dev jackd2

然而现在配置好Euterpea后,无论如何play它都不发声音。。。官网说这玩意只在某些特定的Haskell版本上正常运行,也是醉了。。待调试好后再来补充。。

【补充】Windows下不用配置就可以很愉快的玩Euterpea了。。

探索万恶的 Slick 3 类型系统 | Prologue

这两天在给Samsara Aquarius的各个Service写分页的时候,设计了一个抽象层,想把一些公共的分页逻辑放在这个trait中,但是被Slick的类型系统折磨了一点时间。。今天粗略看了一下相关的源码,结合这几天遇到的问题,总结一下。因此就把这篇文章作为Prologue吧。。。(Slick的版本为3.1.1)

蛋疼的类型参数

在Slick里面,分页可以通过droptake函数实现。query.drop(offset).take(n)对应的SQL为LIMIT n, offset。因此在一开始,我设计了一个trait作为分页逻辑的抽象:

1
2
3
4
5
6
7
trait PageDao {
def page(): Future[Int]
def fetchWithPage(offset: Int): Future[Seq[_]]
}

其中,page函数用于获取总页数,fetchWithPage函数实现分页查询逻辑。

在Slick里,db操作通过db.run(DBIOAction)进行,而每个Query可以通过result函数隐式转换成DBIOAction,因此我们需要给参数中加上Query,以便我们的Service层可以传递不同的Query:

1
2
3
4
5
6
7
trait PageDao {
def page(query: slick.lifted.Query[_, _, Seq]): Future[Int]
def fetchWithPage(query: slick.lifted.Query[_, _, Seq], offset: Int): Future[Seq[_]]
}

Query[+E, U, C[_]]是一个接受3个类型参数的type constructor,这为后边的蛋疼埋下伏笔。。

好了,接下来,由于我们需要在抽象层进行db操作,因此必须获取db对象,这里我选择继承HasDatabaseConfigProvider[JdbcProfile]

1
2
3
4
5
6
7
8
9
10
11
12
13
14
15
16
17
18
19
20
21
22
trait WithPageProvider extends HasDatabaseConfigProvider[JdbcProfile] with PageDao {
import driver.api._
val withQueryByPage =
(query: slick.lifted.Query[_, _, _], offset: Int) =>
query.drop(offset).take(LIMIT_PAGE)
def page(query: slick.lifted.Query[_, _, _]): Future[Int] = {
db.run(query.length.result) map { all =>
val p = all % LIMIT_PAGE == 0
if (p) all / LIMIT_PAGE
else (all / LIMIT_PAGE) + 1
} recover {
case ex: Exception => 0
}
}
def fetchWithPage(query: slick.lifted.Query[_, _, _], offset: Int): Future[Seq[_]] = {
db.run(withQueryByPage(query, offset).result)
}
}

嗯。。逻辑很快写好了,一切似乎都是OK的,下面在业务层中调用一下:

1
2
def fetchWithPage(offset: Int): Future[Seq[(Category, Int)]] =
super.fetchWithPage(categoriesCompiled, offset)

很快,远方就传来了IDE提示GG的声音。。。提示:Expression of type Future[Seq[_]] doesn't conform to expected type Future[Seq[(Category, Int)]]

嗯。。。看来是必须具化Seq的type parameter了。。那么就给trait里的fetchWithPage加个type parameter吧。。下面就陷入了苦逼的Slick类型系统初探过程——Slick在runresult的过程中,如何从一个原始的Query[+E, U, C[_]]转化为最终的Future[Seq[R]]?也就是说Query的这几个type parameters该取什么类型?想解决这个问题,只能看Slick的源码了。。首先从run函数出发,看看Future是怎么产生的:

1
2
/** Run an Action asynchronously and return the result as a Future. */
final def run[R](a: DBIOAction[R, NoStream, Nothing]): Future[R] = runInternal(a, false)

可以看到,最后返回Future的类型参数是DBIOAction[R, NoStream, Nothing]的第一个类型参数R。接着我们看一下DBIOAction的定义:

1
sealed trait DBIOAction[+R, +S <: NoStream, -E <: Effect] extends Dumpable

嗯,看到这里,似乎明白了什么。。然后再看一下Query的定义:

1
2
3
sealed trait QueryBase[T] extends Rep[T]
sealed abstract class Query[+E, U, C[_]] extends QueryBase[C[U]]

可以看到Query[+E, U, C[_]]继承了QueryBase[C[U]],然而注释里完全没有这三个type parameters的含义,所以就瞎猜。。注释里提到计算结果代表一个集合类型,如Rep[Seq[T]],而QueryBase[T]又继承了Rep[T],所以很容易想到Query第三个类型参数为Seq。然而一开始没有看到后边的[C[U]],又因为DBIOAction中返回类型为第一个类型参数R,因此就错误地把这里的返回类型想成了第一个类型参数E(还是协变的,很迷惑人)。于是把fetchWithPage改成了这样:

1
def fetchWithPage[R](query: slick.lifted.Query[R, _, Seq], offset: Int): Future[Seq[R]]

仍然在报错,这次成了Expression of type Future[Seq[Any]] doesn't conform to expected type Future[Seq[R]]

这时候提示就比较明显了,既然第一个类型参数已经限定为R,而返回值还为Future[Seq[Any]],那么很容易就会联想到当前为_的类型参数有猫腻,即Query[+E, U, C[_]]中的U。这时候再看到后边继承的QueryBase[C[U]],一切都一目了然了。这里的QueryBase[C[U]]是一个higher-kinded type,既然我们将C设为Seq,那么很容易想到C[U]其实就是对应着Seq[Result],那么我们的R参数应该放在Query的第二个类型参数U上。改一下发现,一切都正常了:

1
2
3
def fetchWithPage[R](query: slick.lifted.Query[_, R, Seq], offset: Int): Future[Seq[R]] = {
db.run(withQueryByPage(query, offset).result)
}

寻根溯源

问题解决了,但Query[+E, U, C[_]]里那个+E实在是很迷惑人,于是就继续探究了探究它到底是什么玩意。注释里没写,那就从Query的实现中找吧。。在TableQuery的定义中有:

1
2
3
4
5
6
7
8
9
10
class TableQuery[E <: AbstractTable[_]](cons: Tag => E) extends Query[E, E#TableElementType, Seq]
/** The driver-independent superclass of all table row objects.*/
// @tparam T Row type for this table.
abstract class AbstractTable[T](val tableTag: Tag, val schemaName: Option[String], val tableName: String) extends Rep[T] {
type TableElementType
// ...
}

E需要是AbstractTable[_]的子类,而我们在定义表的映射的时候都是继承了Table[_]类,因此可以确定E就是查询的类型所对应的Table类(比如ArticleTable)。

另外一个值的探究的地方就是那个result函数是如何将一个Query转化为DBIOAction的。蛋疼的地方在于这个转换是隐式的(相当于实现了Typeclass Pattern),因此追踪如何转换的比较困难。好在写代码的时候发现,如果不导入driver.api._的话,就会找不到result函数,因此可以从这里入手。跳转到api的源码:

1
val api: API = new API {}

那么秘密应该就藏在JdbcProfile#API类里了:

1
2
3
4
5
6
7
8
9
10
11
12
13
14
15
16
17
18
19
20
trait API extends LowPriorityAPI with super.API with ImplicitColumnTypes {
type FastPath[T] = JdbcFastPath[T]
type SimpleDBIO[+R] = SimpleJdbcAction[R]
val SimpleDBIO = SimpleJdbcAction
implicit def jdbcFastPathExtensionMethods[T, P](mp: MappedProjection[T, P]) = new JdbcFastPathExtensionMethods[T, P](mp)
implicit def queryDeleteActionExtensionMethods[C[_]](q: Query[_ <: RelationalProfile#Table[_], _, C]): DeleteActionExtensionMethods =
createDeleteActionExtensionMethods(deleteCompiler.run(q.toNode).tree, ())
implicit def runnableCompiledDeleteActionExtensionMethods[RU, C[_]](c: RunnableCompiled[_ <: Query[_, _, C], C[RU]]): DeleteActionExtensionMethods =
createDeleteActionExtensionMethods(c.compiledDelete, c.param)
implicit def runnableCompiledUpdateActionExtensionMethods[RU, C[_]](c: RunnableCompiled[_ <: Query[_, _, C], C[RU]]): UpdateActionExtensionMethods[RU] =
createUpdateActionExtensionMethods(c.compiledUpdate, c.param)
implicit def jdbcActionExtensionMethods[E <: Effect, R, S <: NoStream](a: DBIOAction[R, S, E]): JdbcActionExtensionMethods[E, R, S] =
new JdbcActionExtensionMethods[E, R, S](a)
implicit def actionBasedSQLInterpolation(s: StringContext) = new ActionBasedSQLInterpolation(s)
}

这里面存在这样的继承关系(简化过后的):JdbcProfile#API <:< RelationalProfile#API <:< BasicProfile#API

再看RelationalProfile中的API类:

1
2
3
4
5
6
7
8
9
10
11
12
13
14
15
16
17
18
19
20
trait API extends super.API with ImplicitColumnTypes {
type Table[T] = driver.Table[T]
type Sequence[T] = driver.Sequence[T]
val Sequence = driver.Sequence
type ColumnType[T] = driver.ColumnType[T]
type BaseColumnType[T] = driver.BaseColumnType[T]
val MappedColumnType = driver.MappedColumnType
@deprecated("Use an explicit conversion to an Option column with `.?`", "3.0")
implicit def columnToOptionColumn[T : BaseTypedType](c: Rep[T]): Rep[Option[T]] = c.?
implicit def valueToConstColumn[T : TypedType](v: T) = new LiteralColumn[T](v)
implicit def columnToOrdered[T : TypedType](c: Rep[T]): ColumnOrdered[T] = ColumnOrdered[T](c, Ordering())
implicit def tableQueryToTableQueryExtensionMethods[T <: RelationalProfile#Table[_], U](q: Query[T, U, Seq] with TableQuery[T]) =
new TableQueryExtensionMethods[T, U](q)
implicit def streamableCompiledInsertActionExtensionMethods[EU](c: StreamableCompiled[_, _, EU]): InsertActionExtensionMethods[EU] = createInsertActionExtensionMethods[EU](c.compiledInsert.asInstanceOf[CompiledInsert])
implicit def queryInsertActionExtensionMethods[U, C[_]](q: Query[_, U, C]) = createInsertActionExtensionMethods[U](compileInsert(q.toNode))
implicit def schemaActionExtensionMethods(sd: SchemaDescription): SchemaActionExtensionMethods = createSchemaActionExtensionMethods(sd)
}

再看BasicProfile中的API类:

1
2
3
4
5
6
7
8
9
10
11
12
13
14
15
16
17
18
19
20
21
22
23
24
25
26
trait API extends Aliases with ExtensionMethodConversions {
type Database = Backend#Database
val Database = backend.Database
type Session = Backend#Session
type SlickException = slick.SlickException
implicit val slickDriver: driver.type = driver
// Work-around for SI-3346
@inline implicit final def anyToToShapedValue[T](value: T) = new ToShapedValue[T](value)
implicit def repQueryActionExtensionMethods[U](rep: Rep[U]): QueryActionExtensionMethods[U, NoStream] =
createQueryActionExtensionMethods[U, NoStream](queryCompiler.run(rep.toNode).tree, ())
implicit def streamableQueryActionExtensionMethods[U, C[_]](q: Query[_,U, C]): StreamingQueryActionExtensionMethods[C[U], U] =
createStreamingQueryActionExtensionMethods[C[U], U](queryCompiler.run(q.toNode).tree, ())
implicit def runnableCompiledQueryActionExtensionMethods[RU](c: RunnableCompiled[_, RU]): QueryActionExtensionMethods[RU, NoStream] =
createQueryActionExtensionMethods[RU, NoStream](c.compiledQuery, c.param)
implicit def streamableCompiledQueryActionExtensionMethods[RU, EU](c: StreamableCompiled[_, RU, EU]): StreamingQueryActionExtensionMethods[RU, EU] =
createStreamingQueryActionExtensionMethods[RU, EU](c.compiledQuery, c.param)
// Applying a CompiledFunction always results in only a RunnableCompiled, not a StreamableCompiled, so we need this:
implicit def streamableAppliedCompiledFunctionActionExtensionMethods[R, RU, EU, C[_]](c: AppliedCompiledFunction[_, Query[R, EU, C], RU]): StreamingQueryActionExtensionMethods[RU, EU] =
createStreamingQueryActionExtensionMethods[RU, EU](c.compiledQuery, c.param)
// This only works on Scala 2.11 due to SI-3346:
implicit def recordQueryActionExtensionMethods[M, R](q: M)(implicit shape: Shape[_ <: FlatShapeLevel, M, R, _]): QueryActionExtensionMethods[R, NoStream] =
createQueryActionExtensionMethods[R, NoStream](queryCompiler.run(shape.toNode(q)).tree, ())
}

如此多的implicit转换,可以将Query和CompiledQuery转换成各种QueryActionExtensionMethods。那么我们再来看result的源码,看看它是不是在某个QueryActionExtensionMethods类里:

1
2
3
4
class StreamingQueryActionExtensionMethodsImpl[R, T](tree: Node, param: Any) extends QueryActionExtensionMethodsImpl[R, Streaming[T]](tree, param) with super.StreamingQueryActionExtensionMethodsImpl[R, T] {
override def result: StreamingDriverAction[R, T, Effect.Read] = super.result.asInstanceOf[StreamingDriverAction[R, T, Effect.Read]]
// ...
}

果然!result方法存在于这个QueryActionExtensionMethods类里,而且Query可以通过上述API隐式转换为QueryActionExtensionMethods。这个类好混乱,继承了两个trait,还没注释(这一点最蛋疼了,直接看源码估计无解)。再往它的父类找:

1
2
3
4
5
6
7
8
trait QueryActionExtensionMethodsImpl[R, S <: NoStream] {
/** An Action that runs this query. */
def result: DriverAction[R, S, Effect.Read]
}
trait StreamingQueryActionExtensionMethodsImpl[R, T] extends QueryActionExtensionMethodsImpl[R, Streaming[T]] {
def result: StreamingDriverAction[R, T, Effect.Read]
}

它们是最基本的QueryActionExtensionMethods,即查询操作。

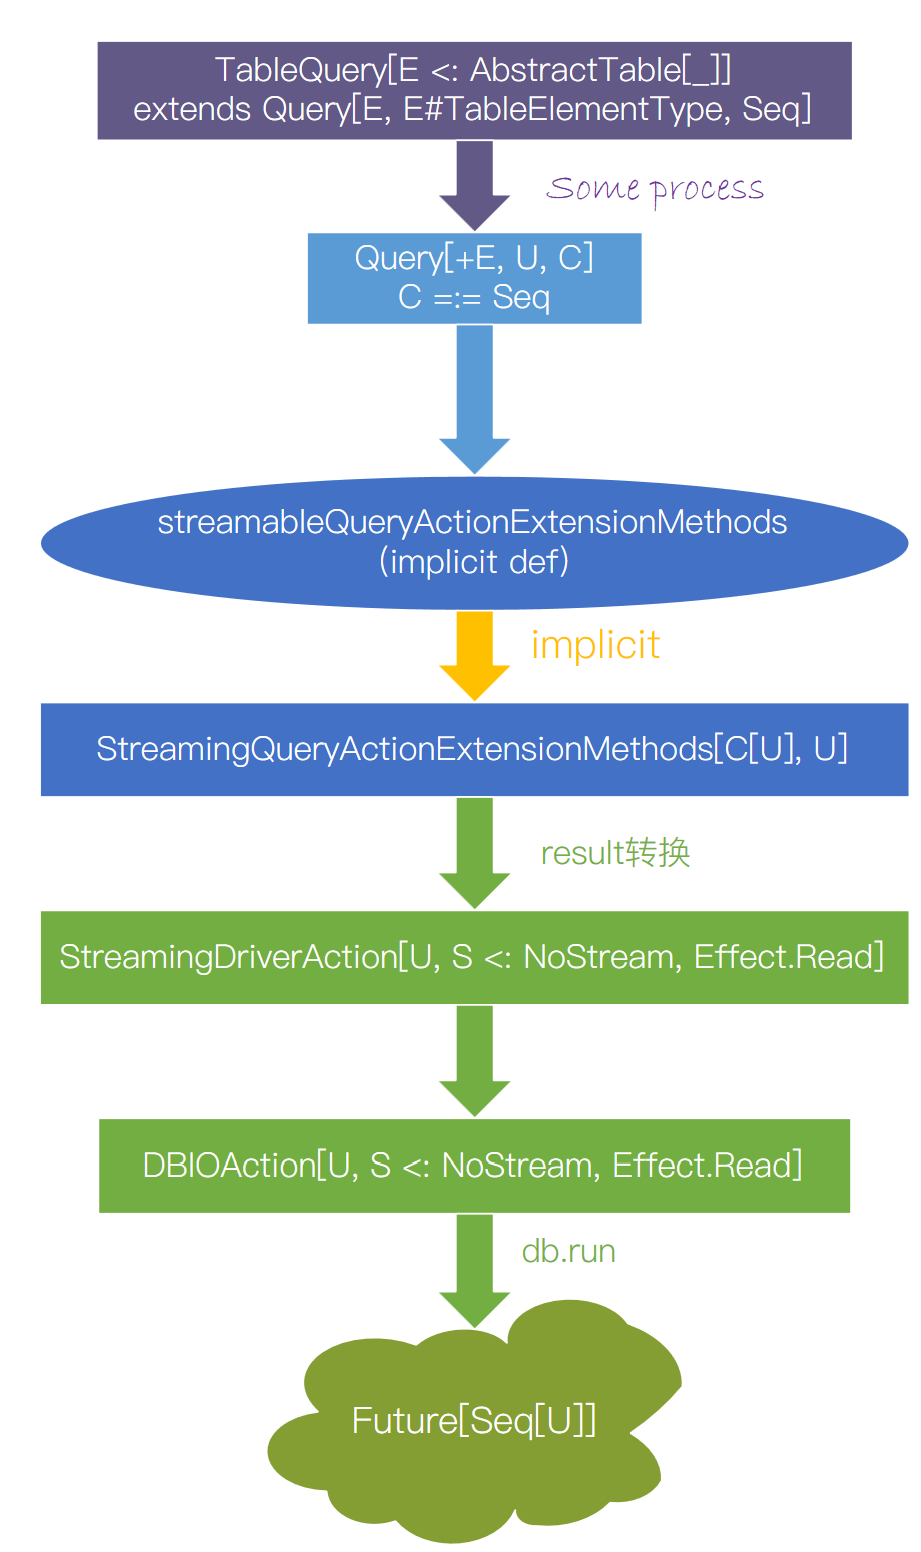
到此为止,我们终于搞明白了一个数据库查询过程中从Query经过implicit的result转换成DBIOAction,再进行db.run得到Future异步结果的类型转换的过程。我做了一张图来总结这个过程:

Slick Query Type Process

Slick 3 总结 | Functional Relational Mapping

不同于平常的ORM框架,Slick提供了一种函数响应式操作数据库的方式:Functional Relational Mapping。这种函数响应式的操作方式允许我们将数据库的每一个表都看作是一个 集合,对数据库的CRUD操作可以转化为对这些“集合”的操作,因此我们可以充分利用各种Monadic的算子而不需要自己编写SQL(当然,需要保证Slick解析的SQL性能好)。并且,Slick是以 异步 的方式操作数据库,返回Future,这有助于我们编写异步响应式的程序,比MyBatis等等的同步阻塞ORM框架之流好很多。这里我们就来总结一下Slick中Functional Relational Mapping的使用以及与SQL语句的对应关系(MySQL语法)。后面有时间的话,我还会总结一下Slick中FRM的实现原理。

Functional Relational Mapping ⇔ SQL

首先我们需要自己定义对应的映射Table,当然也可以用Generator生成。假设有以下两个表:

1
2
3
4
5
6
7
8
9
10
11
12
13
14
15
16
17
18
19
20
CREATE TABLE `article` (
`id` int(11) NOT NULL AUTO_INCREMENT,
`title` varchar(85) NOT NULL,
`author` varchar(45) NOT NULL,
`url` varchar(150) NOT NULL,
`cid` int(11) NOT NULL,
`update_date` date NOT NULL,
PRIMARY KEY (`id`),
KEY `index_title` (`title`),
KEY `index_cid` (`cid`)
) ENGINE=InnoDB DEFAULT CHARSET=utf8
CREATE TABLE `category` (
`cid` int(11) NOT NULL AUTO_INCREMENT,
`name` varchar(45) NOT NULL,
`abbr` varchar(45) NOT NULL,
PRIMARY KEY (`cid`),
UNIQUE KEY `name_UNIQUE` (`name`),
UNIQUE KEY `abbr_UNIQUE` (`abbr`)
) ENGINE=InnoDB DEFAULT CHARSET=utf8

它们对应的Table可以简化成下面的两个类:

1
2
3
4
5
6
7
8
9
10
11
12
13
14
15
16
17
18
19
20
21
22
23
24
25
26
27
28
29
30
31
32
33
class ArticleTable(tag: Tag) extends Table[Article](tag, "article") {
override def * = (id, title, author, url, cid, updateDate) <> (entity.Article.tupled, entity.Article.unapply) // 投影关系
val id: Rep[Int] = column[Int]("id", O.AutoInc, O.PrimaryKey)
val title: Rep[String] = column[String]("title", O.Length(85, varying = true))
val author: Rep[String] = column[String]("author", O.Length(45, varying = true))
val url: Rep[String] = column[String]("url", O.Length(150, varying = true))
val cid: Rep[Int] = column[Int]("cid")
val updateDate: Rep[java.sql.Date] = column[java.sql.Date]("update_date")
val index1 = index("index_cid", cid)
val index2 = index("index_title", title)
}
class CategoryTable(tag: Tag) extends Table[Category](tag, "category") {
override def * = (cid, name, abbr) <> (entity.Category.tupled, entity.Category.unapply)
val cid: Rep[Int] = column[Int]("cid", O.AutoInc, O.PrimaryKey)
val name: Rep[String] = column[String]("name", O.Length(45, varying = true))
val abbr: Rep[String] = column[String]("abbr", O.Length(45, varying = true))
val index1 = index("abbr_UNIQUE", abbr, unique=true)
val index2 = index("name_UNIQUE", name, unique=true)
}

接着我们就可以定义这两个表对应的Slick TableQuery集合:

1
2
val articles = TableQuery[ArticleTable]
val categories = TableQuery[CategoryTable]

下面我们就可以对这两个“集合”进行操作了~

SELECT

普通的SELECT语句非常简单,比如SELECT * FROM article对应articles.result,即article表中所有的数据。

如果要选择的话可以用map算子映射出对应的投影。

WHERE

含WHERE的SQL:

1
SELECT title, url FROM article WHERE id = 10

WHERE通过filter算子实现,对应FRM:

1
2
3
articles.map(x => (x.title, x.url))
.filter(_.id === 10)
.result

ORDER BY

1
SELECT * FROM article ORDER BY id DESC

ORDER BY通过sortBy算子实现:

1
articles.sortBy(_.id.desc).result

LIMIT(分页)

1
SELECT * FROM article LIMIT 10000, 10

LIMIT通过take算子和drop算子实现。drop(offset)表示忽略前offset条记录,take(n)代表取n条记录。对应FRM:

1
articles.drop(10000).take(10).result

聚合函数

使用各种聚合函数也非常方便:

1
2
3
articles.map(_.id).max.result
articles.map(_.id).min.result
articles.map(_.id).avg.result

JOIN

Slick中的连接操作分为Applicative Join和Monadic Join两种。Monadic Join,顾名思义就是用Monad的思想去进行JOIN操作(通过flatMap算子)。

Applicative Join

Applicative Join通过joinon来进行JOIN操作。

内连接的例子:

1
2
3
4
SELECT a.*, c.name
FROM article AS a
INNER JOIN category as c
ON a.cid = c.cid

对应Applicative Join:

1
2
3
val innerJoin = for {
(a, c) <- articles join categories on (_.cid === _.cid)
} yield (a, c.name)

左外连接和右外连接也差不多,只不过外连接可能带来NULL项,因此对应的可能出现NULL的位置被包装为Option,例:

1
2
3
val leftOuterJoin = for {
(a, c) <- articles joinLeft categories on (_.cid === _.cid)
} yield (a, c.map(_.name))

Monadic Join

Monadic Join通过flatMap来进行JOIN操作,这里只举一个内连接的例子:

1
2
3
4
val monadicInnerJoin = for {
a <- articles
c <- categories if c.cid === a.cid
} yield (a, c.name)

注意它会被转化成implicit join(SELECT ... FROM a, b WHERE ...)的形式(貌似是Slick的规则):

1
2
3
SELECT a.*, c.name
FROM article AS a, category AS c
WHERE a.cid = c.cid

UNION

UNION操作比较简单,直接q1 union q2即可。

COUNT

若需要计算COUNT值,直接使用length算子:articles.filter(_.id > 100).length.result

FRM的实现原理

Slick实现Functional Relational Mapping的方式比较强悍。粗略地看了下代码,Slick底层应该是将每个Action逐层解析后转化为AST,然后转化为对应的SQL并执行的。后边有时间详细了解一下。。(待填坑!)