本文章是 Vert.x 蓝图系列 的第二篇教程。全系列:
前言 欢迎回到Vert.x 蓝图系列~在本教程中,我们将利用Vert.x开发一个基于消息的应用 - Vert.x Kue,它是一个使用Vert.x开发的优先级工作队列,数据存储使用的是 Redis 。Vert.x Kue是Automattic/kue 的Vert.x实现版本。我们可以使用Vert.x Kue来处理各种各样的任务,比如文件转换、订单处理等等。
通过本教程,你将会学习到以下内容:
消息、消息系统以及事件驱动的运用
Vert.x Event Bus 的几种事件机制(发布/订阅、点对点模式)
设计 分布式 的Vert.x应用
工作队列的设计
Vert.x Service Proxy (服务代理)的运用更深层次的Redis运用
本教程是 Vert.x 蓝图系列 的第二篇教程,对应的Vert.x版本为 3.3.3 。本教程中的完整代码已托管至GitHub 。
Vert.x的消息系统 既然我们要用Vert.x开发一个基于消息的应用,那么我们先来瞅一瞅Vert.x的消息系统吧~在Vert.x中,我们可以通过 Event Bus 来发送和接收各种各样的消息,这些消息可以来自不同的Vertx实例。怎么样,很酷吧?我们都将消息发送至Event Bus上的某个地址 上,这个地址可以是任意的字符串。
Event Bus支持三种消息机制:发布/订阅 (Publish/Subscribe)、点对点 (Point to point)以及请求/回应 (Request-Response)模式。下面我们就来看一看这几种机制。
发布/订阅模式 在发布/订阅模式 中,消息被发布到Event Bus的某一个地址上,所有订阅此地址的Handler都会接收到该消息并且调用相应的处理逻辑。我们来看一看示例代码:
1
2
3
4
5
6
7
8
9
10
EventBus eventBus = vertx.eventBus();
eventBus.consumer("foo.bar.baz" , r -> {
System.out.println("1: " + r.body());
});
eventBus.consumer("foo.bar.baz" , r -> {
System.out.println("2: " + r.body());
});
eventBus.publish("foo.bar.baz" , "+1s" );
我们可以通过vertx.eventBus()方法获取EventBus的引用,然后我们就可以通过consume方法订阅某个地址的消息并且绑定一个Handler。接着我们通过publish向此地址发送消息。如果运行上面的例子,我们会得到一下结果:
点对点模式 如果我们把上面的示例中的publish方法替代成send方法,上面的实例就变成点对点模式 了。在点对点模式中,消息被发布到Event Bus的某一个地址上。Vert.x会将此消息传递给其中监听此地址的Handler之一。如果有多个Handler绑定到此地址,那么就使用轮询算法随机挑一个Handler传递消息。比如在此示例中,程序只会打印2: +1s或者1: +1s之中的一个。
请求/回应模式 当我们绑定的Handler接收到消息的时候,我们可不可以给消息的发送者回复呢?当然了!当我们通过send方法发送消息的时候,我们可以同时指定一个回复处理函数(reply handler)。然后当某个消息的订阅者接收到消息的时候,它就可以给发送者回复消息;如果发送者接收到了回复,发送者绑定的回复处理函数就会被调用。这就是请求/回应模式 。
好啦,现在我们已经粗略了解了Vert.x中的消息系统 - Event Bus的基本使用,下面我们就看看Vert.x Kue的基本设计。有关更多关于Event Bus的信息请参考Vert.x Core Manual - Event Bus 。
Vert.x Kue 架构设计 Vert.x Kue 组件划分 在我们的项目中,我们将Vert.x Kue划分为两个模块:
kue-core: 核心组件,提供优先级队列的功能kue-http: Web组件,提供Web UI以及REST API
另外我们还提供一个示例模块kue-example用于演示以及阐述如何使用Vert.x Kue。
既然我们的项目有两个模块,那么你一定会好奇:两个模块之间是如何进行通信的?并且如果我们写自己的Kue应用的话,我们该怎样去调用Kue Core中的服务呢?不要着急,谜底将在后边的章节中揭晓:-)
Vert.x Kue 核心模块 回顾一下Vert.x Kue的作用 - 优先级工作队列,所以在Vert.x Kue的核心模块中我们设计了以下的类:
Job - 任务(作业)数据实体JobService - 异步服务接口,提供操作任务以及获取数据的相关逻辑KueWorker - 用于处理任务的VerticleKue - 工作队列
前边我们提到过,我们的两个组件之间需要一种通信机制可以互相通信 - 这里我们使用Vert.x的集群模式 ,即以clustered的模式来部署Verticle。这样的环境下的Event Bus同样也是集群模式的,因此各个组件可以通过集群模式下的Event Bus进行通信。很不错吧?在Vert.x的集群模式下,我们需要指定一个集群管理器ClusterManager。这里我们使用默认的HazelcastClusterManager,使用Hazelcast 作为集群管理。
在Vert.x Kue中,我们将JobService服务发布至分布式的Event Bus上,这样其它的组件就可以通过Event Bus调用该服务了。我们设计了一个KueVerticle用于注册服务。Vert.x提供了Vert.x Service Proxy(服务代理组件),可以很方便地将服务注册至Event Bus上,然后在其它地方获取此服务的代理并调用。我们将在下面的章节中详细介绍Vert.x Service Proxy 。
基于Future的异步模式 在我们的Vert.x Kue中,大多数的异步方法都是基于Future的。如果您看过蓝图系列的第一篇文章的话,您一定不会对这种模式很陌生。在Vert.x 3.3.2中,我们的Future支持基本的响应式的操作,比如map和compose。它们用起来非常方便,因为我们可以将多个Future以响应式的方式组合起来而不用担心陷入回调地狱中。
Vert.x Kue中的事件 正如我们在Vert.x Kue 特性介绍 中提到的那样,Vert.x Kue支持两种级别的事件:任务事件(job events) 以及 队列事件(queue events) 。在Vert.x Kue中,我们设计了三种事件地址:
vertx.kue.handler.job.{handlerType}.{addressId}.{jobType}: 某个特定任务的任务事件地址vertx.kue.handler.workers.{eventType}: (全局)队列事件地址vertx.kue.handler.workers.{eventType}.{addressId}: 某个特定任务的内部事件地址
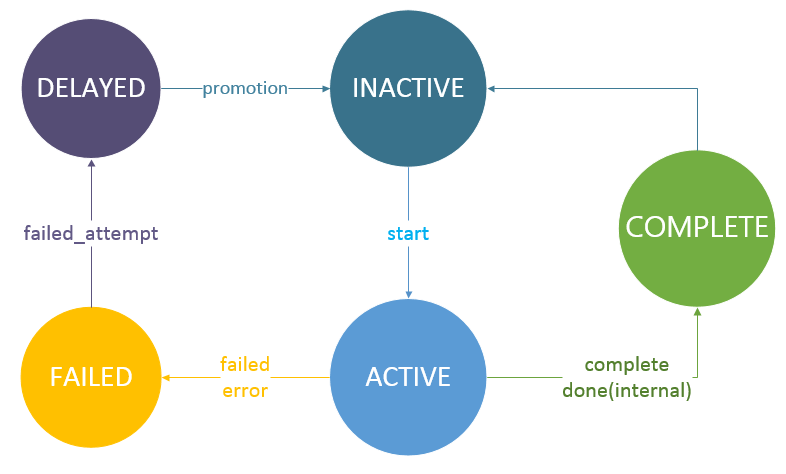
在特性介绍文档 中,我们提到了以下几种任务事件:
start 开始处理一个任务 (onStart)promotion 一个延期的任务时间已到,提升至工作队列中 (onPromotion)progress 任务的进度变化 (onProgress)failed_attempt 任务处理失败,但是还可以重试 (onFailureAttempt)failed 任务处理失败并且不能重试 (onFailure)complete 任务完成 (onComplete)remove 任务从后端存储中移除 (onRemove)
队列事件也相似,只不过需要加前缀job_。这些事件都会通过send方法发送至Event Bus上。每一个任务都有对应的任务事件地址,因此它们能够正确地接收到对应的事件并进行相应的处理逻辑。
特别地,我们还有两个内部事件:done和done_fail。done事件对应一个任务在底层的处理已经完成,而done_fail事件对应一个任务在底层的处理失败。这两个事件使用第三种地址进行传递。
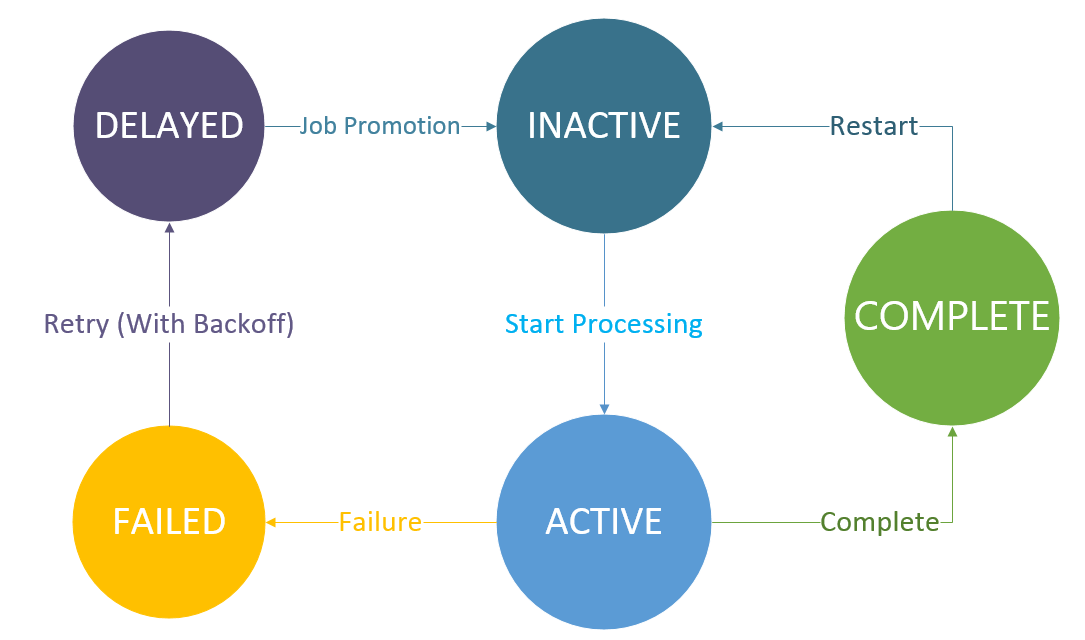
任务状态 在Vert.x Kue中,任务共有五种状态:
INACTIVE: 任务还未开始处理,在工作队列中等待处理ACTIVE: 任务正在处理中COMPLETE: 任务处理完成FAILED: 任务处理失败DELAYED: 任务延时处理,正在等待计时器时间到并提升至工作队列中
我们使用状态图来描述任务状态的变化:
以及任务状态的变化伴随的事件:
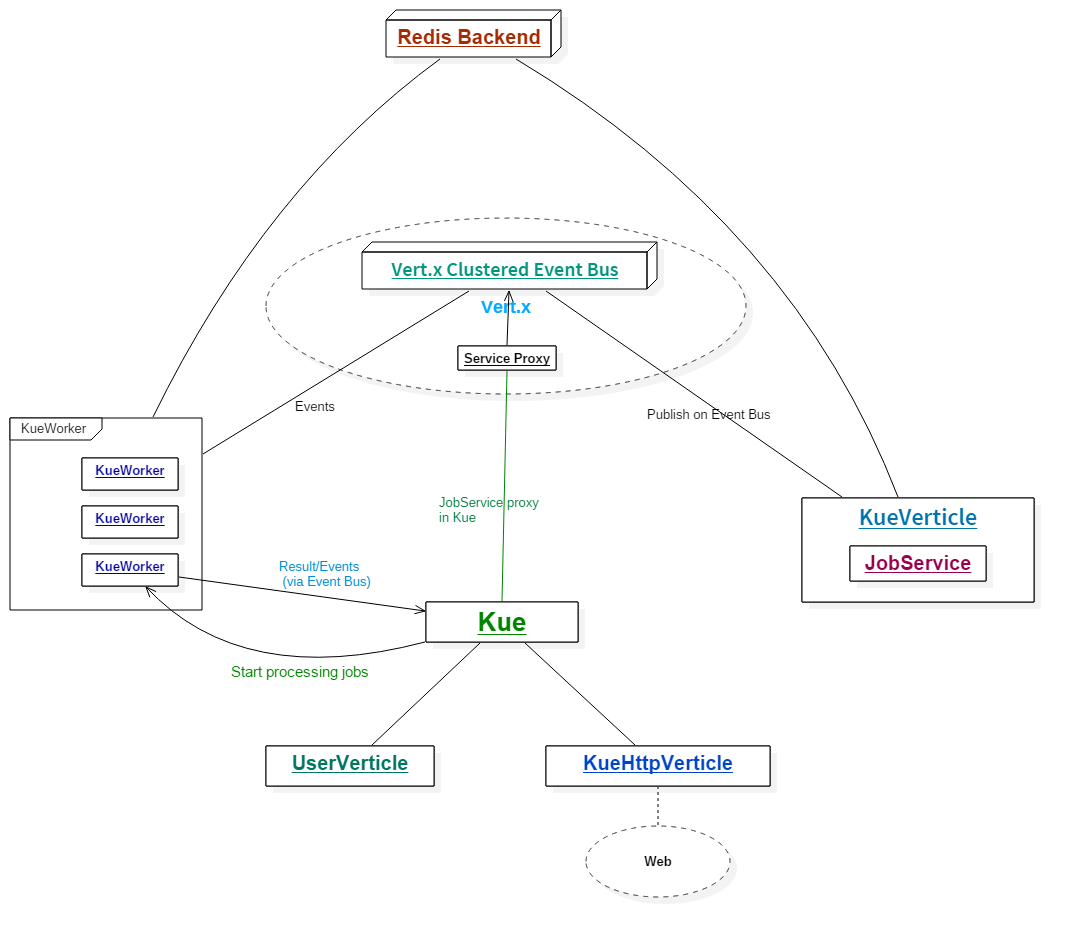
整体设计 为了让大家对Vert.x Kue的架构有大致的了解,我用一幅图来简略描述整个Vert.x Kue的设计:
现在我们对Vert.x Kue的设计有了大致的了解了,下面我们就来看一看Vert.x Kue的代码实现了~
项目结构 我们来开始探索Vert.x Kue的旅程吧!首先我们先从GitHub上clone源代码:
git clone https:
然后你可以把项目作为Gradle项目导入你的IDE中。(如何导入请参考相关IDE帮助文档)
正如我们之前所提到的,我们的Vert.x Kue中有两个功能模块和一个实例模块,因此我们需要在Gradle工程文件中定义三个子工程。我们来看一下本项目中的build.gradle文件:
1
2
3
4
5
6
7
8
9
10
11
12
13
14
15
16
17
18
19
20
21
22
23
24
25
26
27
28
29
30
31
32
33
34
35
36
37
38
39
40
41
42
43
44
45
46
47
48
49
50
51
52
53
54
55
56
57
58
59
60
61
62
63
64
65
66
67
68
69
70
71
72
73
74
75
76
77
78
79
80
81
82
83
84
85
86
87
88
89
90
91
92
93
94
95
96
97
98
99
100
101
102
103
104
105
106
107
108
109
configure(allprojects ) { project ->
ext {
vertxVersion = "3.3.2"
}
apply plugin: 'java'
repositories {
jcenter()
}
dependencies {
compile ("io.vertx:vertx-core:${vertxVersion}" )
compile ("io.vertx:vertx-codegen:${vertxVersion}" )
compile ("io.vertx:vertx-rx-java:${vertxVersion}" )
compile ("io.vertx:vertx-hazelcast:${vertxVersion}" )
compile ("io.vertx:vertx-lang-ruby:${vertxVersion}" )
testCompile("io.vertx:vertx-unit:${vertxVersion}" )
testCompile group : 'junit' , name: 'junit' , version: '4.12'
}
sourceSets {
main {
java {
srcDirs += 'src/main/generated'
}
}
}
compileJava {
targetCompatibility = 1.8
sourceCompatibility = 1.8
}
}
project ("kue-core" ) {
dependencies {
compile ("io.vertx:vertx-redis-client:${vertxVersion}" )
compile ("io.vertx:vertx-service-proxy:${vertxVersion}" )
}
jar {
archiveName = 'vertx-blueprint-kue-core.jar'
from { configurations .compile .collect { it.isDirectory() ? it : zipTree(it) } }
manifest {
attributes 'Main-Class' : 'io.vertx.core.Launcher'
attributes 'Main-Verticle' : 'io.vertx.blueprint.kue.queue.KueVerticle'
}
}
task annotationProcessing(type: JavaCompile, group : 'build' ) {
source = sourceSets .main.java
classpath = configurations .compile
destinationDir = project .file ('src/main/generated' )
options .compilerArgs = [
"-proc:only" ,
"-processor" , "io.vertx.codegen.CodeGenProcessor" ,
"-AoutputDirectory=${project.projectDir}/src/main"
]
}
compileJava {
targetCompatibility = 1.8
sourceCompatibility = 1.8
dependsOn annotationProcessing
}
}
project ("kue-http" ) {
dependencies {
compile (project (":kue-core" ))
compile ("io.vertx:vertx-web:${vertxVersion}" )
compile ("io.vertx:vertx-web-templ-jade:${vertxVersion}" )
}
jar {
archiveName = 'vertx-blueprint-kue-http.jar'
from { configurations .compile .collect { it.isDirectory() ? it : zipTree(it) } }
manifest {
attributes 'Main-Class' : 'io.vertx.core.Launcher'
attributes 'Main-Verticle' : 'io.vertx.blueprint.kue.http.KueHttpVerticle'
}
}
}
project ("kue-example" ) {
dependencies {
compile (project (":kue-core" ))
}
jar {
archiveName = 'vertx-blueprint-kue-example.jar'
from { configurations .compile .collect { it.isDirectory() ? it : zipTree(it) } }
manifest {
attributes 'Main-Class' : 'io.vertx.core.Launcher'
attributes 'Main-Verticle' : 'io.vertx.blueprint.kue.example.LearningVertxVerticle'
}
}
}
task wrapper(type: Wrapper) {
gradleVersion = '2.12'
}
(⊙o⊙)…比之前的待办事项服务项目中的长不少诶。。。我们来解释一下:
在configure(allprojects)作用域中,我们配置了一些全局信息(对所有子工程都适用)。
我们定义了三个子工程:kue-core、kue-http以及kue-example。这里我们来解释一下里面用到的依赖。在kue-core中,vertx-redis-client用于Redis通信,vertx-service-proxy用于Event Bus上的服务代理。在kue-http中,我们将kue-core子工程作为它的一个依赖。vertx-web和vertx-web-templ-jade用于Kue Web端的开发。
任务annotationProcessing用于注解处理(Vert.x Codegen)。我们已经在上一篇教程中介绍过了,这里就不展开讲了。
我们还需要在 settings.gradle 中配置工程:
1
2
3
4
5
rootProject.name = 'vertx-blueprint-job-queue'
include "kue-core"
include "kue-http"
include "kue-example"
看完了配置文件以后,我们再来浏览一下我们的项目目录结构:
1
2
3
4
5
6
7
8
9
10
11
12
13
14
15
16
17
18
19
20
21
22
23
24
25
26
27
.
├── build.gradle
├── kue-core
│ └── src
│ ├── main
│ │ ├── java
│ │ └── resources
│ └── test
│ ├── java
│ └── resources
├── kue-example
│ └── src
│ ├── main
│ │ ├── java
│ │ └── resources
│ └── test
│ ├── java
│ └── resources
├── kue-http
│ └── src
│ ├── main
│ │ ├── java
│ │ └── resources
│ └── test
│ ├── java
│ └── resources
└── settings.gradle
在Gradle中,项目的源码都位于{projectName}/src/main/java目录内。这篇教程是围绕Vert.x Kue Core的,所以我们的代码都在kue-core目录中。
好啦!现在我们已经对Vert.x Kue项目的整体结构有了大致的了解了,下面我们开始源码探索之旅!
任务实体 - 不仅仅是一个数据对象 Vert.x Kue是用来处理任务的,因此我们先来看一下代表任务实体的Job类。Job类位于io.vertx.blueprint.kue.queue包下。代码可能有点长,不要担心,我们把它分成几部分,分别来解析。
任务成员属性 我们先来看一下Job类中的成员属性:
1
2
3
4
5
6
7
8
9
10
11
12
13
14
15
16
17
18
19
20
21
22
23
24
25
26
27
28
29
30
31
32
@DataObject (generateConverter = true )
public class Job
private final String address_id;
private long id = -1 ;
private String zid;
private String type;
private JsonObject data;
private Priority priority = Priority.NORMAL;
private JobState state = JobState.INACTIVE;
private long delay = 0 ;
private int max_attempts = 1 ;
private boolean removeOnComplete = false ;
private int ttl = 0 ;
private JsonObject backoff;
private int attempts = 0 ;
private int progress = 0 ;
private JsonObject result;
private long created_at;
private long promote_at;
private long updated_at;
private long failed_at;
private long started_at;
private long duration;
}
我去。。。好多属性!我们一个一个地解释:
address_id: 一个UUID序列,作为Event Bus的地址id: 任务的编号(id)type: 任务的类型data: 任务携带的数据,以 JsonObject 类型表示priority: 任务优先级,以 Priority 枚举类型表示。默认优先级为正常(NORMAL)delay: 任务的延迟时间,默认是 0 state: 任务状态,以 JobState 枚举类型表示。默认状态为等待(INACTIVE)attempts: 任务已经尝试执行的次数max_attempts: 任务尝试执行次数的最大阈值removeOnComplete: 代表任务完成时是否自动从后台移除zid: zset操作对应的编号(zid),保持先进先出顺序ttl: TTL(Time to live)backoff: 任务重试配置,以 JsonObject 类型表示progress: 任务执行的进度result: 任务执行的结果,以 JsonObject 类型表示
还有这些统计数据:
created_at: 代表此任务创建的时间promote_at: 代表此任务从延时状态被提升至等待状态时的时间updated_at: 代表任务更新的时间failed_at: 代表任务失败的时间started_at: 代表任务开始的时间duration: 代表处理任务花费的时间,单位为毫秒(ms)
你可能注意到在 Job 类中还存在着几个静态成员变量:
1
2
3
4
5
6
7
8
9
10
11
private static Logger logger = LoggerFactory.getLogger(Job.class);
private static Vertx vertx;
private static RedisClient client;
private static EventBus eventBus;
public static void setVertx (Vertx v, RedisClient redisClient)
vertx = v;
client = redisClient;
eventBus = vertx.eventBus();
}
对于 logger 对象,我想大家应该都很熟悉,它代表一个Vert.x Logger实例用于日志记录。但是你一定想问为什么 Job 类中存在着一个Vertx类型的静态成员。Job类不应该是一个数据对象吗?当然咯!Job类代表一个数据对象,但不仅仅 是一个数据对象。这里我模仿了一些Automattic/kue的风格,把一些任务相关逻辑方法放到了Job类里,它们大多都是基于Future的异步方法,因此可以很方便地去调用以及进行组合变换。比如:
1
2
3
job.save()
.compose(Job::updateNow)
.compose(j -> j.log("good!" ));
由于我们不能在Job类被JVM加载的时候就获取Vertx实例,我们必须手动给Job类中的静态Vertx成员赋值。这里我们是在Kue类中对其进行赋值的。当我们创建一个工作队列的时候,Job类中的静态成员变量会被初始化。同时为了保证程序的正确性,我们需要一个方法来检测静态成员变量是否初始化。当我们在创建一个任务的时候,如果静态成员此时未被初始化,那么日志会给出警告:
1
2
3
4
5
private void _checkStatic ()
if (vertx == null ) {
logger.warn("static Vertx instance in Job class is not initialized!" );
}
}
我们还注意到 Job 类也是由@DataObject注解修饰的。Vert.x Codegen可以处理含有@DataObject注解的类并生成对应的JSON转换器,并且Vert.x Service Proxy也需要数据对象。
在Job类中我们有四个构造函数。其中address_id成员必须在一个任务被创建时就被赋值,默认情况下此地址用一个唯一的UUID字符串表示。每一个构造函数中我们都要调用_checkStatic函数来检测静态成员变量是否被初始化。
任务事件辅助函数 正如我们之前所提到的那样,我们通过一个特定的地址vertx.kue.handler.job.{handlerType}.{addressId}.{jobType}在分布式的Event Bus上发送和接收任务事件(job events)。所以我们提供了两个用于发送和接收事件的辅助函数emit和on(类似于Node.js中的EventEmitter):
1
2
3
4
5
6
7
8
9
10
11
12
13
@Fluent
public <T> Job on (String event, Handler<Message<T>> handler) {
logger.debug("[LOG] On: " + Kue.getCertainJobAddress(event, this ));
eventBus.consumer(Kue.getCertainJobAddress(event, this ), handler);
return this ;
}
@Fluent
public Job emit (String event, Object msg)
logger.debug("[LOG] Emit: " + Kue.getCertainJobAddress(event, this ));
eventBus.send(Kue.getCertainJobAddress(event, this ), msg);
return this ;
}
在后面的代码中,我们将频繁使用这两个辅助函数。
Redis中的存储形式 在我们探索相关的逻辑函数之前,我们先来描述一下Vert.x Kue的数据在Redis中是以什么样的形式存储的:
所有的key都在vertx_kue命名空间下(以vertx_kue:作为前缀)
vertx:kue:job:{id}: 存储任务实体的mapvertx:kue:ids: 计数器,指示当前最大的任务IDvertx:kue:job:types: 存储所有任务类型的列表vertx:kue:{type}:jobs: 指示所有等待状态下的某种类型任务的列表vertx_kue:jobs: 存储所有任务zid的有序集合vertx_kue:job:{state}: 存储所有指定状态的任务zid的有序集合vertx_kue:jobs:{type}:{state}: 存储所有指定状态和类型的任务zid的有序集合vertx:kue:job:{id}:log: 存储指定id的任务对应日志的列表
OK,下面我们就来看看Job类中重要的逻辑函数。
改变任务状态 我们之前提到过,Vert.x Kue中的任务一共有五种状态。所有的任务相关的操作都伴随着任务状态的变换,因此我们先来看一下state方法的实现,它用于改变任务的状态:
1
2
3
4
5
6
7
8
9
10
11
12
13
14
15
16
17
18
19
20
21
22
23
24
25
26
27
28
29
30
31
32
33
34
35
36
37
38
39
40
41
42
43
44
45
46
public Future<Job> state (JobState newState)
Future<Job> future = Future.future();
RedisClient client = RedisHelper.client(vertx, new JsonObject());
JobState oldState = this .state;
client.transaction().multi(r0 -> {
if (r0.succeeded()) {
if (oldState != null && !oldState.equals(newState)) {
client.transaction().zrem(RedisHelper.getStateKey(oldState), this .zid, _failure())
.zrem(RedisHelper.getKey("jobs:" + this .type + ":" + oldState.name()), this .zid, _failure());
}
client.transaction().hset(RedisHelper.getKey("job:" + this .id), "state" , newState.name(), _failure())
.zadd(RedisHelper.getKey("jobs:" + newState.name()), this .priority.getValue(), this .zid, _failure())
.zadd(RedisHelper.getKey("jobs:" + this .type + ":" + newState.name()), this .priority.getValue(), this .zid, _failure());
switch (newState) {
case ACTIVE:
client.transaction().zadd(RedisHelper.getKey("jobs:" + newState.name()),
this .priority.getValue() < 0 ? this .priority.getValue() : -this .priority.getValue(),
this .zid, _failure());
break ;
case DELAYED:
client.transaction().zadd(RedisHelper.getKey("jobs:" + newState.name()),
this .promote_at, this .zid, _failure());
break ;
case INACTIVE:
client.transaction().lpush(RedisHelper.getKey(this .type + ":jobs" ), "1" , _failure());
break ;
default :
}
this .state = newState;
client.transaction().exec(r -> {
if (r.succeeded()) {
future.complete(this );
} else {
future.fail(r.cause());
}
});
} else {
future.fail(r0.cause());
}
});
return future.compose(Job::updateNow);
}
首先我们先创建了一个Future对象。然后我们调用了 client.transaction().multi(handler) 函数开始一次Redis事务 (1)。在Vert.x 3.3.2中,所有的Redis事务操作都移至RedisTransaction类中,所以我们需要先调用client.transaction()方法去获取一个事务实例,然后调用multi代表事务块的开始。
在multi函数传入的Handler中,我们先判定当前的任务状态。如果当前任务状态不为空并且不等于新的任务状态,我们就将Redis中存储的旧的状态信息移除 (2)。为了方便起见,我们提供了一个RedisHelper辅助类,里面提供了一些生成特定地址以及编码解码zid的方法:
1
2
3
4
5
6
7
8
9
10
11
12
13
14
15
16
17
18
19
20
21
22
23
24
25
26
27
28
29
30
31
32
33
34
35
36
37
38
39
40
41
42
43
44
45
46
47
48
49
50
package io.vertx.blueprint.kue.util;
import io.vertx.blueprint.kue.queue.JobState;
import io.vertx.core.Vertx;
import io.vertx.core.json.JsonObject;
import io.vertx.redis.RedisClient;
import io.vertx.redis.RedisOptions;
public final class RedisHelper
private static final String VERTX_KUE_REDIS_PREFIX = "vertx_kue" ;
private RedisHelper ()
}
public static RedisClient client (Vertx vertx, JsonObject config)
return RedisClient.create(vertx, options(config));
}
public static RedisOptions options (JsonObject config)
return new RedisOptions()
.setHost(config.getString("redis.host" , "127.0.0.1" ))
.setPort(config.getInteger("redis.port" , 6379 ));
}
public static String getKey (String key)
return VERTX_KUE_REDIS_PREFIX + ":" + key;
}
public static String getStateKey (JobState state)
return VERTX_KUE_REDIS_PREFIX + ":jobs:" + state.name();
}
public static String createFIFO (long id)
String idLen = "" + ("" + id).length();
int len = 2 - idLen.length();
while (len-- > 0 )
idLen = "0" + idLen;
return idLen + "|" + id;
}
public static String stripFIFO (String zid)
return zid.substring(zid.indexOf('|' ) + 1 );
}
public static long numStripFIFO (String zid)
return Long.parseLong(zid.substring(zid.indexOf('|' ) + 1 ));
}
}
所有的key都必须在vertx_kue命名空间下,因此我们封装了一个getKey方法。我们还实现了createFIFO和stripFIFO方法用于生成zid以及解码zid。zid的格式使用了Automattic/Kue中的格式。
回到state方法来。我们使用zrem(String key, String member, Handler<AsyncResult<String>> handler)方法将特定的数据从有序集合中移除。两个key分别是vertx_kue:job:{state} 以及 vertx_kue:jobs:{type}:{state};member对应着任务的zid。
接下来我们使用hset方法来变更新的状态 (3),然后用zadd方法往vertx_kue:job:{state} 和 vertx_kue:jobs:{type}:{state}两个有序集合中添加此任务的zid,同时传递一个权重 (score)。这个非常重要,我们就是通过这个实现优先级 队列的。我们直接使用priority对应的值作为score。这样,当我们需要从Redis中获取任务的时候,我们就可以通过zpop方法获取优先级最高的任务。我们会在后面详细讲述。
不同的新状态需要不同的操作。对于ACTIVE状态,我们通过zadd命令将zid添加至vertx_kue:jobs:ACTIVE有序集合中并赋予优先级权值 (4)。对于DELAYED状态,我们通过zadd命令将zid添加至vertx_kue:jobs:DELAYED有序集合中并赋予提升时间(promote_at)权值 (5)。对于INACTIVE状态,我们向vertx:kue:{type}:jobs列表中添加一个元素 (6)。这些操作都是在Redis事务块内完成的。最后我们通过exec方法一并执行这些事务操作 (7)。如果执行成功,我们给future赋值(当前任务)。最后我们返回future并且与updateNow方法相组合。
updateNow方法非常简单,就是把updated_at的值设为当前时间,然后存到Redis中:
1
2
3
4
Future<Job> updateNow () {
this .updated_at = System.currentTimeMillis();
return this .set("updated_at" , String.valueOf(updated_at));
}
保存任务 这里我们来看一下整个Job类中最重要的方法之一 - save方法,它的作用是保存任务至Redis中。
1
2
3
4
5
6
7
8
9
10
11
12
13
14
15
16
17
18
19
20
21
22
23
24
25
26
27
28
29
30
31
32
public Future<Job> save ()
Objects.requireNonNull(this .type, "Job type cannot be null" );
if (this .id > 0 )
return update();
Future<Job> future = Future.future();
client.incr(RedisHelper.getKey("ids" ), res -> {
if (res.succeeded()) {
this .id = res.result();
this .zid = RedisHelper.createFIFO(id);
String key = RedisHelper.getKey("job:" + this .id);
if (this .delay > 0 ) {
this .state = JobState.DELAYED;
}
client.sadd(RedisHelper.getKey("job:types" ), this .type, _failure());
this .created_at = System.currentTimeMillis();
this .promote_at = this .created_at + this .delay;
client.hmset(key, this .toJson(), _completer(future, this ));
} else {
future.fail(res.cause());
}
});
return future.compose(Job::update);
}
首先,任务类型不能为空所以我们要检查type是否为空 (1)。接着,如果当前任务的id大于0,则代表此任务已经存储过(因为id是存储时分配),此时只需执行更新操作(update)即可 (2)。然后我们创建一个Future对象,然后使用incr方法从vertx_kue:ids字段获取一个新的id (3)。同时我们使用RedisHelper.createFIFO(id)方法来生成新的zid (4)。接着我们来判断任务延时是否大于0,若大于0则将当前任务状态设置为DELAYED。然后我们通过sadd方法将当前任务类型添加至vertx:kue:job:types列表中 (5) 并且保存任务创建时间(created_at)以及任务提升时间(promote_at)。经过这一系列的操作后,所有的属性都已准备好,所以我们可以利用hmset方法将此任务实体存储至vertx:kue:job:{id}哈希表中 (6)。如果存储操作成功,那么将当前任务实体赋给future,否则记录错误。最后我们返回此future并且将其与update方法进行组合。
update方法进行一些更新操作,它的逻辑比较简单:
1
2
3
4
5
6
7
8
9
10
11
12
Future<Job> update () {
Future<Job> future = Future.future();
this .updated_at = System.currentTimeMillis();
client.transaction().multi(_failure())
.hset(RedisHelper.getKey("job:" + this .id), "updated_at" , String.valueOf(this .updated_at), _failure())
.zadd(RedisHelper.getKey("jobs" ), this .priority.getValue(), this .zid, _failure())
.exec(_completer(future, this ));
return future.compose(r ->
this .state(this .state));
}
可以看到update方法只做了三件微小的工作:存储任务更新时间、存储zid以及更改当前任务状态(组合state方法)。
最后总结一下将一个任务存储到Redis中经过的步骤:save -> update -> state :-)
移除任务 移除任务非常简单,借助zrem和del方法即可。我们来看一下其实现:
1
2
3
4
5
6
7
8
9
10
11
12
13
14
15
16
17
18
public Future<Void> remove ()
Future<Void> future = Future.future();
client.transaction().multi(_failure())
.zrem(RedisHelper.getKey("jobs:" + this .stateName()), this .zid, _failure())
.zrem(RedisHelper.getKey("jobs:" + this .type + ":" + this .stateName()), this .zid, _failure())
.zrem(RedisHelper.getKey("jobs" ), this .zid, _failure())
.del(RedisHelper.getKey("job:" + this .id + ":log" ), _failure())
.del(RedisHelper.getKey("job:" + this .id), _failure())
.exec(r -> {
if (r.succeeded()) {
this .emit("remove" , new JsonObject().put("id" , this .id));
future.complete();
} else {
future.fail(r.cause());
}
});
return future;
}
注意到成功移除任务时,我们会向Event Bus上的特定地址发送remove任务事件。此事件包含着被移除任务的id。
监听任务事件 我们可以通过几种 onXXX 方法来监听任务事件:
1
2
3
4
5
6
7
8
9
10
11
12
13
14
15
16
17
18
19
20
21
22
23
24
25
26
27
28
29
30
31
32
33
34
35
36
37
38
39
40
41
42
43
44
45
46
47
48
49
50
51
52
53
54
55
@Fluent
public Job onComplete (Handler<Job> completeHandler)
this .on("complete" , message -> {
completeHandler.handle(new Job((JsonObject) message.body()));
});
return this ;
}
@Fluent
public Job onFailure (Handler<JsonObject> failureHandler)
this .on("failed" , message -> {
failureHandler.handle((JsonObject) message.body());
});
return this ;
}
@Fluent
public Job onFailureAttempt (Handler<JsonObject> failureHandler)
this .on("failed_attempt" , message -> {
failureHandler.handle((JsonObject) message.body());
});
return this ;
}
@Fluent
public Job onPromotion (Handler<Job> handler)
this .on("promotion" , message -> {
handler.handle(new Job((JsonObject) message.body()));
});
return this ;
}
@Fluent
public Job onStart (Handler<Job> handler)
this .on("start" , message -> {
handler.handle(new Job((JsonObject) message.body()));
});
return this ;
}
@Fluent
public Job onRemove (Handler<JsonObject> removeHandler)
this .on("start" , message -> {
removeHandler.handle((JsonObject) message.body());
});
return this ;
}
@Fluent
public Job onProgress (Handler<Integer> progressHandler)
this .on("progress" , message -> {
progressHandler.handle((Integer) message.body());
});
return this ;
}
注意到不同的事件,对应接收的数据类型也有差异。我们来说明一下:
onComplete、onPromotion 以及 onStart: 发送的数据是对应的Job对象onFailure and onFailureAttempt: 发送的数据是JsonObject类型的,其格式类似于:
1
2
3
4
5
6
{
"job" : {},
"extra" : {
"message" : "some_error"
}
}
onProgress: 发送的数据是当前任务进度onRemove: 发送的数据是JsonObject类型的,其中id代表被移除任务的编号
更新任务进度 我们可以通过progress方法来更新任务进度。看一下其实现:
1
2
3
4
5
6
7
public Future<Job> progress (int complete, int total)
int n = Math.min(100 , complete * 100 / total);
this .emit("progress" , n);
return this .setProgress(n)
.set("progress" , String.valueOf(n))
.compose(Job::updateNow);
}
progress方法接受两个参数:第一个是当前完成的进度值,第二个是完成状态需要的进度值。我们首先计算出当前的进度 (1),然后向特定地址发送progress事件 (2)。最后我们将进度存储至Redis中并更新时间,返回Future (3)。
任务失败以及重试机制 当一个任务处理失败时,如果它有剩余的重试次数,Vert.x Kue会自动调用failAttempt方法进行重试。我们来看一下failAttempt方法的实现:
1
2
3
4
5
Future<Job> failedAttempt (Throwable err) {
return this .error(err)
.compose(Job::failed)
.compose(Job::attemptInternal);
}
(⊙o⊙)非常简短吧~实际上,failAttempt方法是三个异步方法的组合:error、failed以及attemptInternal。当一个任务需要进行重试的时候,我们首先向Event Bus发布 error 队列事件并且在Redis中记录日志,然后将当前的任务状态置为FAILED,最后重新处理此任务。
我们先来看一下error方法:
1
2
3
4
5
public Future<Job> error (Throwable ex)
return this .emitError(ex)
.set("error" , ex.getMessage())
.compose(j -> j.log("error | " + ex.getMessage()));
}
它的逻辑很简单:首先我们向Event Bus发布 错误 事件,然后记录错误日志即可。这里我们封装了一个发布错误的函数emitError:
1
2
3
4
5
6
7
8
@Fluent
public Job emitError (Throwable ex)
JsonObject errorMessage = new JsonObject().put("id" , this .id)
.put("message" , ex.getMessage());
eventBus.publish(Kue.workerAddress("error" ), errorMessage);
eventBus.send(Kue.getCertainJobAddress("error" , this ), errorMessage);
return this ;
}
其中发送的错误信息格式类似于下面的样子:
1
2
3
4
{
"id" : 2052 ,
"message" : "some error"
}
接下来我们再来看一下failed方法的实现:
1
2
3
4
5
6
public Future<Job> failed ()
this .failed_at = System.currentTimeMillis();
return this .updateNow()
.compose(j -> j.set("failed_at" , String.valueOf(j.failed_at)))
.compose(j -> j.state(JobState.FAILED));
}
非常简单,首先我们更新任务的更新时间和失败时间,然后通过state方法将当前任务状态置为FAILED即可。
任务重试的核心逻辑在attemptInternal方法中:
1
2
3
4
5
6
7
8
9
10
11
12
13
14
15
16
private Future<Job> attemptInternal ()
int remaining = this .max_attempts - this .attempts;
if (remaining > 0 ) {
return this .attemptAdd()
.compose(Job::reattempt)
.setHandler(r -> {
if (r.failed()) {
this .emitError(r.cause());
}
});
} else if (remaining == 0 ) {
return Future.failedFuture("No more attempts" );
} else {
return Future.failedFuture(new IllegalStateException("Attempts Exceeded" ));
}
}
在我们的Job数据对象中,我们存储了最大重试次数max_attempts以及已经重试的次数attempts,所以我们首先根据这两个数据计算剩余的重试次数remaining (1)。如果还有剩余次数的话,我们就先调用attemptAdd方法增加一次已重试次数并 (2),然后我们调用reattempt方法执行真正的任务重试逻辑 (3)。最后返回这两个异步方法组合的Future。如果其中一个过程出现错误,我们就发布error事件 (4)。如果没有剩余次数了或者超出剩余次数了,我们直接返回错误。
在我们解析reattempt方法之前,我们先来回顾一下Vert.x Kue中的任务失败恢复机制。Vert.x Kue支持延时重试机制(retry backoff),并且支持不同的策略(如 fixed 以及 exponential )。之前我们提到Job类中有一个backoff成员变量,它用于配置延时重试的策略。它的格式类似于这样:
1
2
3
4
{
"type" : "fixed" ,
"delay" : 5000
}
延时重试机制的实现在getBackoffImpl方法中,它返回一个Function<Integer, Long>对象,代表一个接受Integer类型(即attempts),返回Long类型(代表计算出的延时值)的函数:
1
2
3
4
5
6
7
8
9
10
11
private Function<Integer, Long> getBackoffImpl ()
String type = this .backoff.getString("type" , "fixed" );
long _delay = this .backoff.getLong("delay" , this .delay);
switch (type) {
case "exponential" :
return attempts -> Math.round(_delay * 0.5 * (Math.pow(2 , attempts) - 1 ));
case "fixed" :
default :
return attempts -> _delay;
}
}
首先我们从backoff配置中获取延迟重试策略。目前Vert.x Kue支持两种策略:fixed 和 exponential。前者采用固定延迟时间,而后者采用指数增长型延迟时间。默认情况下Vert.x Kue会采用fixed策略 (1)。接下来我们从backoff配置中获取延迟时间,如果配置中没有指定,那么就使用任务对象中的延迟时间delay (2)。接下来就是根据具体的策略进行计算了。对于指数型延迟,我们计算[delay * 0.5 * 2^attempts]作为延迟时间 (3);对于固定型延迟策略,我们直接使用获取到的延迟时间 (4)。
好啦,现在回到“真正的重试”方法 —— reattempt方法来:
1
2
3
4
5
6
7
8
9
10
11
private Future<Job> reattempt ()
if (this .backoff != null ) {
long delay = this .getBackoffImpl().apply(attempts);
return this .setDelay(delay)
.setPromote_at(System.currentTimeMillis() + delay)
.update()
.compose(Job::delayed);
} else {
return this .inactive();
}
}
首先我们先检查backoff配置是否存在,若存在则计算出对应的延时时间 (1) 并且设定delay和promote_at属性的值然后保存至Redis中 (2)。接着我们通过delayed方法将任务的状态设为延时(DELAYED) (3)。如果延时重试配置不存在,我们就通过inactive方法直接将此任务置入工作队列中 (4)。
这就是整个任务重试功能的实现,也不是很复杂蛤?观察上面的代码,我们可以发现Future组合无处不在。这种响应式的组合非常方便。想一想如果我们用回调的异步方式来写代码的话,我们很容易陷入回调地狱中(⊙o⊙)。。。几个回调嵌套起来总显得不是那么优美和简洁,而用响应式的、可组合的Future就可以有效地避免这个问题。
不错!到现在为止我们已经探索完Job类的源码了~下面我们来看一下JobService类。
Event Bus 服务 - JobService 在本章节中我们来探索一下JobService接口及其实现 —— 它包含着各种普通的操作和统计Job的逻辑。
异步RPC 我们的JobService是一个通用逻辑接口,因此我们希望应用中的每一个组件都能访问此服务,即进行RPC。在Vert.x中,我们可以将服务注册至Event Bus上,然后其它组件就可以通过Event Bus来远程调用注册的服务了。
传统的RPC有一个缺点:消费者需要阻塞等待生产者的回应。你可能想说:这是一种阻塞模型,和Vert.x推崇的异步开发模式不相符。没错!而且,传统的RPC不是真正面向失败设计 的。
还好,Vert.x提供了一种高效的、响应式的RPC —— 异步RPC。我们不需要等待生产者的回应,而只需要传递一个Handler<AsyncResult<R>>参数给异步方法。这样当收到生产者结果时,对应的Handler就会被调用,非常方便,这与Vert.x的异步开发模式相符。并且,AsyncResult也是面向失败设计的。
所以讲到这里,你可能想问:到底怎么在Event Bus上注册服务呢?我们是不是需要写一大堆的逻辑去包装和发送信息,然后在另一端解码信息并进行调用呢?不,这太麻烦了!有了Vert.x 服务代理,我们不需要这么做!Vert.x提供了一个组件 Vert.x Service Proxy 来自动生成服务代理。有了它的帮助,我们就只需要按照规范设计我们的异步服务接口,然后用@ProxyGen注解修饰即可。
[NOTE @ProxyGen注解的限制 | @ProxyGen注解的使用有诸多限制。比如,所有的异步方法都必须是基于回调的,也就是说每个方法都要接受一个Handler<AsyncResult<R>>类型的参数。并且,类型R也是有限制的 —— 只允许基本类型以及数据对象类型。详情请参考官方文档 。 ]
异步服务接口 我们来看一下JobService的源码:
1
2
3
4
5
6
7
8
9
10
11
12
13
14
15
16
17
18
19
20
21
22
23
24
25
26
27
28
29
30
31
32
33
34
35
36
37
38
39
40
41
42
43
44
45
46
47
48
49
50
51
52
53
54
55
56
57
58
59
60
61
62
63
64
65
66
67
68
69
70
71
72
73
74
75
76
77
78
79
80
81
82
83
84
85
86
87
88
89
90
91
92
93
94
95
96
97
98
99
100
101
102
103
104
105
106
107
108
109
110
111
112
113
114
115
116
117
118
119
120
121
122
123
124
125
126
127
128
129
130
131
132
133
134
135
136
137
138
139
140
141
142
143
144
145
146
147
148
149
150
151
152
153
154
155
156
157
158
159
160
161
162
163
164
165
166
167
168
169
170
171
@ProxyGen
@VertxGen
public interface JobService
static JobService create (Vertx vertx, JsonObject config)
return new JobServiceImpl(vertx, config);
}
static JobService createProxy (Vertx vertx, String address)
return ProxyHelper.createProxy(JobService.class, vertx, address);
}
* 获取任务,按照优先级顺序
*
* @param id job id
* @param handler async result handler
*/
@Fluent
JobService getJob (long id, Handler<AsyncResult<Job>> handler) ;
* 删除任务
*
* @param id job id
* @param handler async result handler
*/
@Fluent
JobService removeJob (long id, Handler<AsyncResult<Void>> handler) ;
* 判断任务是否存在
*
* @param id job id
* @param handler async result handler
*/
@Fluent
JobService existsJob (long id, Handler<AsyncResult<Boolean>> handler) ;
* 获取任务日志
*
* @param id job id
* @param handler async result handler
*/
@Fluent
JobService getJobLog (long id, Handler<AsyncResult<JsonArray>> handler) ;
* 获取某一范围内某个指定状态下的任务列表
*
* @param state expected job state
* @param from from
* @param to to
* @param order range order
* @param handler async result handler
*/
@Fluent
JobService jobRangeByState (String state, long from, long to, String order, Handler<AsyncResult<List<Job>>> handler) ;
* 获取某一范围内某个指定状态和类型下的任务列表
*
* @param type expected job type
* @param state expected job state
* @param from from
* @param to to
* @param order range order
* @param handler async result handler
*/
@Fluent
JobService jobRangeByType (String type, String state, long from, long to, String order, Handler<AsyncResult<List<Job>>> handler) ;
* 获取某一范围内的任务列表(按照顺序或倒序)
*
* @param from from
* @param to to
* @param order range order
* @param handler async result handler
*/
@Fluent
JobService jobRange (long from, long to, String order, Handler<AsyncResult<List<Job>>> handler) ;
* 获取指定状态和类型下的任务的数量
*
* @param type job type
* @param state job state
* @param handler async result handler
*/
@Fluent
JobService cardByType (String type, JobState state, Handler<AsyncResult<Long>> handler) ;
* 获取某个状态下的任务的数量
*
* @param state job state
* @param handler async result handler
*/
@Fluent
JobService card (JobState state, Handler<AsyncResult<Long>> handler) ;
* 获取COMPLETE状态任务的数量
*
* @param type job type; if null, then return global metrics
* @param handler async result handler
*/
@Fluent
JobService completeCount (String type, Handler<AsyncResult<Long>> handler) ;
* 获取FAILED状态任务的数量
*
* @param type job type; if null, then return global metrics
*/
@Fluent
JobService failedCount (String type, Handler<AsyncResult<Long>> handler) ;
* 获取INACTIVE状态任务的数量
*
* @param type job type; if null, then return global metrics
*/
@Fluent
JobService inactiveCount (String type, Handler<AsyncResult<Long>> handler) ;
* 获取ACTIVE状态任务的数量
*
* @param type job type; if null, then return global metrics
*/
@Fluent
JobService activeCount (String type, Handler<AsyncResult<Long>> handler) ;
* 获取DELAYED状态任务的数量
*
* @param type job type; if null, then return global metrics
*/
@Fluent
JobService delayedCount (String type, Handler<AsyncResult<Long>> handler) ;
* 获取当前存在的所有任务类型
*
* @param handler async result handler
*/
@Fluent
JobService getAllTypes (Handler<AsyncResult<List<String>>> handler) ;
* 获取指定状态下的所有任务的ID
*
* @param state job state
* @param handler async result handler
*/
@Fluent
JobService getIdsByState (JobState state, Handler<AsyncResult<List<Long>>> handler) ;
* 工作队列运行时间(ms)
*
* @param handler async result handler
*/
@Fluent
JobService getWorkTime (Handler<AsyncResult<Long>> handler) ;
}
可以看到我们还为JobService接口添加了@VertxGen注解,Vert.x Codegen可以处理此注解生成多种语言版本的服务。
在JobService接口中我们还定义了两个静态方法:create用于创建一个任务服务实例,createProxy用于创建一个服务代理。
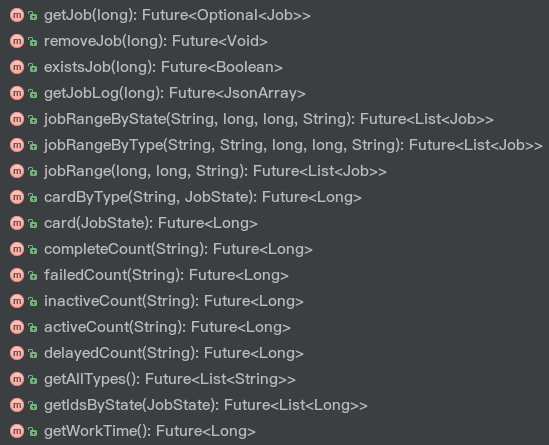
JobService接口中包含一些任务操作和统计的相关逻辑,每个方法的功能都已经在注释中阐述了,因此我们就直接来看它的实现吧~
任务服务的实现 JobService接口的实现位于JobServiceImpl类中,代码非常长,因此这里就不贴代码了。。。大家可以对照GitHub中的代码 读下面的内容。
getJob: 获取任务的方法非常简单。直接利用hgetall命令从Redis中取出对应的任务即可。removeJob: 我们可以将此方法看作是getJob和Job#remove两个方法的组合。existsJob: 使用exists命令判断对应id的任务是否存在。getJobLog: 使用lrange命令从vertx_kue:job:{id}:log列表中取出日志。rangeGeneral: 使用zrange命令获取一定范围内的任务,这是一个通用方法。
[NOTE zrange 操作 | zrange 返回某一有序集合中某个特定范围内的元素。详情请见ZRANGE - Redis 。 ]
以下三个方法复用了rangeGeneral方法:
jobRangeByState: 指定状态,对应的key为vertx_kue:jobs:{state}。jobRangeByType: 指定状态和类型,对应的key为vertx_kue:jobs:{type}:{state}。jobRange: 对应的key为vertx_kue:jobs。
这两个通用方法用于任务数量的统计:
cardByType: 利用zcard命令获取某一指定状态和类型下任务的数量。card: 利用zcard命令获取某一指定状态下任务的数量。
下面五个辅助统计方法复用了上面两个通用方法:
completeCountfailedCountdelayedCountinactiveCountactiveCount
接着看:
getAllTypes: 利用smembers命令获取vertx_kue:job:types集合中存储的所有的任务类型。getIdsByState: 使用zrange获取某一指定状态下所有任务的ID。getWorkTime: 使用get命令从vertx_kue:stats:work-time中获取Vert.x Kue的工作时间。
注册任务服务 既然完成了JobService的实现,接下来我们来看一下如何利用Service Proxy将服务注册至Event Bus上。这里我们还需要一个KueVerticle来创建要注册的服务实例,并且将其注册至Event Bus上。
打开io.vertx.blueprint.kue.queue.KueVerticle类的源码:
1
2
3
4
5
6
7
8
9
10
11
12
13
14
15
16
17
18
19
20
21
22
23
24
25
26
27
28
29
30
31
32
33
34
35
36
37
38
39
40
41
42
43
44
package io.vertx.blueprint.kue.queue;
import io.vertx.blueprint.kue.service.JobService;
import io.vertx.blueprint.kue.util.RedisHelper;
import io.vertx.core.AbstractVerticle;
import io.vertx.core.Future;
import io.vertx.core.json.JsonObject;
import io.vertx.core.logging.Logger;
import io.vertx.core.logging.LoggerFactory;
import io.vertx.redis.RedisClient;
import io.vertx.serviceproxy.ProxyHelper;
public class KueVerticle extends AbstractVerticle
private static Logger logger = LoggerFactory.getLogger(Job.class);
public static final String EB_JOB_SERVICE_ADDRESS = "vertx.kue.service.job.internal" ;
private JsonObject config;
private JobService jobService;
@Override
public void start (Future<Void> future) throws Exception
this .config = config();
this .jobService = JobService.create(vertx, config);
RedisClient redisClient = RedisHelper.client(vertx, config);
redisClient.ping(pr -> {
if (pr.succeeded()) {
logger.info("Kue Verticle is running..." );
ProxyHelper.registerService(JobService.class, vertx, jobService, EB_JOB_SERVICE_ADDRESS);
future.complete();
} else {
logger.error("oops!" , pr.cause());
future.fail(pr.cause());
}
});
}
}
首先我们需要定义一个地址用于服务注册 (1)。在start方法中,我们创建了一个任务服务实例 (2),然后通过ping命令测试Redis连接 (3)。如果连接正常,那么我们就可以通过ProxyHelper类中的registerService辅助方法来将服务实例注册至Event Bus上 (4)。
这样,一旦我们在集群模式下部署KueVerticle,服务就会被发布至Event Bus上,然后我们就可以在其他组件中去远程调用此服务了。很奇妙吧!
Kue - 工作队列 Kue类代表着工作队列。我们来看一下Kue类的实现。首先先看一下其构造函数:
1
2
3
4
5
6
7
public Kue (Vertx vertx, JsonObject config)
this .vertx = vertx;
this .config = config;
this .jobService = JobService.createProxy(vertx, EB_JOB_SERVICE_ADDRESS);
this .client = RedisHelper.client(vertx, config);
Job.setVertx(vertx, RedisHelper.client(vertx, config));
}
这里我们需要注意两点:第一点,我们通过createProxy方法来创建一个JobService的服务代理;第二点,之前提到过,我们需要在这里初始化Job类中的静态成员变量。
基于Future的封装 我们的JobService是基于回调的,这是服务代理组件所要求的。为了让Vert.x Kue更加响应式,使用起来更加方便,我们在Kue类中以基于Future的异步模式封装了JobService中的所有异步方法。这很简单,比如这个方法:
1
2
@Fluent
JobService getJob (long id, Handler<AsyncResult<Job>> handler) ;
可以这么封装:
1
2
3
4
5
6
7
8
9
10
11
public Future<Optional<Job>> getJob(long id) {
Future<Optional<Job>> future = Future.future();
jobService.getJob(id, r -> {
if (r.succeeded()) {
future.complete(Optional.ofNullable(r.result()));
} else {
future.fail(r.cause());
}
});
return future;
}
其实就是加一层Future。其它的封装过程也类似所以我们就不细说了。
process和processBlocking方法 process和processBlocking方法用于处理任务:
1
2
3
4
5
6
7
8
9
10
11
12
13
14
15
16
17
18
19
20
21
22
23
24
25
26
27
public Kue process (String type, int n, Handler<Job> handler)
if (n <= 0 ) {
throw new IllegalStateException("The process times must be positive" );
}
while (n-- > 0 ) {
processInternal(type, handler, false );
}f
setupTimers () ;
return this ;
}
public Kue process (String type, Handler<Job> handler)
processInternal(type, handler, false );
setupTimers();
return this ;
}
public Kue processBlocking (String type, int n, Handler<Job> handler)
if (n <= 0 ) {
throw new IllegalStateException("The process times must be positive" );
}
while (n-- > 0 ) {
processInternal(type, handler, true );
}
setupTimers();
return this ;
}
两个process方法都类似 —— 它们都是使用Event Loop 线程处理任务的,其中第一个方法还可以指定同时处理任务数量的阈值。我们来回顾一下使用Event Loop 线程的注意事项 —— 我们不能阻塞Event Loop线程。因此如果我们需要在处理任务时做一些耗时的操作,我们可以使用processBlocking方法。这几个方法的代码看起来都差不多,那么区别在哪呢?之前我们提到过,我们设计了一种Verticle - KueWorker,用于处理任务。因此对于process方法来说,KueWorker就是一种普通的Verticle;而对于processBlocking方法来说,KueWorker是一种Worker Verticle 。这两种Verticle有什么不同呢?区别在于,Worker Verticle会使用Worker线程 ,因此即使我们执行一些耗时的操作,Event Loop线程也不会被阻塞。
创建及部署KueWorker的逻辑在processInternal方法中,这三个方法都使用了processInternal方法:
1
2
3
4
5
6
7
8
9
10
11
12
13
14
private void processInternal (String type, Handler<Job> handler, boolean isWorker)
KueWorker worker = new KueWorker(type, handler, this );
vertx.deployVerticle(worker, new DeploymentOptions().setWorker(isWorker), r0 -> {
if (r0.succeeded()) {
this .on("job_complete" , msg -> {
long dur = new Job(((JsonObject) msg.body()).getJsonObject("job" )).getDuration();
client.incrby(RedisHelper.getKey("stats:work-time" ), dur, r1 -> {
if (r1.failed())
r1.cause().printStackTrace();
});
});
}
});
}
首先我们创建一个KueWorker实例 (1)。我们将在稍后详细介绍KueWorker的实现。然后我们根据提供的配置来部署此KueWorker (2)。processInternal方法的第三个参数代表此KueWorker是否为worker verticle。如果部署成功,我们就监听complete事件。每当接收到complete事件的时候,我们获取收到的信息(处理任务消耗的时间),然后用incrby增加对应的工作时间 (3)。
再回到前面三个处理方法中。除了部署KueWorker以外,我们还调用了setupTimers方法,用于设定定时器以监测延时任务以及监测活动任务TTL。
监测延时任务 Vert.x Kue支持延时任务,因此我们需要在任务延时时间到达时将任务“提升”至工作队列中等待处理。这个工作是在checkJobPromotion方法中实现的:
1
2
3
4
5
6
7
8
9
10
11
12
13
14
15
16
17
18
19
20
21
22
23
24
private void checkJobPromotion ()
int timeout = config.getInteger("job.promotion.interval" , 1000 );
int limit = config.getInteger("job.promotion.limit" , 1000 );
vertx.setPeriodic(timeout, l -> {
client.zrangebyscore(RedisHelper.getKey("jobs:DELAYED" ), String.valueOf(0 ), String.valueOf(System.currentTimeMillis()),
new RangeLimitOptions(new JsonObject().put("offset" , 0 ).put("count" , limit)), r -> {
if (r.succeeded()) {
r.result().forEach(r1 -> {
long id = Long.parseLong(RedisHelper.stripFIFO((String) r1));
this .getJob(id).compose(jr -> jr.get().inactive())
.setHandler(jr -> {
if (jr.succeeded()) {
jr.result().emit("promotion" , jr.result().getId());
} else {
jr.cause().printStackTrace();
}
});
});
} else {
r.cause().printStackTrace();
}
});
});
}
首先我们从配置中获取监测延时任务的间隔(job.promotion.interval,默认1000ms)以及提升数量阈值(job.promotion.limit,默认1000)。然后我们使用vertx.setPeriodic方法设一个周期性的定时器 (3),每隔一段时间就从Redis中获取需要被提升的任务 (4)。这里我们通过zrangebyscore获取每个需要被提升任务的id。我们来看一下zrangebyscore方法的定义:
1
RedisClient zrangebyscore (String key, String min, String max, RangeLimitOptions options, Handler<AsyncResult<JsonArray>> handler) ;
key: 某个有序集合的key,即vertx_kue:jobs:DELAYEDmin and max: 最小值以及最大值(按照某种模式)。这里min是0 ,而max是当前时间戳
我们来回顾一下Job类中的state方法。当我们要把任务状态设为DELAYED的时候,我们将score设为promote_at时间:
1
2
3
case DELAYED:
client.transaction().zadd(RedisHelper.getKey("jobs:" + newState.name()),
this .promote_at, this .zid, _failure());
因此我们将max设为当前时间(System.currentTimeMillis()),只要当前时间超过需要提升的时间,这就说明此任务可以被提升了。
options: range和limit配置。这里我们需要指定LIMIT值所以我们用new RangeLimitOptions(new JsonObject().put("offset", 0).put("count", limit)创建了一个配置
zrangebyscore的结果是一个JsonArray,里面包含着所有等待提升任务的zid。获得结果后我们就将每个zid转换为id,然后分别获取对应的任务实体,最后对每个任务调用inactive方法来将任务状态设为INACTIVE (5)。如果任务成功提升至工作队列,我们就发送promotion事件 (6)。
CallbackKue - 提供多语言支持 我们知道,Vert.x支持多种语言(如JS,Ruby),因此如果能让我们的Vert.x Kue支持多种语言那当然是极好的!这没有问题~Vert.x Codegen可以处理含@VertxGen注解的异步接口,生成多语言版本。@VertxGen注解同样限制异步方法 —— 需要基于回调,因此我们设计了一个CallbackKue接口用于提供多语言支持。CallbackKue的设计非常简单,其实现复用了Kue和jobService的代码。大家可以直接看源码,一目了然,这里就不细说了。
注意要生成多语言版本的代码,需要添加相应的依赖。比如要生成Ruby版本的代码就要向build.gradle中添加compile("io.vertx:vertx-lang-ruby:${vertxVersion}")。
KueWorker - 任务在此处理 好啦,我们已经对Vert.x Kue Core的几个核心部分有了大致的了解了,现在是时候探索一下任务处理的本源 - KueWorker了~
每一个worker都对应一个特定的任务类型,并且绑定着特定的处理函数(Handler),所以我们需要在创建的时候指定它们。
prepareAndStart方法 在KueWorker中,我们使用prepareAndStart方法来准备要处理的任务并且开始处理任务的过程:
1
2
3
4
5
6
7
8
9
10
11
12
13
14
15
16
private void prepareAndStart ()
this .getJobFromBackend().setHandler(jr -> {
if (jr.succeeded()) {
if (jr.result().isPresent()) {
this .job = jr.result().get();
process();
} else {
this .emitJobEvent("error" , null , new JsonObject().put("message" , "job_not_exist" ));
throw new IllegalStateException("job not exist" );
}
} else {
this .emitJobEvent("error" , null , new JsonObject().put("message" , jr.cause().getMessage()));
jr.cause().printStackTrace();
}
});
}
代码比较直观。首先我们通过getJobFromBackend方法从Redis中按照优先级顺序获取任务 (1)。如果成功获取任务,我们就把获取到的任务保存起来 (2) 然后通过process方法处理任务 (3)。如果中间出现错误,我们需要发送error错误事件,其中携带错误信息。
使用zpop按照优先级顺序获取任务 我们来看一下我们是如何从Redis中按照优先级顺序获取任务实体的:
1
2
3
4
5
6
7
8
9
10
11
12
13
14
15
16
17
18
19
20
21
private Future<Optional<Job>> getJobFromBackend() {
Future<Optional<Job>> future = Future.future();
client.blpop(RedisHelper.getKey(this .type + ":jobs" ), 0 , r1 -> {
if (r1.failed()) {
client.lpush(RedisHelper.getKey(this .type + ":jobs" ), "1" , r2 -> {
if (r2.failed())
future.fail(r2.cause());
});
} else {
this .zpop(RedisHelper.getKey("jobs:" + this .type + ":INACTIVE" ))
.compose(kue::getJob)
.setHandler(r -> {
if (r.succeeded()) {
future.complete(r.result());
} else
future.fail(r.cause());
});
}
});
return future;
}
之前我们已经了解到,每当我们保存一个任务的时候,我们都会向vertx_kue:{type}:jobs列表中插入一个新元素表示新的任务可供处理。因此这里我们通过blpop命令来等待可用的任务 (1)。一旦有任务可供处理,我们就利用zpop方法取出高优先级的任务的zid (2)。zpop命令是一个原子操作,用于从有序集合中弹出最小score值的元素。注意Redis没有实现zpop命令,因此我们需要自己实现。
Redis官方文档 介绍了一种实现zpop命令的简单方法 - 利用 WATCH。这里我们利用另外一种思路实现zpop命令:
1
2
3
4
5
6
7
8
9
10
11
12
13
14
15
16
17
18
19
20
21
22
23
24
25
private Future<Long> zpop (String key)
Future<Long> future = Future.future();
client.transaction()
.multi(_failure())
.zrange(key, 0 , 0 , _failure())
.zremrangebyrank(key, 0 , 0 , _failure())
.exec(r -> {
if (r.succeeded()) {
JsonArray res = r.result();
if (res.getJsonArray(0 ).size() == 0 )
future.fail(new IllegalStateException("Empty zpop set" ));
else {
try {
future.complete(Long.parseLong(RedisHelper.stripFIFO(
res.getJsonArray(0 ).getString(0 ))));
} catch (Exception ex) {
future.fail(ex);
}
}
} else {
future.fail(r.cause());
}
});
return future;
}
在我们的zpop的实现中,我们首先开始了一个事务块,然后依次执行zrange和zremrangebyrank命令。有关这些命令的详情我们就不细说了,可以参考Redis官方文档 。然后我们提交事务,如果提交成功,我们会获得一个JsonArray类型的结果。正常情况下我们都可以通过res.getJsonArray(0).getString(0)获取到对应的zid值。获取到zid值以后我们就可以将其转换为任务的id了,最后我们将id置于Future内(因为zpop也是一个异步方法)。
接着回到getJobFromBackend方法中。获取到对应的id之后,我们就可以通过Kue的getJob函数获取任务实体了 (3)。由于getJobFromBackend也是一个异步方法,因此我们同样将结果置于Future中。
真正的“处理”逻辑 前边讲了那么多,都是在为处理任务做准备。。。不要着急,现在终于到了真正的“处理”逻辑咯!我们看一下process方法的实现:
1
2
3
4
5
6
7
8
9
10
11
12
13
14
15
16
17
18
19
20
21
22
23
24
25
26
27
28
29
30
31
32
private void process ()
long curTime = System.currentTimeMillis();
this .job.setStarted_at(curTime)
.set("started_at" , String.valueOf(curTime))
.compose(Job::active)
.setHandler(r -> {
if (r.succeeded()) {
Job j = r.result();
this .emitJobEvent("start" , j, null );
try {
jobHandler.handle(j);
} catch (Exception ex) {
j.done(ex);
}
eventBus.consumer(Kue.workerAddress("done" , j), msg -> {
createDoneCallback(j).handle(Future.succeededFuture(
((JsonObject) msg.body()).getJsonObject("result" )));
});
eventBus.consumer(Kue.workerAddress("done_fail" , j), msg -> {
createDoneCallback(j).handle(Future.failedFuture(
(String) msg.body()));
});
} else {
this .emitJobEvent("error" , this .job, new JsonObject().put("message" , r.cause().getMessage()));
r.cause().printStackTrace();
}
});
}
到了最核心的函数了!首先我们先给开始时间赋值 (1) 然后将任务状态置为ACTIVE (2)。如果这两个操作成功的话,我们就向Event Bus发送任务开始(start)事件 (3)。接下来我们调用真正的处理逻辑 - 之前绑定的jobHandler (4)。如果处理过程中抛出异常的话,Vert.x Kue就会调用job.done(ex)方法发送done_fail内部事件来通知worker任务处理失败。但是似乎没有看到在哪里接收并处理done和done_fail事件呢?就在这 (5)!一旦Vert.x Kue接收到这两个事件,它就会调用对应的handler去进行任务完成或失败的相应操作。这里的handler是由createDoneCallback方法生成的:
1
2
3
4
5
6
7
8
9
10
11
12
13
14
15
16
17
18
19
20
21
22
23
24
25
26
27
28
29
30
31
private Handler<AsyncResult<JsonObject>> createDoneCallback(Job job) {
return r0 -> {
if (job == null ) {
return ;
}
if (r0.failed()) {
this .fail(r0.cause());
return ;
}
long dur = System.currentTimeMillis() - job.getStarted_at();
job.setDuration(dur)
.set("duration" , String.valueOf(dur));
JsonObject result = r0.result();
if (result != null ) {
job.setResult(result)
.set("result" , result.encodePrettily());
}
job.complete().setHandler(r -> {
if (r.succeeded()) {
Job j = r.result();
if (j.isRemoveOnComplete()) {
j.remove();
}
this .emitJobEvent("complete" , j, null );
this .prepareAndStart();
}
});
};
}
任务处理有两种情况:完成和失败,因此我们先来看任务成功处理的情况。我们首先给任务的用时(duration)赋值 (2),并且如果任务产生了结果,也给结果(result)赋值 (3)。然后我们调用job.complete方法将状态设置为COMPLETE (4)。如果成功的话,我们就检查removeOnComplete标志位 (5) 并决定是否将任务从Redis中移除。然后我们向Event Bus发送任务完成事件(complete)以及队列事件job_complete (6)。现在这个任务的处理过程已经结束了,worker需要准备处理下一个任务了,因此最后我们调用prepareAndStart方法准备处理下一个Job。
处理失败了怎么办? 人生不如意事十之八九,任务处理过程中很可能会遇见各种各样的问题而失败。当任务处理失败时,我们调用KueWorker中的fail方法:
1
2
3
4
5
6
7
8
9
10
11
12
13
14
15
private void fail (Throwable ex)
job.failedAttempt(ex).setHandler(r -> {
if (r.failed()) {
this .error(r.cause(), job);
} else {
Job res = r.result();
if (res.hasAttempts()) {
this .emitJobEvent("failed_attempt" , job, new JsonObject().put("message" , ex.getMessage()));
} else {
this .emitJobEvent("failed" , job, new JsonObject().put("message" , ex.getMessage()));
}
prepareAndStart();
}
});
}
面对失败时,我们首先通过failedAttempt方法尝试从错误中恢复 (1)。如果恢复失败(比如没有重试次数了)就向Event Bus发送error队列事件 (2)。如果恢复成功,我们就根据是否还有剩余重试次数来发送对应的事件(failed或者failed_attempt)。搞定错误以后,worker同样需要准备处理下一个任务了,因此最后我们调用prepareAndStart方法准备处理下一个Job (5)。
这就是KueWorker的全部实现,是不是很有趣呢?看了这么久的代码也有些累了,下面是时候来写个Kue应用跑一下咯~
展示时间! 在io.vertx.blueprint.kue.example包下(kue-example子工程)创建一个LearningVertxVerticle类,然后编写如下代码:
1
2
3
4
5
6
7
8
9
10
11
12
13
14
15
16
17
18
19
20
21
22
23
24
25
26
27
28
29
30
31
32
33
34
35
36
37
38
39
40
41
42
43
44
45
46
47
48
49
50
51
52
53
54
package io.vertx.blueprint.kue.example;
import io.vertx.blueprint.kue.Kue;
import io.vertx.blueprint.kue.queue.Job;
import io.vertx.blueprint.kue.queue.Priority;
import io.vertx.core.AbstractVerticle;
import io.vertx.core.json.JsonObject;
public class LearningVertxVerticle extends AbstractVerticle
@Override
public void start () throws Exception
Kue kue = Kue.createQueue(vertx, config());
kue.on("error" , message ->
System.out.println("[Global Error] " + message.body()));
JsonObject data = new JsonObject()
.put("title" , "Learning Vert.x" )
.put("content" , "core" );
Job j = kue.createJob("learn vertx" , data)
.priority(Priority.HIGH)
.onComplete(r -> {
System.out.println("Feeling: " + r.getResult().getString("feeling" , "none" ));
}).onFailure(r -> {
System.out.println("eee...so difficult..." );
}).onProgress(r -> {
System.out.println("I love this! My progress => " + r);
});
j.save().setHandler(r0 -> {
if (r0.succeeded()) {
kue.processBlocking("learn vertx" , 1 , job -> {
job.progress(10 , 100 );
vertx.setTimer(3000 , r1 -> {
job.setResult(new JsonObject().put("feeling" , "amazing and wonderful!" ))
.done();
});
});
} else {
System.err.println("Wow, something happened: " + r0.cause().getMessage());
}
});
}
}
通常情况下,一个Vert.x Kue应用可以分为几部分:创建工作队列、创建任务、保存任务以及处理任务。我们推荐开发者把应用写成Verticle的形式。
在这个例子中,我们要模拟一个学习Vert.x的任务!首先我们通过Kue.createQueue方法创建一个工作队列并且通过on(error, handler)方法监听全局错误(error)事件。接着我们通过kue.createJob方法创建学习任务,将优先级设定为HIGH,并且监听complete、failed以及progress事件。然后我们需要保存任务,保存完毕以后我们就可以通过processBlocking方法来执行耗时任务了。在处理逻辑中,我们首先通过job.progress方法将进度设为10,然后使用vertx.setTimer方法设一个3秒的定时器,定时器时间到以后赋予结果并完成任务。
像往常一样,我们还需要在build.gradle中配置一下。我们需要将kue-example子工程中的Main-Verticle属性设为刚才写的io.vertx.blueprint.kue.example.LearningVertxVerticle:
1
2
3
4
5
6
7
8
9
10
11
12
13
14
15
project ("kue-example" ) {
dependencies {
compile (project (":kue-core" ))
}
jar {
archiveName = 'vertx-blueprint-kue-example.jar'
from { configurations .compile .collect { it.isDirectory() ? it : zipTree(it) } }
manifest {
attributes 'Main-Class' : 'io.vertx.core.Launcher'
attributes 'Main-Verticle' : 'io.vertx.blueprint.kue.example.LearningVertxVerticle'
}
}
}
好了,到了展示时间了!打开终端,构建项目:
gradle build
当然不要忘记运行Redis:
redis-server
然后我们先运行Vert.x Kue Core部分:
java -jar kue-core/build/ libs/vertx-blueprint-kue-core.jar -cluster -ha -conf config/ config.json
然后再运行我们的实例:
java -jar kue-example/build/ libs/vertx-blueprint-kue-example.jar -cluster -ha -conf config/ config.json
这时终端应该会依次显示输出:
1
2
3
INFO: Kue Verticle is running...
I love this! My progress => 10
Feeling: amazing and wonderful!
当然你也可以在Vert.x Kue的Web端查看任务情况。
完成我们的探索之旅! 棒极了!我们终于结束了我们的Vert.x Kue核心部分探索之旅~~!从这篇超长的教程中,你学到了如何利用Vert.x去开发一个基于消息的应用!太酷了!
如果想了解kue-http的实现,请移步Vert.x 蓝图 | Vert.x Kue 教程(Web部分) 。如果想了解更多的关于Vert.x Kue的特性,请移步Vert.x Kue 特性介绍 。
Vert.x能做的不仅仅是这些。想要了解更多的关于Vert.x的知识,请参考Vert.x 官方文档 —— 这永远是资料最齐全的地方。